In this article, we'll explain how you can add, remove or override MustMeet Meeting Preferences from the Grip Engage Admin. Usually event participants create their own preferences via the Grip web platform, but it's possible to manage preferences on behalf of your participants, either individually or through bulk upload.
In this article we will cover:
- Things to remember
- Using the Preferences page
- Managing meeting preferences
- Adding preferences via the Profile Data page
Things to remember
MustMeet Preferences consist of 3 options: Must Meet, Meet and No Thanks.
It is important to note that as event organizers, you have more control over what can be submitted by event participants. From the MustMeet settings page, you may have set up preference limits for each of your groups, and may even have prevented some groups from making certain types of preferences.
When using the Preferences page in the dashboard, you are not limited by the same rules that are imposed on your participants . This means that:
- Meeting Preferences can be added beyond the limits that you've configured for your participants. They will still contribute to those limits and will be visible to the participant, as if they had made it themselves.
- If you're adding or updating preferences in bulk, you can create preferences that participants wouldn't be able to make.
For example, you may have prevented your 'Suppliers' group from making MustMeet preferences, in order to give them less impact over the final schedules. When creating or modifying bulk preferences, you can override this and create any preference you like. - You can manage preferences even if the event is in the Closed Stage, when your participants wouldn't have the option anymore. This is especially useful for late-registrations.
- Preferences are one-way - i.e. from one profile to a different profile. Creating a positive preference from one profile to another profile doesn't create a preference in the other direction too.
Using the Preferences page
To find the Preferences page, look for the MustMeet menu item, expand it and choose Preferences. The preferences page is very simple, consisting mostly of a table of existing preferences, and a few other options.
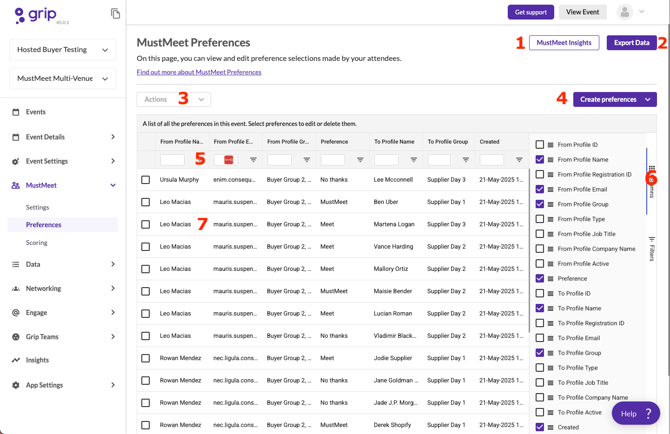
- MustMeet Insights - a shortcut to the insight reports for MustMeet, which are particularly useful when you want to analyse how many people have completed their preferences, and how many still need to take action.
- Export Data - exports the current list of preferences into a CSV spreadsheet file. Useful to take a snapshot of the current preferences or for use in an external system.
- Actions - this button will become available once you select one or more preferences, for removing or bulk editing preferences.
- Create preferences - you can choose to add preferences individually on behalf of a participant, or to upload in bulk using a spreadsheet template.
- Filtering options - every column allows you to filter your results to focus on just the data you need.
- Columns - gives you control over the data displayed in the table.
- Clicking on any row opens the preference for editing or removal.
Managing meeting preferences
Creating preferences
Choosing to 'create preferences manually' opens a sidebar with some simple options.

- You'll need to choose the profile that the preferences should be made on behalf of. If you can't find the person you're looking for, ensure they're part of a MustMeet group.
- You will then need to specify the target group - i.e. the group that the people receiving the preference are a part of. This is so that the preference can be assigned to the right group correctly and contribute to the participant's limits. Again, as the event organizer, you can exceed the limits you have set.
- You can then add profiles that the preferences will be made on - you can add more than one to speed things up. Again, if you can't find someone in the list, ensure that they're part of the Target Group that you've specified.
- Choose the Preference that will be made on these profiles. In this list, Preferences that you've disabled in the MustMeet settings for the 'From' profile will be disabled here. This is in place to avoid accidents - if you want to make a preference that your participant wouldn't be able to make themselves, use the bulk upload option below.
- If there is already an existing preference made by 'From' profile to any of the 'To' profiles, you'll see a warning message appear. You can continue, knowing that you're about to override a preference that the participant previously made.
- Hit Create preferences.
Editing & removing preferences
Either click on a preference row in the table, or select multiple rows using the checkboxes, click on the Actions button, and then choose to edit or remove.
Removing preferences effectively resets any action that was previously taken by those participants. You'll see a confirmation dialogue before you confirm the action.
Editing is completed in the sidebar once again - just choose what you'd like to change the preference(s) to and confirm.
Upload in preferences in bulk via spreadsheet
Clicking on Create preferences and then Upload in bulk via spreadsheet takes you to the spreadsheet upload flow - very similar to how you'd upload Profiles or Sessions. We'll cover the differences in this process here.
- On the initial page, you can download the template to fill in. Choosing 'Prefill with existing preferences data' will fill the template with the preferences that have already been made in the event, allowing you to make mass changes and re-upload.
- The template itself only has a few mandatory fields - these are marked with an asterisk. All other fields are optional, and simply there to make the spreadsheet easier to read when it's filled.
While the 'To Profile Group ID' field is not mandatory, it is recommended to complete it if you're running an event where your participants are in multiple MustMeet groups, otherwise the preference may not be assigned to the intended group.
- On the second page of the upload flow, you can choose whether to only create preferences, or create and update any existing preferences. Creating only is safer, as you can be sure that you're not accidentally overriding any preferences that your participants have made.
- You'll also find some information that will help you fill in the template - Preferences and Group IDs. You can click on the cells in the tables under the 'Available information' section, which will copy them to your computer's clipboard, making it easy to paste the correct values into your sheet.
- Once you've filled in your spreadsheet, save it, ensuring that you keep it in the CSV file format. If you transform it into an Excel file for example, you will not be able to upload back in to Grip. You can then upload it by clicking on 'Select CSV file' before moving to the final step.
- Your preferences will then be uploaded. On the final page you'll see any problems with the data you've provided (e.g. a mistyped email address or preference). You can download a new spreadsheet of these failed preferences for details on any issues.
Using the spreadsheet uploader allows you to ignore any limits or preference limitations that you've set for you participants. Be aware that if you create a preference on behalf of a participant who would not be able to make that preference themselves, they will not see it listed when they log in to the platform.
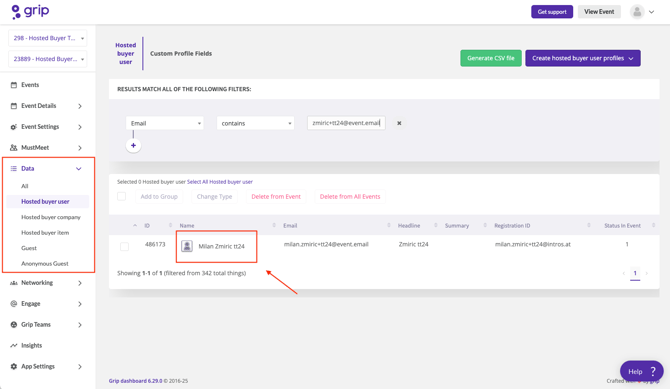
Adding preferences via the Profile Data page
You can also add a preference while viewing a profile in the Grip Engage Admin.
1. Go the user's profile in the dashboard
2. Press on "Create manual preference"
In the right sidebar, you'll see a number of options. If your event is in the Initial or Closed phases you'll be able to create a preference.
Please note if you are in the "Live Networking Phase" this option is used for creating Interest actions not MustMeet preferences, and is called "Create Swipe" instead.
3. Specify the Preference
You can now select the type of preference you wish to add (Must Meet, Meet, or No Thanks). If the target profile is in more than one MustMeet group, you'll be prompted to choose the group that you want the preference associated to (so that it counts towards the correct limit for the participant).
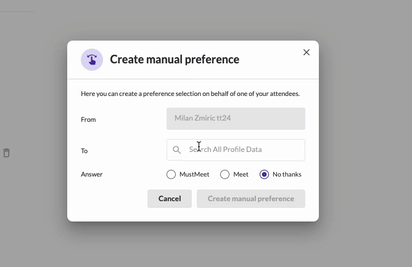
Click 'Create manual preference'.