A campaign is a customizable email that you can send to all of your event participants. The most common usage at Grip is for a ‘welcome email’, which is usually the first email that your participants receive, and contains their initial credentials and a link to log in to the event. However with our email designer, you can create emails for any purpose you like.
A fair use limit applies to our campaign emails - please refer to our terms of service for more detail.
In this article we’ll go through how you can set up and manage your campaigns, using tools like segmentation, scheduling and AutoSending, along with how to see email analytics and judge your campaigns’ effectiveness.
Table of Contents
- Statistics
- Campaign List
- Registration AutoSending
- Creating your first Campaign
- Unsubscribe Links
- Copying Events
- Deactivating Events
- FAQs
Statistics
When you navigate to the Engage > Emails section and select the Campaigns tab, the first thing you'll see is the email statistics for all existing campaigns. These statistics provide a snapshot of your campaigns' engagement levels, helping you gauge their effectiveness. Hover over the ‘i’ tooltips next to each number for detailed explanations.
- Detailed Logs: For more comprehensive information on sent emails, or to export a list of bounced or unsubscribed addresses, use the Logs tab.
- Exportable Data: All campaign statistics can be exported by clicking the ‘Export as CSV’ button.
- Real-Time Updates: Statistics are not updated in real-time; allow a few minutes and refresh the page to view the latest numbers.
The Campaign List
If you haven’t created a campaign yet, you’ll see a prompt to start creating one. Once campaigns are created, a table displays them along with key details such as status and engagement metrics. Hover over the table headers for explanations of each column.
Campaign States:
- Draft: The campaign has not been sent or scheduled.
- Scheduled: The campaign is set to be sent at a future time.
- Sent: The campaign has already been sent.
For each campaign, you’ll find an overflow menu (three vertical dots) at the end of the row, offering options such as:
- Edit/Resend: Modify settings or design, and resend the campaign to participants in the segment.
- Cancel Sending: Cancel a scheduled campaign before it is sent.
- Delete: Permanently delete the campaign and its associated data.
Caution: Campaigns created in the old email editor cannot be edited in the new editor. They will continue to be sent if they were already scheduled or have AutoSending enabled, but you will notice that you cannot edit them, only delete them.
Registration AutoSending
Registration AutoSending is a feature that automatically sends an email to any newly-registered profile that enters a specific segment. This is particularly useful for ensuring that new participants receive welcome emails or other important communications without manual intervention.
- Example: If you create a campaign for participants in Group X and enable Registration AutoSending, only new registrants added to Group X will receive the email. Existing participants added manually to Group X will not.
-
Session example: If you use it for the segment option ‘attendees of a session’. This would mean that any participant that adds a given session to their schedule will receive an email that you’ve created for this purpose, automatically.
- Note: AutoSending begins only after the initial email campaign is sent, making it safe to enable even for scheduled emails.
Creating your first Campaign
If you haven’t created a campaign yet, click the Create Campaign button below the statistics bar to open the email designer.
Steps to Create a Campaign:
-
Campaign Name: Enter a name that is unique and identifiable for future reference. This name will not be visible to recipients.
-
Choose Segment: Define your target audience by selecting a number of filters. There is a large list of options for segmenting recipients, and the ability to add multiple segments on top of each other. When adding more than one filter, be aware that these are always added on top of one another, so that the total number of recipients will always go down as you add more filters.
Some segments allow you to target simple properties about your participants, like which data types they're in. Other segments are based on the actions that your participants have (or have not taken) in the current event, which can allow you to be really creative and refine your recipients.
Note on browser cookies
Legally, tracking attendee actions requires that the attendee accepts performance cookies when visiting the event in a web browser. Be aware of this, as your notifications may be sent to attendees that did take the action(s) in reality but didn't accept cookies initially. Actions taken on the mobile app are always tracked.
If you do not add any filters, you will be sending the email to everyone in your event!Note that the 'operator' (e.g. 'Equals', 'Greater than' etc.) is specific to the segment chosen. In some you may see options for 'Includes one of' or 'Matches all of', which act as a choice between an AND or an OR condition.
Examples:
Using the 'Viewed Page' filter and selecting both the Event Agenda and Teams - Inbound Leads pages.
"Includes one of" - would allow you to send a notification to any participants who have visited either the Event Agenda or Teams - Inbound Leads pages."Matches all of" - would allow you to limit your notification to only participants who have visited both the Event Agenda and Teams - Inbound Leads pages.
See this table for a full list of segmentation options:
Segment Options Description Data Type Select specific Data Types Sends an email to specific data types (e.g., Attendees, Exhibitors, Speakers). Custom Group Select specific Custom Group(s) Sends an email to all members of a chosen groups. Status in the event Active, Inactive Sends an email to either active users (logged in) or inactive users (not yet logged in). Attendees of Session Select a session(s) Sends an email to participants who have added the session to their schedule. Invitees of Private Session Select a private session(s) Sends an email to invitees of a private session (those invited but not yet added). Attendees of Sessions on a Track Select a track(s) Sends an email to participants who have added at least one session on this Track. Attendees of Sessions at a Stage Select a stage(s) Sends an email to participants who have added at least one session at this Stage. User email Search for individual participants Sends an email to the participants specifically chosen. Last activity within Enter number of days between 1 - 99 If the participant has used the platform via any device in last X days. Has logged in on mobile or web Web
iOS
AndroidIf the participant has ever used the platform via this device. Viewed Page All custom Navigation Items in event, plus a list of default pages.
Note that some pages are only available on the Web, like Teams.
If the participant has visited or clicked on this page on web or mobile. Unique Profiles Viewed Number between 1 - 99 Number of profile pages viewed. Unique Sessions Viewed Number between 1 - 99 Number of session detail pages visited. Added Sessions to Schedule Number between 1 - 99 Number of sessions added to schedule. Session Feedback given Number between 1 - 99 Number of times the participant left session feedback. Meeting Feedback given Number between 1 - 99 Number of times the participant left meeting feedback. Created Meeting Requests Number between 1 - 99 Number of meeting requests created. Interested actions Number between 1 - 99 Number of profiles the participant has marked as 'Interested'. Skip actions Number between 1 - 99 Number of profiles the participant has marked as 'Skip'. MustMeet ‘Meet’ preferences made Number between 1 - 99 Number of profiles the participant has marked as 'Meet'. MustMeet ‘MustMeet’ preferences made Number between 1 - 99 Number of profiles the participant has marked as 'MustMeet'. MustMeet ‘No thanks’ preferences made Number between 1 - 99 Number of profiles the participant has marked as 'No thanks'. Pending Meetings Number between 1 - 99 Current number of meetings sent by a participant that are Pending. Meetings Awaiting Response Number between 1 - 99 Current number of meetings sent by a participant that are Awaiting Response. Accepted Meetings Number between 1 - 99 Current number of meetings the participant has Accepted. Declined Meetings Number between 1 - 99 Current number of meetings the participant has Declined. Created Connections Number between 1 - 99 Current number of Connections in this event. Interested Swipes not Answered Number between 1 - 99 Number of profiles that have shown Interest, where the participant has not responded.Recommendation Answers Number between 1 - 99 Number of recommendations the participant has responded to (accepted or declined).Badge Scans Made Number between 1 - 99 Number of unique badge scans this participant has made. Badge Scans Received Number between 1 - 99 Number of unique badge scans this participant has received. Has been scanned into X session List of sessions If the participant has been scanned into sessions. Teams via current plan Select Basic or Pro plan Sends an email to all members of Teams based on the Team's current Lead Retrieval Plan. Team members by role Select Admin or Team member Sends an email to any participants who are part of a team based on their role in the team. Does not include Teams that aren't created yet. 
-
Choose Template: Start with a pre-built template or create a custom design from scratch. Every template includes a mandatory unsubscribe link that should not be altered.
You will only see this step when you first create a campaign. When editing an existing campaign, you will have already picked a template and so have a design which you can continue to edit.Template Name
Description
Session_Invite
A design geared towards encouraging participants to add a session to their schedule.
Welcome_Long
A welcome email containing credentials that the recipient can use to log in, along with some additional instruction and detail about what to expect.
Welcome_Short
A simplified email containing credentials and less detail.
-
Edit Design: Use the drag-and-drop editor to customize your email. Add buttons, images, and merge tags to personalize content. Ensure that all event-specific links and merge tags are correctly applied (see section below regarding links).
For a quick rundown on features, you can watch this video on YouTube. -
Multi-Language Designs: If your event supports multiple languages, you can create different language variants of the email design.
-
Test and Send: Preview the email design on different devices, set an engaging subject line, and send a test email to verify everything is working as expected. Be aware that in multi-language appplications, you'll be forced to add a subject line in each available language, to avoid accidents. Click the language selected in the subject line field to see what's available.
-
Save or Schedule: Save your campaign as a draft or schedule it to be sent at a specific time. You can also enable Registration AutoSending at this stage.
Caution: For events that use Single Sign-On instead of the normal Grip login experience, it is advised that you remove the Registration ID credentials from your welcome emails for security reasons.
Often the Registration ID is used as a private key to validate login with an external SSO provider, and so should not be made public in an email like this.
Your Templates
You can save your email designs as templates for future campaigns, making it easier to maintain consistency and save time across all events within your Grip application. These templates are accessible to dashboard users with the App Admin role or higher. If your Grip application supports multiple languages, your templates can be created in multiple languages as well.
Email colors are configured through the branding options of your event. This ensures that your email's call-to-actions (CTAs) are visible and consistent with your brand identity. While automated emails automatically inherit the event’s primary color, campaign emails require manual setup within the branding options.
You’ll have the opportunity to save your email design as a template at the end of the design process. If you’ve already saved templates from previous campaigns, they will be available at this step for reuse.
Keep in mind: that when you use one of your saved templates as a starting point for a new campaign, you aren’t altering the original template. Any new design you create can be saved as a separate template for future use.
If you need to delete a template, hover over it during this step and click the trash can icon. Confirm the deletion to remove the template from the Grip application, which will erase it from all events. However, this will not affect any campaign emails already created from that template—only the template itself will be deleted.
Here are some important things to note for working with emails in Grip:
Caution: all text within a mail merge field’s must remain as initially written, in English, even for emails being sent in other languages. Translating these tags will prevent the emails from sending.
Event-Specific Links
When adding a button, menu, image or any other type of object that contains a link, you have the option of adding in any URL. By default we have pre-defined the main login link that all your event participants will use, called the Smart Marketing Link.

Smart Marketing Link
This is the standard link that you should use wherever you invite your attendees to log in to the platform. It is a dynamic link which will take your attendees to the web login page or mobile app depending on the device that they use to open the email.
If opening on the web, it will also help the email recipient by pre-filling data like their email address and Registration ID.
If you accidentally delete the login button from the email design then you can create another one - in the URL field of the link that you create, just copy in the following text:
If you want to direct email recipients to somewhere really specific, and don't want them to be taken to the mobile app, then you can type in your own URL instead of the Smart Marketing Link. An example might be to send an email reminder to Company Representatives to encourage them to create their Teams, which they have to do on the web version of the event platform.
The easiest way to do this is to navigate to that page yourself and copy the link in your browser's address bar, which will ensure that if you're using a Custom Domain, you are directing your attendees to the correct site. Alternatively, you can get quite creative with deep links if you want to!
You could also do this for something like a Session that you want to send an email invite for.
Note: Session links are most effective on the web - if you have a mobile app and your recipients click on a Session link via their cellphones, they will simply be taken to the event mobile app itself.
Merge Tags
Merge tags are an essential part of email design, and we have predefined a list of Grip-specific fields for you to use. These are especially important when it comes to welcome emails, where the login credentials shown are unique and specific to the intended recipient.
Whenever you’re typing text in one of the blocks, you’ll see an option to add a merge tag in the formatting bar - or you can type a curly bracket { to instantly see a drop-down list of tags.
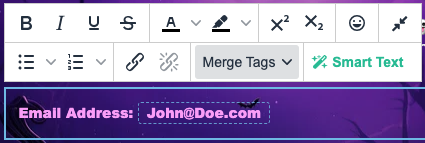
The available merge tags refer to fields within the recipient's profile in Grip and are built with two curly brackets }{ surrounding the field. Unfortunately we cannot list them as copyable text in this article because our help center tries to convert them into its own merge tags! We've converted them into pictures so that you can write them out yourself from the table below.
|
Field |
Merge Tag |
|---|---|
|
First Name |
|
|
Last Name |
|
|
Name |
|
|
Company Name |
|
|
Email Address |
|
|
Registration ID |
|
|
Event Name |
For welcome emails, you should always include the Email Address and Registration ID merge tags, so that your attendees have what they need to log in. Refer to the pre-built welcome email templates if you need some guidance on this.
It’s good practice to use merge tags in your templates, so that you don’t need to change much between events - for example using the ‘Event Name’ merge tag instead of writing out the name of the event itself within the design.
When using merge tags, make sure you’re confident that your attendees all have this data in their Grip profiles, otherwise you may end up with empty spaces in the resulting emails!
Images
You can upload images or just copy and paste a direct image link.
If you’re linking to images, make sure to use publicly-available image links, and ensure that you use a link to the image itself. An easy way to tell if your link is correct is to make sure that it ends in the file format of the image itself, for example “.png” or “.jpg”.
Google Drive or Dropbox links will not work, as they do not lead directly to an image, they lead to a google drive page with the image within it.
To overlay items on top of an image, add it as the background to an existing column. Otherwise, use an image block if you’re looking to add an image between other components.
Previewing
You can use the built-in preview tool at the bottom-left to check how responsive your email design is for different screen sizes. This is an important step in order to ensure that your email design looks as intended on a range of desktop and mobile devices.
Multi-Language Designs
In apps where multiple languages have been enabled for your events, you’ll also be able to design email variants for these additional languages. The journey has been designed so that you can complete your English design first (as it is mandatory), before moving on to the additional languages, where your English design is your starting point.
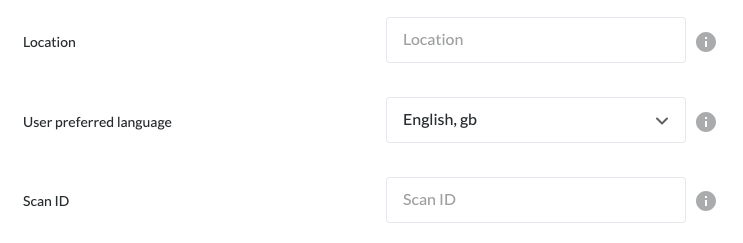
Note that your attendees will receive emails (and notifications) in the language that is set on their profile under the ‘User Preferred Language’ field. This is set either as part of the data import, and can be modified by the attendee themselves when they’ve logged into the web platform.
If you have a multi-language app, you will be prompted about additional languages once you click ‘Continue’ on the design step. You are given the option to design other variants or just use the English version for all recipients, regardless of their language preference.
Email Subject Line
Now that you’ve completed your design, make sure you choose an engaging Subject Line that recipients will see in their inboxes. Best practice for subjects is to keep them within 50 characters, although you can technically add up to 130 characters.
We support the use of emojis, and you can also use merge tags to personalize your subject lines. You will need to write them in the tag format, so as a reminder, here is the list of merge tags.
Example: “Start networking now for !”
If your application is multi-language, you must add in a subject line in every language before you can save or send the email (even if you just use an English subject line for all of them).
Testing Emails
You can use this option to fire off a test to some attendees of your choice. Use the search bar to look up profiles within the current event and send the email to the email addresses on their profiles.
Again, if you have a multi-language application, you can choose which language design variant to send to the profile - regardless of their specific preferred language, your choice here will override their preference.
Estimated Segment Size
Based on the conditions and filters you set on the second step, you will see a number in this section which is an estimation of the (current) number of profiles that should receive your email. As noted in the text below, this number can change if profiles are added to (or removed from) the event matching your segment.
If this doesn’t look like the right number of profiles, it will be best to save your email as a draft and check the data in your event, ensuring it matches the segment options you chose.
Saving your design as a template
Now that you have created designs (in as many languages as your Grip application supports) you can save them as a template to use in future email campaigns.
As mentioned before, these templates can be used (and removed) by any App Admin in this Grip application. Modifying this campaign’s design later will not change the template you’ve already saved.
As these designs are files, unfortunately we cannot allow spaces or some characters (like slashes /\ ) in the template name. The template name must also be unique within this application.
Save campaign
If you’d like to simply save this campaign as a draft and send it later, click this button. All of your settings and any designs you’ve made will be saved and can be edited later.
If you’ve previously made a campaign and scheduled it to send in the future, clicking the “Save campaign” button will not cancel the previously set schedule.
Schedule
Clicking this button will allow you to set a date and time at which your campaign will be sent. The timezone is shown and will always match the timezone of the event, in order to make remotely managing events easier.
You can cancel sending from the main Campaign page before the scheduled send time, by clicking the three dots at the end of the campaign email row in the table, and selection 'Cancel send'.
You can also choose to activate ‘Registration AutoSending’ at this stage - see details here.
Send Now
Clicking this button will bring up a confirmation dialogue, and then will schedule the campaign to go out in 5 minutes from the current time. This grace period allows you to ‘undo’ the action in case there’s a last-minute issue!
You can cancel sending from the main Campaign page before the scheduled send time, by clicking the three dots at the end of the campaign email row in the table, and selection 'Cancel send'.
You can also choose to activate ‘Registration AutoSending’ at this stage - see details here.
Unsubscribe Links
You'll notice that the pre-defined templates and even the empty design include a section at the bottom containing an unsubscribe link. This is of course a mandatory link for legal reasons, and should not be removed.
If you are confident editing HTML you can modify the text surrounding this link, and the word 'unsubscribe' itself, but you must not break the link. We have added validation when testing or sending an email to check for the presence of the correct link, in order to safeguard the email system, and you, legally.
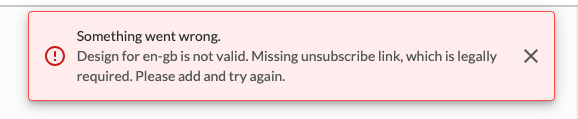
If you see this message, you have broken or removed the unsubscribe link in (at least) one of your email design variants. You will need to add it once more to be able to send the email.
If you have completely deleted the unsubscribe section you can recreate it from scratch - simply add a new HTML block to your email, delete the placeholder text, and copy and paste the below code:
<div style="font-size:11px;color:#8d8d8d;line-height:140%;text-align:center;word-wrap:break-word"> <p style="line-height:140%">You're receiving this email because you registered for {{event_name}}.</p> <p style="line-height:140%"> </p> <p style="line-height:140%">To stop receiving emails, please contact the organizer to de-register for the event, or you can <a href="%tag_unsubscribe_url%">unsubscribe</a>.</p> </div>
Copying Events
When you copy an event, the campaigns for that event are also copied into your new event, with their designs and subject lines. However, there are two things to note about this process:
- Campaigns created in our legacy email designer will not be copied to new events. This is effectively any campaign created before the 18th of December 2023.
- Segmentation options are not copied, as they are not necessarily compatible with your new event. This means that you'll need to make sure to target the right attendees before you send your new campaign, because if you leave the segment step blank, all your attendees will be emailed!
Disabling Emails or Deactivating Events
Deactivating your event or disabling emails via the Settings page will both have the same effect on your Campaigns:
- Emails will stop sending.
- AutoSending will be disabled for all Campaigns.
- Any scheduled emails that haven't already been sent will have their scheduled send time cancelled and be returned to a draft state.
- You will not be able to create or update any existing Campaigns.
Both of these actions can be undone but your campaigns will need to be resent - they are not enabled automatically.
FAQs
Q: Can I edit campaigns created in the old email editor?
- A: No, campaigns created in the old email editor cannot be edited in the new editor. They will continue to be sent if already scheduled, but you cannot modify them.
Q: What happens if I disable emails for an event?
- A: Disabling emails will stop all campaign emails from sending, including those scheduled or set to AutoSend. Campaigns will return to a draft state and will not resume automatically when emails are re-enabled.
- A: Yes, you can save your email designs as templates to reuse in future campaigns. Templates can be accessed by all App Admins within the Grip application.
Q: Will a participant receive an email if their profile is modified to fit a different segment with Registration AutoSending enabled?
- A: No, Registration AutoSending will only trigger an email if the participant's profile matches the segment criteria at the time of registration. To ensure all relevant participants receive the appropriate emails, it's best to create AutoSending campaigns that cover all possible profile segments.
Q: Are notes visible in the "Interested in You" emails sent to event participants/attendees?
A: No, notes are not currently visible in the "Interested in You" emails sent to attendees.