![Grip-Vertical-Logo-Purple-1.png]](https://support.grip.events/hs-fs/hubfs/Grip-Vertical-Logo-Purple-1.png?width=23&height=34&name=Grip-Vertical-Logo-Purple-1.png)
Create tickets and pricing in Grip Manage
This guide shows you how to set up the tickets attendees can buy, how much they cost and when, and how they can be bought.
In this article, we will cover the following:
Before you start
- Make sure your event's timezone is set in Event Settings > Settings. Price windows and expiration dates use this timezone.
- Decide which ticket types you need (for example Standard, VIP, Student), plus their prices and when each price applies.
Registration Settings
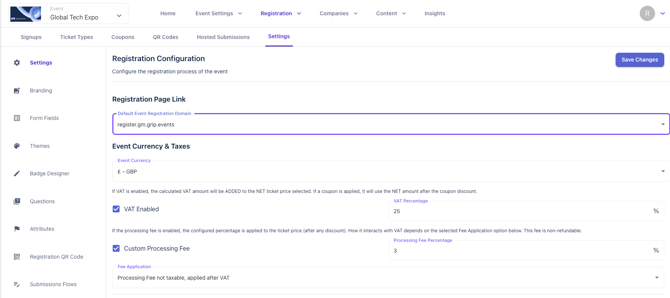
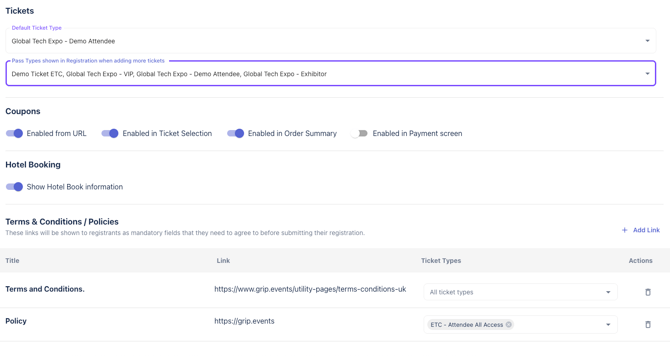
In this page you can:
- Select the registration domain you want to use
- Configure currency, VAT and Processing Fee if using it
- One VAT rate applies to the whole event. You can't set different rates for different ticket types.
- Select your Default Ticket Type and what other ticket types can be purchased in the same transaction
- Define which pages include the "Add coupon" input box
- Configure your Terms and Conditions / Policies.
Click "Save Changes"
Configuring ticket types
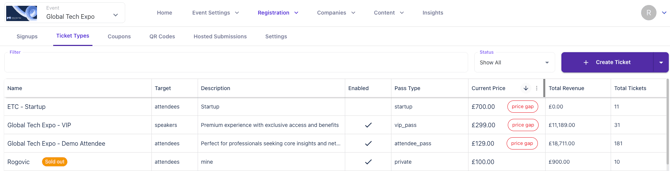
- Go to Registration > Ticket Types.
- Click + Create Ticket.
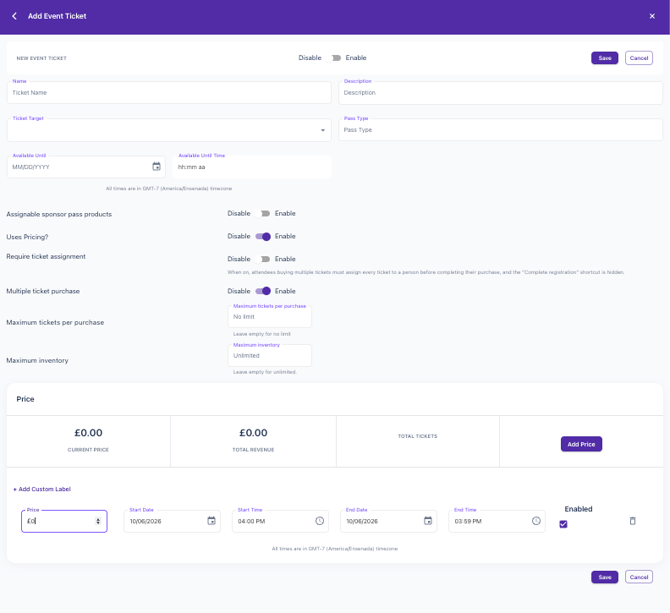
Fill in the details:
| Field | What it's for |
|---|---|
| Name | The name attendees see, for example "Standard Pass". |
| Description | A short explanation of what the ticket includes. Attendees see this when choosing a ticket. |
| Ticket target | Type of audience this ticket is targeting. |
| Pass Type | System name for the ticket type. |
Add price windows
Price windows set how much a ticket costs during a period of time. You can use them to offer lower prices to people who book early.
- Open the ticket type.
- Toggle "Uses Pricing" on
- Add a price window with a start date, end date and price.
- Optionally, add a label, for example "Early Bird", "Standard" or "Last Call". Attendees see the label next to the ticket on the order summary.
- Add more windows as needed.
- Click Save.
Control availability
These settings are all in the ticket type modal and are optional.
| Setting | What it does |
|---|---|
| Available until [Expiration date and time] | After this date, the ticket can no longer be bought. Attendees who try see a "ticket is not available" message. |
|
Require ticket assignment |
Require every registrant's details to be filled in before the order can be confirmed, rather than allowing "unassigned" tickets to be completed later. |
| Multiple ticket purchase | If disabled, restricts a transaction to a single ticket, removing the "Me & Others" / "Others" flow entirely. |
| Maximum tickets per purchase | Set a maximum number of tickets a single purchaser can buy in one order. |
| Maximum inventory | Sets the maximum number of this ticket that can be sold. When the limit is reached, the ticket shows as Sold Out. Leave empty for no limit. |
Changing tickets after sales start
You can edit prices, settings, or delete a ticket type at any time. Orders already placed are not affected, so attendees keep the ticket and price they paid for.
Tip: To stop selling a ticket but keep it for your team to assign, hide it from registration instead of deleting it.
Test your tickets
Before you launch, open your registration page and check that:
- Each ticket shows the right name, description and price
- Price window labels appear on the order summary
- Hidden tickets don't appear
- Purchase limits work as expected
What's next
- Set up coupons (Setting up and Using Coupons in Grip Manage)
- Add registration questions (How to Configure Questions for Event's Registration Form)
- Connect Stripe (How do I set up Stripe in Grip Manage for Payments)