What Are Custom Groups and How Do They Work?
In this article, we’ll explain how Custom Groups work in Grip. You'll learn how to create and manage Custom Groups, set permissions, and explore common use cases such as separating Hybrid and Virtual participants in events.
A Custom Group in Grip is a way to organize different profiles within the platform. It’s useful for grouping participants with different permissions or separating them by category. For example, in hybrid events, Custom Groups can differentiate between Hybrid and Virtual participants under the same Data Type. This impacts profile tags and meeting availability (virtual, in-person, or both). We'll cover more use cases and details below.
In this article we will cover:
- Understanding the Custom Groups page
- How to create a Custom Group
- Hybrid Event Setup
- Native Lists Setup
- MustMeet Setup
- How to add Data Types and profiles to Custom Groups
- How to delete Data Types and profiles from Custom Groups
- How to edit a Custom Group
- FAQs
Understanding the Custom Groups Page
- Navigate to Event Settings, then click on Custom Groups.

- If no groups have been set up, the page will be blank. Click Create Custom Group in the top right to get started.
How to Create a Custom Group
Hybrid Event Setup:
- Click Create Custom Group.

- Enter the Group Name. Please note for events with multiple languages enter translations as well.

- Select whether the group is Hybrid, Virtual, or Not Specified.

-
If you're managing a Hybrid event, consider creating two custom groups:
- Hybrid (for participants with access to both in-person and virtual features)
- Virtual (for participants with access to virtual features only)

This will add a tag to each participant’s profile, indicating whether they are a Virtual or Hybrid attendee. It will also determine the available meeting locations:
- Hybrid participants will see both in-person and virtual meeting rooms.
- Virtual participants will only see virtual meeting rooms.
This functionality is available on both web and mobile.
-
Click Create Group to complete the setup.
Custom Groups for Native Lists Setup:
Custom Groups can also be used to separate profiles within navigation lists. For example, on the Exhibitors list, you can separate 'Premium' exhibitors from 'Standard exhibitors'. 
Tip: use this on mobile and web platforms.
To create Custom Groups:
- Click Create Custom Group.
- Enter the Group Name. If your event supports multiple languages, add translations.
- If your event is set to Hybrid, you will see the Hybrid Group Access dropdown. Select Not Specified from the options. For in-person or virtual-only events, this option will not appear.
- No further settings are required (additional settings apply only to MustMeet events).
- Click Create Group to finish.
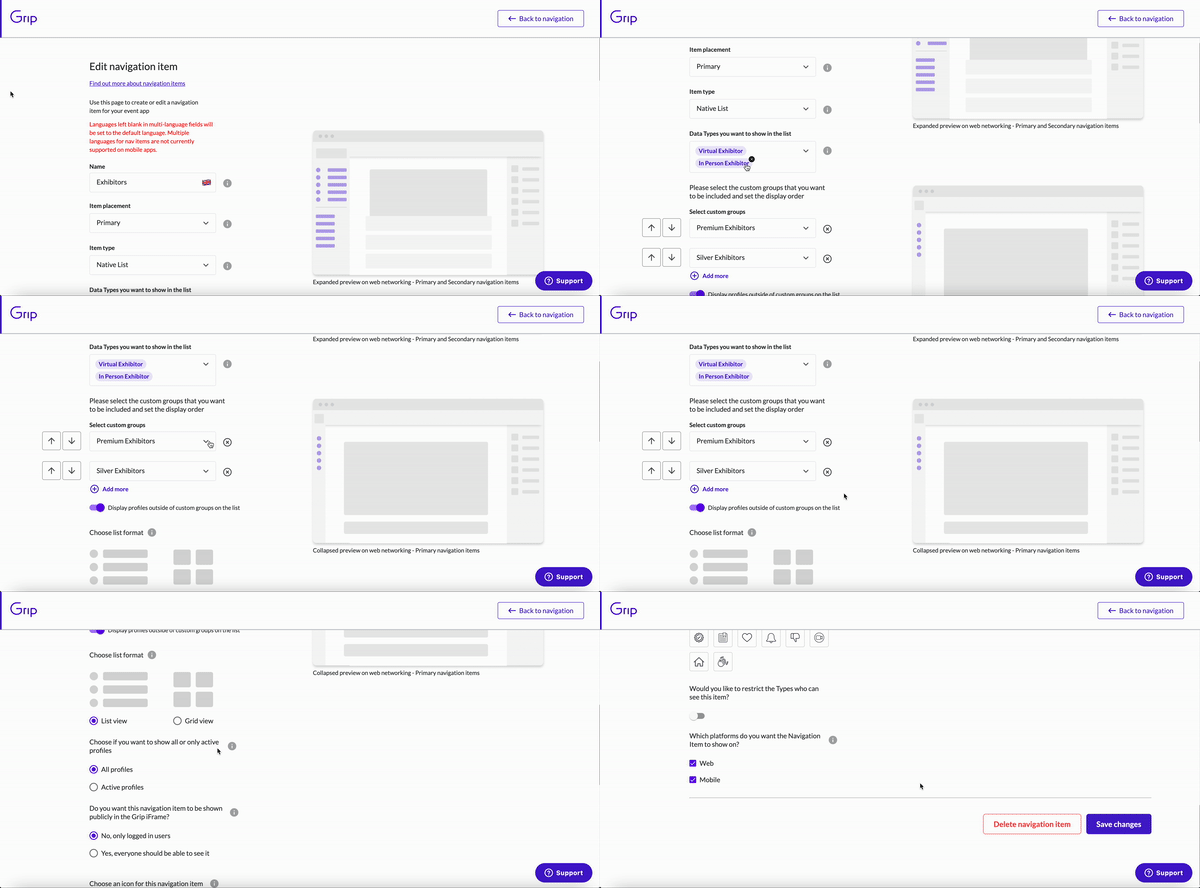
To add Custom Groups to a navigation list:
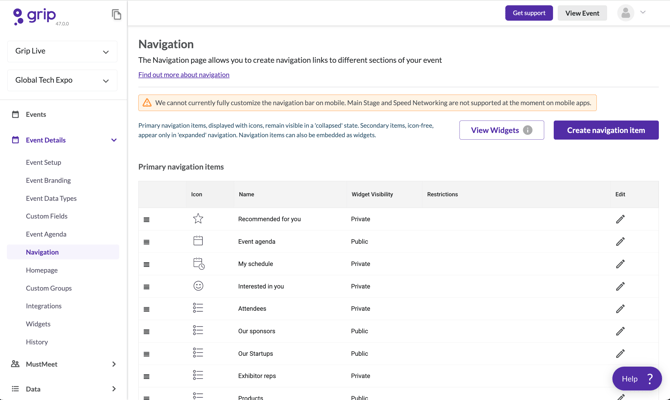
- Go to Event Details and click on the Navigation Page.

- Choose Native List under Item Type, select the relevant Data Types, and then assign your Custom Groups.

This setup will display the custom groupings in the platform's navigation, both on web and mobile. For more details, check out our [Navigation Items article].
Note: This can be done for any 'Native List' within navigation items.
MustMeet Event Setup:
To create Custom Groups:
- Click Create Custom Group.
- Enter the Group Name. If your event supports multiple languages, add translations.
- In MustMeet events, additional settings allow you to configure recommendations, profile visibility, and similar profile displays. You can also configure unstructured metadata if needed.
-
- "New group can see recommendations of": Select the Data Types from other groups that will be recommended within the platform. Leaving this blank will have no effect.
- "New group can see profiles, search and see lists of": Limit what this group can view by selecting specific Data Types.
- "New group can display similar profiles": Toggle this to allow or prevent similar profile recommendations. If a Data Type is shared across groups and the feature is turned off in any group, it will disable similar profile recommendations for that Data Type across all groups, even if enabled elsewhere.
How to Add Data Types and Profiles to Custom Groups
-
Click View next to the group, then click Add Items to search for and add profiles or Data Types.

-
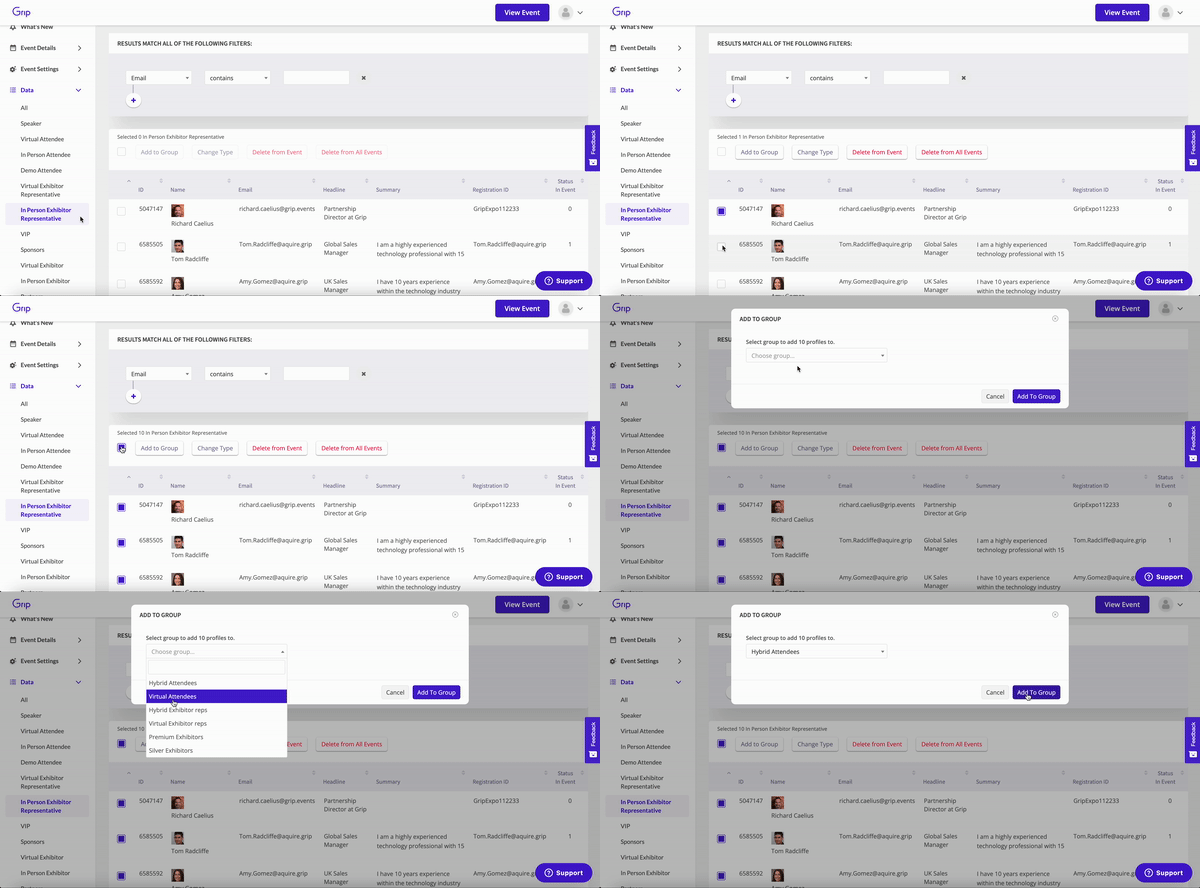
Alternatively, you can go to the Data tab, select a Data Type, and choose the profiles you want to add. Use the checkbox to select all items on the page.

-
Another method is to click into a profile on the Grip Engage Admin. On the right-hand side, you’ll see a Custom Groups button. Click it to open a screen where you can add the profile to a Custom Group.

How to Remove Data Types and Profiles from Custom Groups
- Click View next to the group, then use the checkboxes to select profiles you want to remove. Click Remove from Group.
- To remove a specific profile, open the profile under Data tab, navigate to Custom Groups on the right, and click Remove.

How to Edit a Custom Group
Under Event Settings / Custom Groups click View next to the group, then click Edit Group at the top. This will bring up the same fields you used to create the group, allowing you to make any necessary changes.
How Group Permissions Work
Custom Group permissions were designed primarily for use in MustMeet event, though they can be used in normal events too.
Custom Group permissions are set individually per group and allow the Event Organizer to specify other groups that members of a group can see, or be recommended. They only ever apply to profiles that are in a Custom Group - if a profile is not a member of any Custom Group, then they are not affected by group permissions in any way. There is an example below which should help explain this further.
Group permissions sit above data type permissions, so they act as a sort of second filter on top of any data type permissions that have been set already. They will not allow group members do anything that their data type already restricts them from doing, so you can effectively only further restrict permissions by adding more at the group level.
Example
You have two data types in your event, Attendees and Representatives. Data type permissions allow each data type to only see and be recommended members of the other data type, so Attendees cannot see other Attendees.
You then create two Custom Groups, Group A and Group B. Each group contains a mix of attendees and representatives. There are also some attendees and representatives that are not part of any Custom Groups.
Group A's permissions allow its members to only see and be recommended members of Group B, and vice versa.
Data Type Attendee - Group A
This participant can only see and be recommended Exhibitor Reps that are part of group B, and Exhibitor Reps that are not part of any group.
Data Type Attendee - not part of any Group
This participant can see and be recommended every Exhibitor Rep in the event.
Data Type Rep - Group A
This participant can only see and be recommended Attendees that are part of group B, and Attendees that are not part of any group.
Data Type Rep - not part of any Group
This participant can see and be recommended every Attendee in the event.
This will be the same in reverse for members of the other group.
FAQs
What Data Types can I add to a Custom Group?
Any Data Type can be added to a Custom Group.
How many Data Types can I have in a Custom Group?
There is no limit to the number of Data Types in a Custom Group.
Can a profile be in multiple Custom Groups?
Yes, profiles can be assigned to multiple Custom Groups.
If I use Custom Groups in a list with the “Display profiles outside of custom groups” option off, will only Custom Group data be shown?
Yes, only data within the Custom Group will be displayed.