This article is for event organisers managing events on the Grip Engage Admin.
Custom fields allow organisers to collect, display and structure key data about participants, companies, sessions and more. These fields support onboarding, enhance search and filtering, and improve AI-based recommendations for networking and content discovery.
There are two key types of custom fields:
-
Profile custom fields – for people, companies, or items
-
Session custom fields – for agenda sessions and activities. For more info on session custom fields see this article.
You can use custom fields to:
-
Display structured information on profiles or sessions
-
Collect extra data from participants during onboarding
-
Power Grip's Al recommendation engine
-
Enable advanced filters and improve search relevance
Important: Avoid using Custom Fields to store Personally Identifiable Information (PII) unless you have explicit consent and proper security controls in place.
In this article we will cover:
- Types of custom fields
- Permission levels for profile custom fields
- Managing Custom Profile Fields within a Single Event
- Understanding the Custom Profile Fields Page
- How to create a Single-Event Custom Profile Field
- Hiding and Displaying values
- Importing Data into Custom Profile Fields
- FAQs
Types of custom fields
There are two levels of custom fields:
1. Single-Event Fields
-
Exist only in one event
-
Best for event-specific data
-
Managed in the Grip Engage Admin
2. Multi-Event Fields
-
Available across multiple events in the same app
-
Ideal for recurring fields (e.g., industry, job function)
-
Require App Admin role to create or edit on Grip Engage Admin.
Tip: Use Multi-Event Fields wherever possible to save time and ensure consistency across events.
Permission levels for profile custom fields
Custom Field settings can be controlled at three levels:
-
Multi-event level (App-wide control, managed by App Admins)
-
Single-event level (Control specific to the event)
-
Data type level (e.g., Attendee, Exhibitor, Company)
The permission structure follows a top-down model—settings defined at a higher level (like Multi-Event) cannot be overridden at lower levels (like Data Type).
Key permissions
| Setting | What it controls |
|---|---|
| Visible | Whether the field is shown on profiles |
| Editable | Whether participants can update the field |
| Filterable | Whether the field is usable as a filter |
| Used in AI | Whether Grip's AI uses this field for recommendations |
Managing custom fields for a single event
To manage Custom Fields within a specific event:
-
Go to Event Details > Custom Fields in the Grip Engage Admin.
-
Use the tabs at the top to view available custom fields.
What you’ll see on this page
The table provides an overview of all Custom Fields available in the current event. You can filter or sort by:
-
Status in Event – Whether a field is active or inactive.
-
Field Type – Identifies whether the field is a Single-Event or Multi-Event field.
-
Input Type – The format of the field, such as dropdown, text input, or link.
-
Matching Type – Indicates how the field is used in Grip’s AI recommendation engine.
-
Types Using Field in Event – Lists the data types (e.g. Attendee, Exhibitor) assigned to this field.
-
Settings – Opens the configuration panel for that specific field.
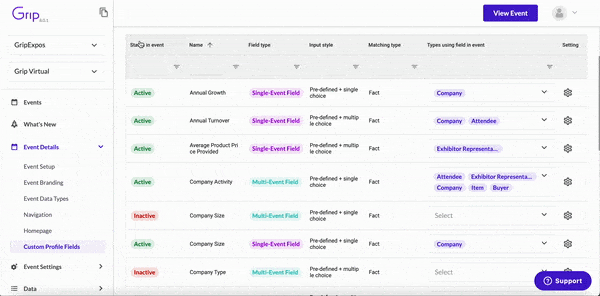
From this page, you can:
-
Activate or deactivate fields within the event.
-
Assign fields to one or more data types.
-
Edit settings for single-event custom fields.
- Create new custom fields for single event.
Note: You do not need App Admin permissions to create or edit Single-Event Custom Fields.
However, App Admin access is required to create or modify Multi-Event Custom Fields, as changes may affect multiple events across the app.
Creating a single-event custom profile field
To create a new Profile Custom Field:
-
Go to Event Details > Custom Fields (Profiles tab)
-
Click Create New Custom Profile Field
-
Choose whether it’s a Single-Event or Multi-Event field
(Only App Admins can create Multi-Event fields)
Required Step: Declare PII Usage
Before creating the field, you’ll need to declare whether it will store Personally Identifiable Information (PII).
Do not use Custom Fields to store sensitive data (like email, phone number, or birthdate) unless absolutely necessary and legally compliant.
Changing settings for a single data type only
Once custom fields have been created to customise field settings per data type:
-
Go to Event Details > Event Data Types > [Select Data Type] > Custom Fields,
or -
Go to Data > [Data Type] > Custom Profile Fields
Here, you can:
-
Toggle visibility or editability for a specific data type
-
Reorder fields as they appear in profiles
-
Troubleshoot if changes are not reflected (contact your Grip representative — caching may be involved)

To make changes on a data type-level only, you can access Custom Profile Field settings by going into the individual data type that they're assigned to, via two routes:
- Go to Event Details > Event Data Types > Choose a data type > Custom Fields
- Go to Data > Choose a data type > (in the example below we've used Attendee). Once the list of Attendee profiles has loaded, click Custom Profile Fields at the top.
You will then be taken to the Custom Profile Fields page specifically for this data type. You can go back to the event-level page by clicking the button 'Go to event custom profile fields'.
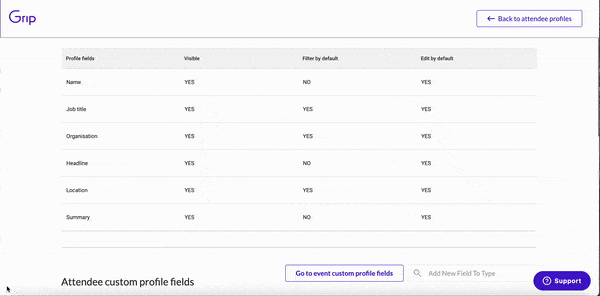
On this page you're looking at controls for any custom fields that are assigned to this data type - changing settings here will not affect other data types, even when they're sharing a field.
This is very useful if you have field that you don't want visible for a particular data type - simply head to this page, find the field and toggle off that option. If the option is disabled and you can't use it, that's a sign that it's being blocked by the same setting higher up the permission level. You'll need to make sure you've enabled this permission for that field at the single or multi-event settings first.
You can also re-order visible fields from this page, by dragging them up or down. This will affect the order in which they're displayed on a profile from the current data type. Note that Link-type fields are always shown underneath all other fields.
If you've previously viewed a profile within an event, re-ordered the profile fields, and then notice that the order of the fields has not changed, speak to your Grip contact for assistance. Profile information is usually 'cached' when you view it, meaning that we may need to force a regeneration of the profile's data to see any updates.
How to create a Single-Event Custom Field
Tips for creating effective Custom Fields
When it comes to custom fields, we believe in giving you the flexibility to add as many characters as you need. However, we'd like to highlight the importance of testing the visual impact of longer field names. Opting for a shorter, concise version can enhance the overall look and readability of your fields.
Additionally, we recommend using statements instead of questions for custom fields. This choice ensures full understanding when using them as filter options that your participants can use. By following these recommendations, you can optimize the feel and functionality of your custom fields.
Remember, our goal is to provide you with the best user experience possible, so feel free to explore the possibilities while keeping these suggestions in mind.
Again, the steps below are specific to Profile custom fields - Session custom fields are created from the second tab and have fewer options. See our companion article here.
1. Click the 'Create new custom profile field' button on the 'Custom Profile Fields' tab.
If you are an App Admin or above, you will be prompted about whether you want to create a multi-event field, or just a single-event field. Again, multi-event fields are recommended unless you don't plan on using this field again in future events.

2. You will then land on the custom field creation page.
Storing Personally Identifiable Information
Initially, you will be forced to answer the question of whether you plan to store Personally Identifiable Information (PII) within the field that you're about to create. This is an extremely important question which we must get confirmation of before you can continue.
PII is generally classed as 'any information that could be used by itself or in combination with other data to identify an individual'. For more information see here. In relation to the events industry, making data like people's names visible is generally unavoidable, so in reality this will be something like an email address, telephone number, date of birth, address etc.
In general, the only information we recommend you store in custom fields should be interest or non-personal - for example, Company Details, Topics that the participant is interested in, website links etc.
We strongly recommend that you do not store PII in custom fields, so as to avoid any issues with sensitive information being visible to participants in your event and risking GDPR or other data leak issues. If you do plan on storing PII in a custom field, answer Yes and accept the prompt - and ensure that you have all the legal agreements from your participants in place to justify this decision, and protect you from legal repercussions.
Additionally, if you plan to store PII in a custom field, we recommend that this field is set to not be visible (toggle off the 'Visible' control), for all of the same reasons as stated above.
Field settings
Once you've made your choice about PII data, you can continue with the field setup. First you'll need to select the Input type of the field, so that we can show you the right options.
| Input type |
1. Pre-defined values: Create a field where answers can only be picked from a defined list, e.g. 'Industry'. 5. Marketing Consent: This uncommon field type allows your participants to specifically choose whether they want to share their information with a given company profile in your event, and prevents things like Leads in that company's Team from being populated unless the option is accepted. |
Once this initial choice is complete, you'll see the page add or remove options and you can continue with the remaining steps. If an option is disabled, that means it can't be used with the Input type you've selected.
|
Field system name |
Automatically-generated name, used as a unique ID for data integrations. This will stay the same regardless of name changes. It's not visible to participants. |
| Profile field label | This is the name of the field as it will appear within the event, click the flag to add different translations. |
| Field Explainer Text | This customizable text appears as a placeholder in free-form input fields, or on the selection box for pre-defined and Link fields. Use it to give your attendees a hint about what the field's purpose is. |
| Show in Connections Exports | If enabled, this field will still be shown in the Connections export, along with the Teams Contacts table and export. It will remain hidden on profiles. |
| Profile field visible. |
Controls whether this field and its contents can be shown on participant profiles in events. |
| Profile field editable. | Controls whether this field and its contents are editable by participants during onboarding or when editing their profiles. |
| Profile field filterable. | Controls whether this field and its contents are permitted as a filter on profile lists within events. |
| Profile field can be used in recommendation engine. | This should normally be turned on unless you specifically don't want to use the data in this field to help recommend this profile. |
| Profile field can be used in personalized URLs | Controls whether the data in this field can be used as part of a personalized URL - see this article. |
| Parent / Child field | Enables parent/child functionality for this field - see this article. |
| How many answers can be selected? | Choose whether this field is a single or multiple choice field. After making a selection, you'll see a Required field toggle appear, or some options to control the minimum/maximum answers possible - more on this in the section below this table. |
| Use for matchmaking engine as: |
This field gives you a choice about how our AI should interpret the data within this field. 1. Fact - Facts are values used by our AI for learning purposes and in order to do things like compare 'similar' attendees. Use this option for general data about a user themselves - when any of the other more intent-based options below don't seem to fit. 2. Supply - Used as a pair along with a demand field, to create a common ground between two data types. One group of people will select 'supply' values - for example an Exhibitor listing their available services. Once you've created a Supply field, you should connect it to its matching Demand field (if you're already created it of course). These values MUST exactly match those in the equivalent Demand field. 3. Demand - The other group of people will select 'demand' values - as per the example above, this could be attendees showing interest those exhibitor services. Once you've created a Demand field, you should connect it to its matching Supply field (if you're already created it of course). 4. Matching fact - Matching Facts act as both Supply & Demand and are used to create matches using only one field. The AI is more likely to recommend users that have entered the same value(s) for the Matching Fact that they have both answered. If you want to ask more than one data type the exact same question, and want them all to be recommended to each other based on matching responses, this is easier than creating pairs of supply/demand fields. 5. Unused - Use this if your data cannot or should not be used for AI recommendations - e.g. for web links. |
| Types using field in event | These are the types where you want this custom profile field to be present, e.g. Company, and Exhibitor representative. |
3. In the 'How many answers can be selected?' field, if you select 'Can pick one' you will see a required field toggle, which will make this Custom Profile Field mandatory to complete before proceeding in the platform. If you select 'Can pick many', you will see a minimum answers required box, and a maximum answers required box. We have an article which explains these options here.
4. Click 'Create custom profile field' to confirm and create it.

5. If you've created a pre-defined field, you'll be taken to the next tab in order to input the values (answers) that will form a list for your participants to select from.

From here you can add your pre-defined answers. Click 'Add rows' and enter your answers. You can copy and paste values from a spreadsheet into these rows. You can paste as many values as you would like without needing to add new rows, simply copy and paste! You can delete rows by clicking the trash button under 'Delete'.
Always click Save new values before trying to leave the page.

If a participant has already provided answers to questions and selected values in a Multi-Event Custom Field, such as during Event A, they won't need to fill them in again when attending Event B. The Custom Field data, including values and answers, will already be present, saving time and ensuring all information is pre-filled for a seamless experience. This means they will get even better recommendations with our AI learning more each time.
Hiding and Displaying values (pre-defined fields only)
When you create or import values you'll notice that each has a tag to indicate whether it is 'displayed' or 'hidden'. This effectively controls whether that value is visible to participants within your events and, if the field is being used for recommendations, allows the AI to use the displayed values. (Of course, if you've hidden the entire field by toggling off its visibility toggle, then no event participant will be able to see any data contained within it.)
When you add values via the Grip Engage Admin, they will be displayed by default.
To Hide/Display a value, select the value(s) you want to deactivate and click ‘hide selected’ or 'display selected' at the top of the table.

Where do Hidden values come from?
Aside from values that you've specifically chosen to hide, hidden values will be values that were imported along with a profile, but didn't match any existing values for that field.
See more on the section 'Importing Data into Custom Profile Fields' below.
Managing and creating multi-event custom fields
Only App Admins can manage these fields.
To create or update:
-
Navigate to App Settings > Custom Fields
Alternatively, you can access this from Event Details > Custom Fields when managing a specific event, but full configuration must be done from App Settings. -
Click create new multi-event field
-
Configure as needed (same as above in signle event custom field section)
-
Configure the field using the same setup options described in the Single-event custom fields section.
-
Click Save changes

Note: You cannot assign "Types Using Field by Default" during the initial creation of the field.
Assigning default data types
To apply the field across default data types (e.g., Attendee, Company, Exhibitor) for all events:
-
In App Settings > Custom Fields, find the field in the list.
-
Click the Settings (cog icon) next to the field name.
-
Scroll to Types Using Field by Default.
-
Select the appropriate data types from the dropdown.
-
Click Save Changes.
Assigning types by default ensures the field will automatically appear in new and existing events where those types are used.
Add or enable the video URL field
The Embedded Video URL field is usually available by default for all events. If you can’t find it, it may have been removed — in that case, follow the steps under “To Create a New Embedded Video URL Custom Field” below.
To enable for a single event
-
Log in to the Grip Engage Admin.
-
Go to Event Details > Custom Fields.
-
Look for Embedded Video URL in the list.
-
Click the field and check the following settings:
-
Visible to Users → Yes
-
Editable by Users → Yes
-
Shown on Profile → Yes
-
-
Click Save if you make any changes.
💡 If the field isn’t showing on participant profiles, make sure it’s enabled for the correct profile types.
To enable for multi-event use
-
Go to Grip Engage Admin > Admin Settings > Custom Fields (this is outside any specific event).
-
Find the Embedded Video URL field.
-
Click on it, then click Manage Events.
-
Toggle the field on for the events where it should be used.
-
Click Save.
Create a new embedded video URL custom field
If the Embedded Video URL field is missing or was previously deleted, you can create a new one. Choose whether to create it for just one event or for use across multiple events.
Option 1: create for a single event
-
Go to the event’s workspace and open Event Details > Custom Fields.
-
Click Create profile custom field.
-
Select Single Event as the field type.
-
Use the following settings:
Setting Value Field Label Embedded Video URL Input Type Freeform Visible to Users ✅ Yes Editable by Users ✅ Yes Shown on Profile ✅ Yes Required ❌ No -
Click Save.
Important: the field label must be exactly “Embedded Video URL” when first created. This creates the correct system name so the platform can embed video links.
Option 2: create for multiple events
-
In the Grip Engage Admin (outside any event workspace), go to Admin Settings > Custom Fields.
-
Click Create profile custom field.
-
Select Multi-Event as the field type.
-
Use the same settings as shown in Option 1.
-
Click Save.
-
To enable the field for specific events:
-
Open the field
-
Click Manage Events
-
Toggle it on for each event where it should be used
-
If the Field Was Deleted or Isn’t Working
-
First, check if the field already exists under Custom Fields. If so, try enabling it again.
-
If the field is missing or broken:
-
Recreate it using the steps above
-
Make sure the initial field name is exactly
Embedded Video URL(capitalization matters) -
After it’s saved, you can change the label shown to users—the internal system name will still work correctly
-
Test a video link field
Once the field is set up, you can test it by adding an embed link either through the Grip Engage Admin or the event platform.
Option 1: add a link via the Grip Engage Admin
-
Open the Grip Engage Admin.
-
Go to Data > All > Profiles.
-
Use filters to find the profile (by name, company, or role).
-
Open the profile and find the Embedded Video URL field.
-
Paste a valid embed link, such as:
https://www.youtube.com/embed/dQw4w9WgXcQ
https://player.vimeo.com/video/123456789
-
Click Save or Update.
Option 2: add a link via the event platform (web or mobile)
-
Log in as the participant or an event admin.
-
Go to My Profile or open the relevant profile (Participant, Exhibitor, etc.).
-
Paste a valid YouTube or Vimeo embed URL in the Embedded Video URL field.
-
Click Save Profile.
Check that the video is displaying
After saving the link, go back to the profile on the event platform:
-
The video should appear and play directly in the profile.
-
If it doesn’t, double-check the following:
-
The link uses the correct embed format (contains
/embed/) -
The field name is correctly set to
Embedded Video URL -
The field is visible, enabled, and set to show on profile
-
The profile type supports video embedding (e.g., Participants or Exhibitors)
-
Video isn’t showing on the profile - what should I check?
-
Only embedded video links will work:
-
✅
https://www.youtube.com/embed/dQw4w9WgXcQ -
✅
https://player.vimeo.com/video/123456789 -
❌
https://www.youtube.com/watch?v=dQw4w9WgXcQ(this will not work)
-
-
The field does not accept raw HTML—Grip automatically wraps the embed link for you.
-
If your video isn’t showing:
-
Make sure the system key is correct:
video_url -
Confirm the field is enabled for the right profile types
-
Verify that the embed link format is valid
-
Importing Data into Custom Profile Fields
-
Set up your fields and values before importing profile data
-
Ensure imported data exactly matches predefined values
-
Incorrect spelling, spacing, or capitalisation will create hidden duplicates
-
-
Hidden values won’t display or filter until manually reviewed
It's best to create and assign your Custom Profile Fields & values prior to importing participants, companies and items into your event. Doing so allows you to add data to these fields during data imports through Grip Engage Admin bulk uploads and Native Integrations, as well as through custom API integrations.
There are, however, two ways of importing the fields' values into these fields - through the Grip Engage Admin (as explained further up in this article) or through simply importing profiles into your event.
This is not relevant for freeform or link type fields, as their data is always populated by imported profiles - it cannot be pre-defined.
Creating predefined values in advance (recommended)
If you've populated all of the values for your fields in advance, you'll give your attendees a full list of options for those fields (for things like filtering lists and onboarding). This is the best option, as it ensures that all of the values that should be available to your attendees are indeed present.
However, you must ensure that the profile data that is imported into your event EXACTLY matches the values you've entered into the Grip Engage Admin.
This is where hiding and displaying values becomes really important.
Grip has some inbuilt logic that allows new values to be created automatically if they are present in a participant's profile when they're imported. This is very beneficial as it means that incoming data which is 'unexpected' (doesn't match values that already exist) is not lost. Instead, those values are 'hidden' and so not shown on profiles or filters.
This logic helps prevent unwanted values from automatically appearing in your event and causing problems.
Example:
Your registration form contains a question with an option for the registrant to choose a value or write their own response. This might be something like a 'Reasons for Attending' question, with some existing options, along with an 'Other: please specify' option.
You don't know in advance what your registrants might write into that box, and whether it should be visible to everyone else.
In Grip, you've added your existing options, so anything else that comes through as a value will be hidden automatically. This prevents unwanted answers from clogging up your filter options for this field, for example, leaving only the 'displayed' values that you initially set.
This means of course that if the values that are coming in through an integration don't exactly match an existing value, they will be created and hidden, and you'll end up with answers that are very similar to each other. As mentioned above, this is why you must be very accurate when entering values in advance - spaces, symbols, spelling etc. must be precise otherwise your profiles' values will be hidden.
If you notice blank profiles or filters missing values in your event, mismatched custom field values are likely to be the cause.
You will also be able to check by finding a profile whose data isn't displaying, opening it in the Grip Engage Admin and trying to save the profile. If the values assigned to it don't match what's been 'displayed' in that custom field's values, you'll see an error saying 'Not all Profile Field Data was updated', and the problem field(s) and value(s) will be highlighted:

Note: Custom field values cannot be edited once created. If you need to make changes, you’ll need to delete the existing value and add a new one.
What can I do about it?
The issue is that your data doesn't match - so you need to work out which is correct. Is the data you entered into the Grip Engage Admin wrong, or are the profiles that are being registered coming in with incorrect data?
If the values coming in look the same but are being created as 'duplicates' and are hidden, there is probably an issue like a leading or trailing space character, or even two symbols that look the same but are actually different.
Once you've worked out where the problem values are coming from, you'll need to take some steps to 'clean-up' your data.
If you entered values into the Grip Engage Admin and the imported profile data is correct:
- Delete (or hide) incorrect values on the field's value page.
- Add all missing values and ensure they match the data coming in.
Or, if your Grip Engage Admin data is good, but the profiles being imported have incorrect values:
- Correct the problems in the integration or data upload so that the values match the Grip Engage Admin.
- Delete the profiles that you've previously imported.
- Reimport the profiles with the corrected data.
You should notice that values will start to appear in filters and on profiles and you should not see any errors when saving profiles in the Grip Engage Admin.
If you've previously viewed a profile with incorrect data in the event, have fixed it, and then see no new values (or the old values) still shown, speak to your Grip contact for assistance. Profile information is usually 'cached' when you view it, meaning that we may need to force a regeneration of the profile's data to see any updates. This does not include the Grip Engage Admin, where profile information should always be shown correctly.
Relying on data integrations to populate values (not recommended)
If you skip predefining values:
-
Grip will auto-create hidden values from unmatched imports
-
You must manually review and display them later
-
Risk: messy filters or blank profiles if data doesn’t match predefined values
FAQs
Q: Can I have multiple Custom Profile fields with the same name?
-
A: Yes, you can have multiple Custom Profile fields with the same name.
Q: How much Custom Profile Field data can be stored against one profile?
- A: The maximum size a profile's CPF data can be is 64kb. The character limit will depend on the data being sent but works out as roughly 25,000 characters per profile. This is a very large limit and profiles containing anywhere near this amount of data would be very difficult to manage and view in an event.
Q: Can I copy and paste data values into the Grip Engage Admin from an external spreadsheet?
- A: Yes, edit the field, go to the 'values' page, click 'add rows' and then paste as many values as you like into an empty cell, like you would a spreadsheet.
Q: Who can create Multi-Event Custom Profile Fields?
- A: Only app admins can create and edit Multi-Event Custom Profile Fields.
Q: In what order do Custom Profile Fields appear in onboarding?
- A: Currently there is no hard rule, but they generally appear in the order in which they are created.
Q: Event participants have reported that they can't update the custom URL profile field via the mobile app. Is that supposed to be the case?
-
A: Yes, this is expected. The custom field link can only be added or updated via the Grip Engage Admin or the web networking platform. While the link will appear on the profile, participants do not have the option to update it through the mobile app. Currently, creating or updating custom field links via mobile is not supported.
Q: Event participants have reported that they can't see the custom URL on their profile in the mobile app. Is that supposed to be the case?
-
A: Yes, this is a known limitation that we are planning to work on. However, participants should still be able to view custom field URLs when viewing other users' profiles.
Q: Are emojis supported within custom profile fields?
- A: Yes, emojis are supported within custom profile fields and their values.
Q: How can I export my Custom Profile Field values once they have been created?
- A: In order to export CPF values, select the Custom Profile Field first. Open the tab ‘Single-Event Field Values’ or ‘Multi-Event Field Values’, and click on the ‘Export Data’ button.

Q: Help! Field values seem to be missing or profiles are blank.
- A: It's likely that you have a data problem, and the incoming fields values don't match what's been Displayed for each field. See the Hiding & Displaying values and Importing Data sections above.
Q: Can I use different values for recommendations between supply & demand fields?
- A: No. Supply and Demand matching will only work if the values for related fields are an exact match. This means that their structure needs to be identical too.
For example, you will not get recommendations for supply & demand fields that are related but where one side uses parent/child values and the other does not.
Q: What are the default Profile Fields available globally on Grip?
- A: The following default Profile Fields are standard across Grip and always editable unless profile editing is disabled:
- Name
- Headline
- Summary
- (Most Recent) Job Title
- (Most Recent) Company
- Location
To control whether these fields can be used as filters throughout the event platform, click here.
Q: How can I customize which Profile Fields participants can edit on the event platform?
- A: Profile Editing Enabled: Participants can edit Custom Fields during onboarding and on the Edit Profile page. Fields with editing disabled will not appear in these sections.
Profile Editing Disabled: No fields can be edited, and the onboarding step for profile editing is skipped.
Q: What if the Embedded Video URL field is deleted or is not working properly?
- A: If the Embedded Video URL field already exists in your Grip Engage Admin, you can simply reactivate it and reuse it.
But if the field has been deleted or the default version isn’t working properly, follow these steps to recreate it:
- Create a new custom field and make sure the initial name is exactly
Embedded Video URL(this is important for the system to recognize and apply the correct embed behavior). - After saving, you can change the label shown to users to anything you prefer — it won’t affect the video embedding, as long as the system name remains
Embedded Video URL.
- Create a new custom field and make sure the initial name is exactly