This article describes the Google Tag Manager (GTM) and Google Analytics 4 (GA4) integration for Grip's registration platform. This integration provides comprehensive tracking of the registration checkout flow, which is essential for marketing teams to track user journeys, optimize ad bidding, and analyze conversion funnels. We will cover the prerequisites for testing, the step-by-step setup and testing guide, and the detailed structure of the data layer for each registration event.
In this article, we will cover the following:
- Understanding the GA4/GTM Integration
- Before you begin configuring the Integration
- How do you use/configure the Integration (Testing Setup)
- Event Details and Data Layer Structure
- Privacy & Data Handling
Understanding the GA4/GTM Integration
The integration connects Grip's registration platform with Google Tag Manager (GTM) and Google Analytics 4 (GA4). The primary purpose is to enable marketing teams to track the entire user journey through the registration checkout flow, which supports ad bidding optimization and conversion funnel analysis.
Before you begin configuring the Integration
To set up and test the GA4/GTM integration, the following prerequisites are necessary:
- GTM workspace access
- Event access to a Grip event that has GTM enabled
- A browser with GTM Preview mode
How do you use/configure the Integration (Testing Setup)
The setup and testing process involves five key steps, primarily centered on verifying the data flow using the GTM Preview mode and GA4 DebugView.
Step 1: Enable GTM on Test Event
- Navigate to the event settings within Grip Admin.
- Enable the GTM integration found in the External Integrations section.
- Configure the GTM ID and, if server-side tracking is being used, configure the custom tracking domain.
Step 2: Set Up GTM Container
- Open your GTM workspace.
- Create a new Tag or use an existing GA4 Configuration tag.
- Set up the necessary triggers for each event.
Step 3: Enable GTM Preview Mode
- In GTM, click "Preview".
- Enter the registration URL for your test event.
- The GTM Preview window will then show all data layer pushes in real-time.
Step 4: Test Each Registration Step
- Navigate to the event registration page.
- Complete each stage of the registration process.
- Monitor the GTM Preview window for data layer events.
- Verify the event data either in the GA4 DebugView or the GTM Preview console.
Step 5: Verify in GA4
- Open GA4 DebugView.
- Complete a test registration.
- Verify that events appear with the correct parameters.
- Check revenue tracking details in the Conversions report.
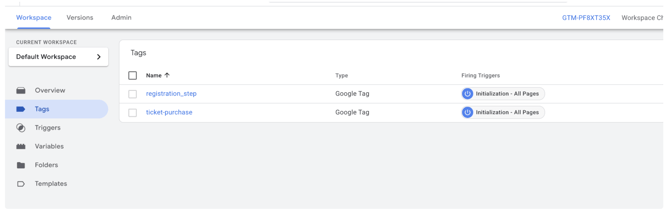
Event Details and Data Layer Structure
There are two primary event types tracked during the registration process: registration_step (Checkout Flow Events) and ticket-purchase (Final Purchase Event).
| Event Type | Event Name | Trigger Location/Description | Marketing Use Case |
|---|---|---|---|
registration_step |
Step 1: Email Entry | Triggered when the user enters an email and selects a registration flow (Just Me / Me and Others / Others). | Track initial engagement and intent (equivalent to begin_checkout). |
registration_step |
Step 2: Attendee Information | Triggered when the user lands on the attendee information form step. | Track form engagement and drop-off points. |
registration_step |
Step 2a: Attendee Completed | Triggered when the user clicks "Go to Next Attendee" (only for multi-ticket registrations, fires when 2+ tickets are present and not on the last attendee). | Track multi-attendee completion rates. |
registration_step |
Step 3: Order Summary | Triggered when the user reaches the order summary/review step. | Track review stage engagement (equivalent to add_to_cart). |
registration_step |
Step 4: Payment | Triggered when the user lands on the payment step. | Track payment initiation (equivalent to add_payment_info). |
ticket-purchase |
Step 5: Order Confirmation | Triggered when the order is successfully completed and the user reaches the confirmation page. | Primary conversion event, revenue tracking for ad platform bidding, and campaign attribution. |
registration_step |
Submission Form | Triggered when the user submits a non-ticket submission form. | Track non-ticket submission forms. |
Data Layer Structure and Coding Examples
All events include standard common fields, along with specific fields dependent on the step.
Common Fields (Always Present)
| Field | Type | Description |
|---|---|---|
event |
string | Event name (registration_step or ticket-purchase). |
ticketsQuantity |
number | Total number of tickets. |
revenue |
string | Total revenue as a string (used for currency formatting). |
tickets |
string | Comma-separated ticket identifiers (shortIds for ticket-purchase). |
flow |
string | Registration flow type. |
Data Layer Examples by Step:
Step 1: Email Entry (registration_step)
This event tracks initial engagement.
{
  event: 'registration_step',
  step: 1,
  stepName: 'email_entry',
  ticketsQuantity: number, // Total tickets selected
  revenue: string, // Total revenue as string (may be 0)
  tickets: string, // Comma-separated ticket type IDs
  flow: 'JUST_ME' | 'ME_AND_OTHERS' | 'OTHERS',
  emailEntered: true, // Boolean indicator
  flowSelected: true // Boolean indicator
}
Step 2: Attendee Information (registration_step)
When the user lands on the attendee information form step.
{
  event: 'registration_step',
  step: 2,
  stepName: 'attendee_information',
  ticketsQuantity: number,
  revenue: string,
  tickets: string,
  flow: string,
  emailEntered: true,
  attendeeInfoCompleted: true, // Always true for this step
  coupon: string                    // Optional: coupon code if applied
}
Step 2a: Attendee Completed (registration_step)
Fires only for multi-ticket registrations when proceeding to the next attendee.
{
  event: 'registration_step',
  step: 2,
  stepName: 'attendee_completed_proceed_to_next_attendee',
  attendeeIndex: number, // 1-based index of completed attendee
  attendeesTotal: number, // Total number of attendees
  ticketsQuantity: number,
  tickets: string,
  flow: string,
  attendeeInfoCompleted: true,
  coupon: string                     // Optional
}
Step 3: Order Summary (registration_step)
Triggered upon reaching the summary/review step.
{
  event: 'registration_step',
  step: 3,
  stepName: 'order_summary',
  ticketsQuantity: number,
  revenue: string, // Total order value
  tickets: string,
  flow: string,
  refId: string, // Optional: referral ID from URL
  coupon: string, // Optional: coupon code
  orderReviewed: true, // Boolean indicator
  emailEntered: true,
  attendeeInfoCompleted: true
}
Step 4: Payment (registration_step)
Triggered when the user lands on the payment step.
{
  event: 'registration_step',
  step: 4,
  stepName: 'payment',
  ticketsQuantity: number,
  revenue: string,
  tickets: string,
  flow: string,
  refId: string, // Optional
  coupon: string, // Optional
  paymentMethod: 'stripe', // Payment method used
  paymentInitiated: true, // Boolean indicator
  emailEntered: true,
  attendeeInfoCompleted: true
}
Step 5: Order Confirmation (ticket-purchase)
This is the final purchase event. Note: The Order ID is only generated at this step but is NOT included in this implementation based on client requirements.
{
  event: 'ticket-purchase',
  step: 5,
  stepName: 'order_confirmation',
  ticketsQuantity: number, // Number of tickets purchased
  revenue: string, // Total revenue as string
  tickets: string, // Comma-separated ticket shortIds
  flow: string, // Registration flow type
  refId: string, // Optional: referral ID
  coupon: string                     // Optional: coupon code
}
Submission Form (registration_step)
Used for tracking non-ticket submission forms.
{
  event: 'registration_step',
  step: 1,
  stepName: 'submission_form',
  ticketsQuantity: 0, // Not applicable for submissions
  revenue: '0',
  tickets: '',
  formType: string, // Type of submission form
  formSubmitted: true
}
Privacy & Data Handling
It is important to note that NO personal information is included in these events, meaning no emails, names, or addresses are shared. Only anonymized data is passed through, such as ticket quantities, revenue, ticket IDs, and flow type. All data transmitted is non-identifiable. The Order ID is only generated at the final confirmation step, but it is explicitly NOT included in the implementation.