Managing your meeting availability is essential to ensure that you only receive meeting requests when you're available. This guide will walk you through customizing your availability on the platform to optimize your event experience and avoid conflicts.
Currently, this feature is available on the web unless the event organizer has configured a navigation item under the "More" section or on the homepage.
Table of Contents
- Why Managing Availability Matters
- How to Manage Your Meeting Availability
- Resetting Your Availability Settings
- Reviewing Availability After Changing Time Zones
- Frequently Asked Questions
Why Managing Availability Matters
Managing your meeting availability ensures that you only receive meeting requests when you're actually available. This is particularly useful for event attendees who may have other commitments or work across different time zones. Properly setting your availability helps you make the most out of networking opportunities without scheduling conflicts.
How to Manage Your Meeting Availability
Follow these steps to set and customize your meeting availability:
-
Go to the 'Edit Profile' section
Start by accessing the availability management feature in your profile settings. Click the 'Profile' button located at the top right of the page. -
Click 'Manage My Availability'
In the 'Edit Profile' section, click 'Manage My Availability'. This will show what the event organizer has set for meeting days and the default time ranges.
-
Customize Your Availability
You can adjust your availability by modifying the daily time ranges, or setting different ranges for each event day. Use this feature to ensure you're only available for meetings when it suits you. - Save Your Changes
After setting your preferred time slots, make sure to save your changes. The platform will now follow your customized availability when scheduling meeting requests.
Tip: You can make an entire day unavailable by unselecting the checkbox next to the listed days.
Please note: If you have an OOO (Out of Office) event on your calendar set to decline all new invitations, you may inadvertently decline meeting invites from the event you're attending. To avoid this, regularly review your meeting requests leading up to and during the event.
Resetting Your Availability Settings
If you need to reset your meeting availability back to its default settings, simply click the Reset Availability button. This action will revert any changes you've made and restore the default time ranges for your meetings.
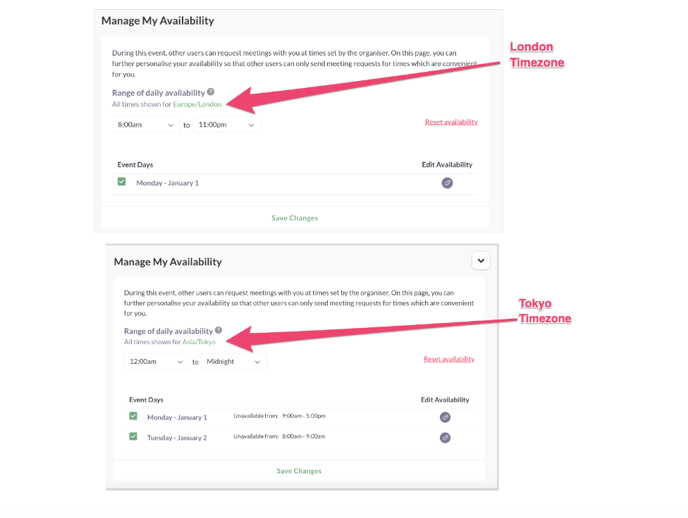
Reviewing Availability After Changing Time Zones
If you've recently traveled or changed time zones, it's important to review and update your meeting availability. Time ranges may display differently depending on your new location, so double-check your settings to ensure they align with the event's actual schedule.
Example:
In a new time zone, your availability might be shown as unavailable across two days to match the time ranges you previously set.
Frequently Asked Questions
Can I manage my availability for only part of the event?
Yes, you can customize your availability by selecting specific days and time ranges that fit your schedule.
What happens if I forget to update my availability after traveling to a new time zone?
If your availability is not updated, the platform might show incorrect time ranges, leading to potential meeting conflicts. Be sure to review your settings after traveling.
How often can I update my availability?
You can update your availability at any time before or during the event. Simply follow the steps outlined above to make changes as needed.