Overview
This article provides a comprehensive guide to setting up onboarding for both event organizers and end users. It includes steps for customizing welcome emails, configuring the login page, and creating custom profile fields, ensuring a seamless experience for all participants. Additionally, links to related articles on campaign emails, customized text, and custom fields are included.
Table of Contents
- Onboarding Steps for Event Organizers
- End User Onboarding Process
- Troubleshooting Common Issues
- Frequently Asked Questions
Onboarding Steps for Event Organizers
Event organizers have several tools available to set up a tailored onboarding experience for participants. Here are the primary onboarding tasks for organizers:
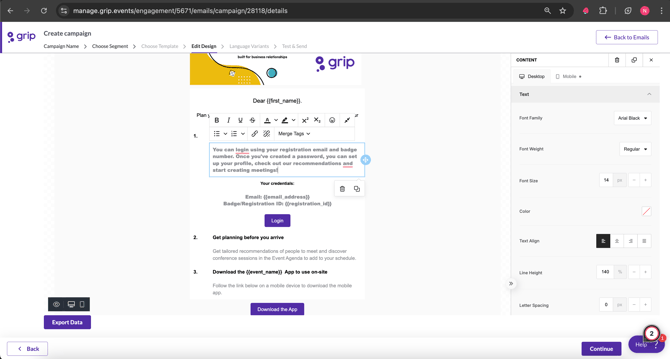
- Prepare the Welcome Email:
- Organizers can create and customize a welcome email that is sent to participants once the event goes live. The email includes essential details such as the login credentials, badge registration ID, and event link.
- Organizers may add a banner or image at the top of the email, which can link to the event page.
- Configure Custom Fields:
- Custom fields allow organizers to gather relevant information from participants, like goals for the event or company details. These fields are useful for networking and allow attendees to connect based on shared interests.
- Set Privacy Options:
- Privacy settings for user profiles can be adjusted. Organizers may allow email and phone number to be public or visible only to connections, depending on the event's privacy policies.
Customization Options
Event organizers can further personalize the onboarding experience by customizing emails, the login page, and user profile fields.
Customizing Emails
Organizers can fully personalize the welcome email from the Grip Engage Admin under Engage > Emails > Campaign Emails. Customizations include:
- Visual Elements: Add images or banners.
- Text Formatting: Adjust font, alignment, and color to match event branding.
- Device Preview: View and adjust the email appearance on both desktop and mobile.
For a complete guide on setting up campaign emails, refer to the Campaign Emails Guide.
There is available Step-By-Step Guide for "New Emails" on the Grip Engage Admin "Help" beacon!
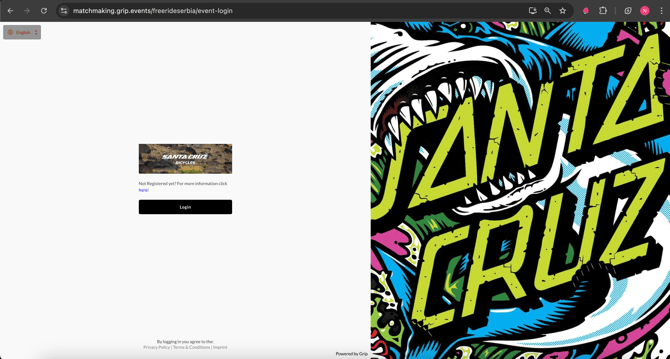
Login Page Customization
The login page can also be customized to include unique event details, such as:
- Custom Text Options: Organizers can customize the language and layout of login instructions from Grip Engage Admin > App Settings > Customize Text.
e.g. For unregistered users, organizers can include a link with text like “Not registered yet? Follow this link to register.
For detailed customization instructions, please see our Customized Text Guide.
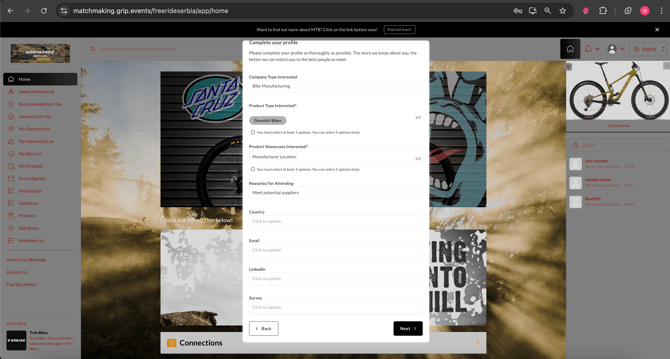
Setting Up Custom Fields
Custom fields are essential for collecting information that facilitates networking. Organizers can create various types of custom fields to capture participants' information, such as job title or event goals.
- Configuration: Custom fields are set up in Grip Engage Admin > Event Details > Custom Fields.
- Field Types: Available options include freeform, predefined values, marketing consent or links.
For more information on custom fields, see our Custom Fields Guide.
End User Onboarding Process
End users experience a straightforward onboarding journey starting with the welcome email and culminating in event engagement:
-
Receive Welcome Email:
- Users receive an email with a link to the event and a badge registration ID. This email can be customized by the organizer and will guide users to the login page or download the app if using the mobile device.

-
Login and Profile Setup:
- Users log in with their email and registration ID, where they are prompted to set a password. Afterward, they gain access to the event page.
-
Complete Custom Fields:
- During onboarding, users fill out custom fields relevant to the event, like their goals or interests, to enhance networking opportunities.
- During onboarding, users fill out custom fields relevant to the event, like their goals or interests, to enhance networking opportunities.
-
Privacy and Visibility Options:
- Users can choose between “Connections Only” or “Public” for profile visibility. Note: If contact detail sharing is disabled by the organizer, users won’t be able to adjust this setting.
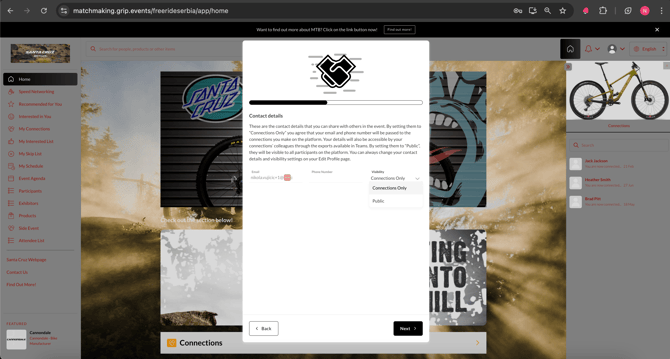
- Users can choose between “Connections Only” or “Public” for profile visibility. Note: If contact detail sharing is disabled by the organizer, users won’t be able to adjust this setting.
-
Networking and Engagement:
- Once onboarding is complete, users can connect with other participants, attend sessions, and explore event features.
Troubleshooting Common Issues
-
Forgotten Badge Registration ID: If participants delete the welcome email or lose their registration ID, they can request a new email with the ID directly from the login page.
 The following email will be sent to participant:
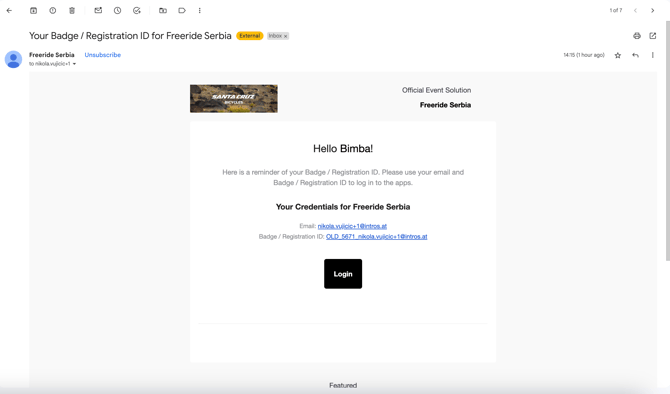
-
Customization Limitations: If organizers encounter issues with customization settings (e.g., unavailable options), please refer to the specific customization guides or contact support.
Frequently Asked Questions
What should I do if I didn’t receive my welcome email?
Please check your spam or junk folder. If you still can’t find it, confirm with your event organizer that your registration is complete.
Can I update my profile visibility after onboarding?
Yes, you can adjust your profile visibility from the "Edit Profile" menu unless the organizer has disabled this option.
Is it possible to change my registration ID?
No, registration IDs are automatically assigned and cannot be changed.
- Capitalize – the first word of the title or heading
- We want event organiser to understand what event participants experience
How can I customize event participant onboarding?
Overview
Customizing participant onboarding on the Grip Engage Admin enhances user engagement by personalizing the event entry experience. Organizers can set up branded welcome emails, customize login page text, and add custom fields that collect relevant participant information. This streamlined onboarding ensures event participants are informed, connected, and ready to interact. Here’s how to get started.
Event participant onboarding flow: What participants will experience
Understanding the participant journey through onboarding can help you create a seamless experience. Below is the order participants will follow when accessing the event platform for the first time.
Participant support guide: Event Participant Guide — Direct participants here for step-by-step instructions. Unless custom branded engagement resources have been created.
1. Welcome email
Event participants receive a customized welcome email with login information and a badge registration ID, leading them directly to the event.
2. Login and profile setup
Using their email and registration ID, event participants log in, create a password, and gain access to the event.
3. Complete custom fields
Participants fill out custom fields that provide event-specific information, such as their goals or interests. These details enhance networking opportunities, allowing participants to connect based on shared interests.
4. Set profile visibility
Participants can choose their profile visibility setting, either “Connections only” or “Public,” based on the event’s privacy guidelines set by the organizer.
5. My team setup
The first team member from each company is prompted to create a team, becoming the admin for their organization 'My Team'. This enables them to manage team settings and add other team members.
6. Explore and network
With setup complete, participants can connect with other event participants and explore all available event features.
Configuring the event onboarding flow
Below are the main configuration steps you can set up on the Grip Engage Admin to ensure participants have a smooth onboarding experience.
1. Create a welcome email with essential event details
Purpose: The welcome email provides participants with all they need to access the event platform.
Where to go:
- Grip Engage Admin > Engage > Emails > Campaign Emails
Pro Tip: Refer to the “New Emails” guide in the Help beacon on the Grip Engage Admin for detailed instructions.
Additional Information: Managing event emails
2. Tailor the login page to enhance participant entry
Why it’s important: A custom login page provides a welcoming entry point to the event platform.
Where to go:
- Grip Engage Admin > App Settings > Customize Text
Further Guidance: Refer to our Customize Text Page Guide.
3. Set up custom fields to gather valuable participant information
Purpose: Custom fields enable you to collect information about participants—such as goals or job titles—that enhances networking and allows for better recommendations.
Where to go:
- Grip Engage Admin > Event Details > Custom Fields
Additional Information: Learn more in our Custom Profile Fields Guide.