This article explains how to configure MustMeet settings for a hosted buyer style event. There is an extensive set of features within MustMeet, but most can be added once you're comfortable with the overall process. This guide covers the main points needed to run an event, while linking out to other articles for those that want to know more.
In this article, we will cover the following:
- MustMeet overview
- How to configure MustMeet in your event
- Publishing meetings
- Availability Management
- How to configure MustMeet slot visibility
- FAQs
MustMeet overview
Running a MustMeet event will allow you to bring groups of participants together using prescheduled meetings. Grip uses a combination of participant preferences and AI to find the best matches within your audience, and creates a tailored schedule with many options to suit difference requirements.
Before you start configuring your event, consider the following:
- Do you want to run a bilateral Buyer <> Supplier style event, or just allow various groups to meet one another? Check the Platform Types article for more details.
- Where and when should your participants meet? MustMeet requires certain meeting location setups depending on the type of event - though in all cases your prescheduled meetings need to be in locations that have the same time slot setup as each other. See this article on Meeting Location Assignment.
- How long do you have to run your event? You need to allow time for participants to login, update their profiles, and make preferences on each other, and then for the meeting schedules to be generated and approved by your team and the participants. See the MustMeet Phases article for more details.
- If you're going for a Buyer <> Supplier event, should all your meetings be 1:1 or do you want to allow Suppliers to have multiple representatives assigned to the same meetings? See our article on Sharers in MustMeet.
There are other powerful features that can affect the way you manage your event, but these questions are a great starting point if you're new to MustMeet.
How to enable MustMeet in your event
Step 1: Create Custom Groups
MustMeet relies on Custom Groups in order to identify the different participants who will be meeting. You'll need to create these groups before you can configure MustMeet, even if you don't have attendee profiles to put in them yet.
See our article on Custom Group setup for MustMeet to get started.
Step 2: Enable MustMeet
- In the Grip dashboard, select an event and expand to the Event Settings menu item. If you see a MustMeet item, click on it. If you do not see a MustMeet option, speak to your Grip contact person - MustMeet needs to be enabled in your application first.
- On the MustMeet page, enable the toggle "Enable MustMeet Experience".
Step 3: Add Groups to MustMeet
Once the MustMeet setting has been enabled for the event, the MustMeet Custom Groups need to be added to in the Pre-Event Configuration section:
- Under Pre-Event Configuration, select all Custom Groups that need to be added
- Press save at the top of the page
If you want attendees to make preferences on Company profiles instead of (or as well as) attendee profiles, see our article on Company Preferences.
Step 4: Add Preference limits for each group
To ensure that users are making thoughtful meeting selections and valuable meeting schedules are generated, we set maximum and minimum limits for the meeting preferences between buyers and suppliers. The preference limits should be configured before Initial Phase Stage 2: Preference selection and recommendations available.
Preference minimums can help encourage your attendees to make more preferences, which will lead to better meeting scores, but limits are important too. If you allow your attendees to make too many 'No Thanks' preferences for example, you may see a reduction in the overall number of matches that can be made.
Steps to add preference limits:
- Ihe Pre-Event Configuration section, select 'Configure' next to each Custom Group.
- Toggle on/off actions per group (MustMeet, Meet, No Thanks). Some event organizers allow only one group to make MustMeet preferences for example, which makes their preferences significantly more impactful to the meeting scores.
- Set minimum and maximum preference limits for Must Meet, Meet, No Thanks. For some advice on how to calculate rough limits based on the number of attendees, refer to the article Rules and Calculations for setting Preference Limits.
Step 5: Change the MustMeet phase throughout the event
The MustMeet phases control the experience that your attendees have in the event. Once the above steps are complete, you're ready to launch the MustMeet experience to your participants. You'll need to move through the phases as your event moves forward - though not every phase is mandatory.
Again, see the MustMeet Phases article to ensure you understand how the experience changes throughout the phases.

When you have enough preferences, you can move to the Scoring and Schedule generation steps, where you'll need to move to the Closed - Meetings are currently being scheduled phase.
After you've published meetings, you can go on through the remaining schedule approval and finalised stages.
Step 6: Publishing meetings to participants (Closed phase)
Once you've generated a schedule you're happy with from the Scores & Schedules page, use the Publish action on the MustMeet setup page to make meetings visible in all areas to participants.
This step is not relevant to schedules created in our legacy MustMeet scheduler - where meetings are automatically published as soon as you 'Approve Schedules' and push them back to Grip Engage.
If you're still using the legacy MustMeet platform, you can still "publish" your schedules when you move to the Closed - Provisional or Closed - Finalized stages, though the event participants' experience will not change.
Before meeting schedules are published:
-
MustMeet Meetings do not automatically create Connections or Lead Tags.
-
Meetings are not visible in external/linked systems, including Teams and participants' Synced Calendars.
-
Meetings will show in the My Schedule area of the platform (as they do already exist) - however they are hidden from participants during the Closed - Meetings are currently being scheduled phase. This is deliberate, so that you can make changes to your schedules and then choose when to publish and when to move to the Closed - Meetings have been generated provisionally phase, which allows the meetings to be seen.
⚠️ Important: Publishing is a one-time action. Once you publish, any further changes you make to meetings are synced to participants as soon as possible — there's no way to "unpublish" the schedules again, so make sure you're ready before publishing.
You can still move back to the Closed - Meetings are currently being scheduled phase after publishing. Doing so will hide MustMeet meetings from My Schedule and Teams pages when you want to make further changes to meetings - but having already Published schedules, any changes to meetings will be synced to external systems and Connections will be created ASAP.
Publishing meetings:
On the MustMeet Settings page, you'll see an indicator of whether your meetings are published or not.

-
You can publish your schedules simply by clicking the button and confirming in the dialogue that pops up.
-
Alternatively, you will be prompted to publish your meetings when you move to the Closed - Meetings have been generated provisionally phase (or any phase after that).
- You can choose not to publish if you're just testing the platform and real participants do not have access.
Availability Management
In normal events, attendees are able to modify their availability to set busy periods where they can't receive meeting requests. You may want to allow this behaviour in MustMeet events too, so that attendees can manage their own time. However, doing so will mean that there are fewer slots available to generate meetings in, and could result in worse schedules overall.
If the meeting schedule and quality of meetings are the most important things for you, you could consider disabling the ability for attendees to mark themselves as busy. You can do this from the Data Type settings:

MustMeet Availability Import Settings (legacy Scheduler)
If you're using the modern scheduler in Grip Engage, availability changes won't affect meetings that are already booked, and so this section is not relevant to you.
However, you will still not be able to book new meetings over attendee's busy periods.
If attendees can edit their own availability, and you're making changes to the meeting schedule later in the event, AND you're still using the legacy MustMeet platform to schedule meetings, you may notice that a data import in MustMeet 'fails', and informs you that some individuals availability has changed and they can no longer make the meetings that have been scheduled:
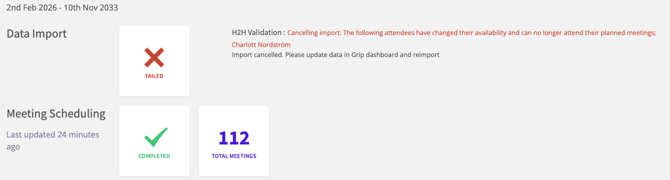
This is a safety mechanism that prevents meetings being cancelled without the event organizer's consent.
For example:
- Meeting schedules have been finalized and it's the first day of the event
- An attendee, Lauren, has decided to block their calendar for the duration of the MustMeet meetings. Their reasoning is that they want to dedicate their time to their prescheduled meetings, and so don't want any other requests coming in at the same time.
- The Event Organizer is making some minor changes to the schedule for other attendees who are running late.
In this scenario, Lauren is going to attend her MustMeet meetings, but has marked herself unavailable. The Event Organizer wants to keep Lauren's meetings, even though it looks like they should be unbooked.
To control this feature, you can change the behaviour during imports using the 'Import Settings' option on the MustMeet configuration page.

The first import in MustMeet will always run as normal. The second and any subsequent imports will check this option and deal with availability changes for individuals according to this setting. There are three options to choose from:
- Inform and cancel import (default behaviour)
- Continue and remove meetings
- Continue and ignore availability changes
The default behaviour will be to stop the import and list the users with availability changes, informing the event organizer that they should resolve the affected attendees’ calendars, or change this setting in Grip in order to move forward.
The second option will simply remove any conflicting meetings automatically. This allows the event organizer to remove affected meetings and regnerate meetings for the entire event for example, or allow for people that are actually now busy and need new meetings.
The third option skips checking availability (for affected attendees) moving forward, relying on the initial data that was pulled in the previous import. This means that people can block out whatever time they like and MustMeet will still consider them free. For many events where MustMeet is happening alongside regular networking, this is what many event organizers will prefer, as they want to protect their prescheduled meetings while allowing attendees to modify their availability for normal meeting requests.
After changing this setting, you'll need to run another import in MustMeet to continue.
MustMeet slot visibility
This setting, which is only available in the Live Networking phase, allows for event organizers to control whether regular networking attendees are able to book meetings in meeting slots that are usually intended only for MustMeet meetings. This feature is great for filling any gaps between pre-scheduled MustMeet meetings and fill up any leftover time - assuming that there will be no further changes to the MustMeet schedules.
Enabling the MustMeet slot visibility toggle
By default this toggle is off, but once the event is in the Live Networking phase, it will be visible in the MustMeet settings (see image below). This means that the setting will be hidden on the dashboard during the initial and closed phases of the event.
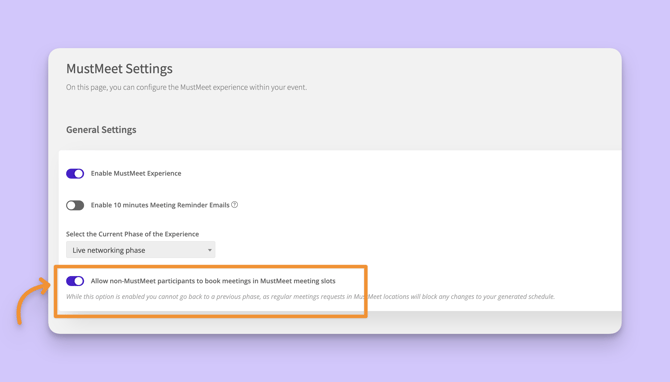
Should you choose to at the Live Networking phase, you can enable the option to show these MustMeet slots to all event users. Now normal users can book meetings in any available slots, even if they were originally intended only for MustMeet meetings.
If you do choose to enable this option, please note that you will be prevented from going back to any of the previous MustMeet phases unless you disable the toggle once more. This is because there is now potential for regular meetings to block MustMeet slots, which will prevent a new schedule being created. If you want to go back and regenerate the MustMeet schedule, you need to be certain that there are no clashes, and all MustMeet slots are available.
FAQs
What happens if I have chosen to allow MustMeet locations to be visible to regular attendees, then I want to return to one of the earlier phases to change my MustMeet schedule?
If the setting has been turned ON, you’ll need to switch it OFF again first, to be allowed to return to one of the earlier phases. Make sure that no regular meetings have been booked in the MustMeet slots.