How to scan badges using the mobile app
Event app enables participants to scan QR codes on badges and, depending on event settings, export data through the web platform. This guide explains how to locate your own QR code, scan other participants’ badges and view or export your scan data.
Using the event’s mobile app, you can quickly scan an event participant's QR code via the event platform and, depending on permissions set by event organiser, export the data through the web platform.
In this guide, we’ll explain how to scan badges, find your own QR code, and export your badge scans.
In this article:
- How to find your QR code
- How to Scan a Badge in the App
- Viewing Your Scan Lists and Exporting Badge Scans
- FAQs
How to find my QR code
Follow these steps to locate your personal QR code in the mobile app:
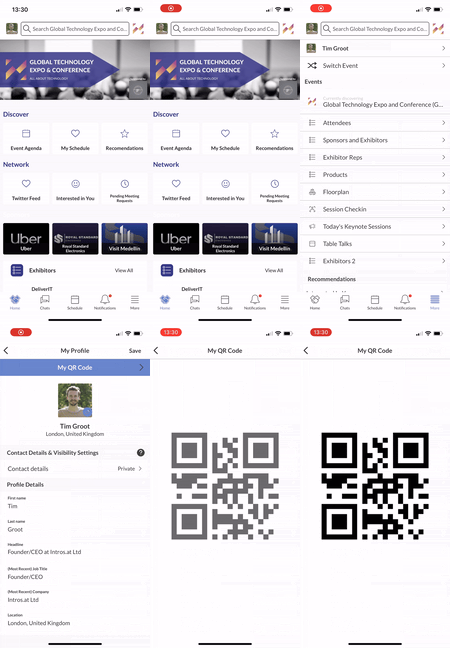
- Step 1: Log in and go to the "More" section in the mobile app’s main menu.
- Step 2: Tap on your profile image at the top left-hand corner.
Here, you’ll find your QR code, which others can scan to connect with you.

How to Scan a Badge in the Mobile App
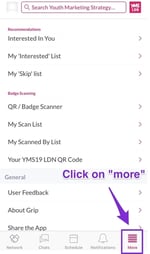
- Step 1: Log in and access the "More" section.

- Step 2: Select "QR / Badge Scanner"

- Step 3: Start Scanning
- When you tap "Badge Scanner", the app will activate your device’s camera. Ensure the app has permission to use the camera.
- Hold the badge in front of the camera. The scan will begin automatically.
- A green box will appear around the QR code to indicate a successful scan, along with a confirmation message.

- You can tap on the participant’s name to view their profile, but a connection will be automatically created regardless.
Additional Notes:
-
The mobile app is optimized for rapid badge scanning, allowing multiple scans with minimal delay.
-
If an error message appears (e.g. no scanning permission), this may be due to restrictions set by the event organizer based on event participant type. Contact the organizer for clarification.
What happens when you scan a badge while being offline:
No data is lost in this action. Offline badge scanning and lead capture ensures:
-
Key features:
-
offline scan visibility: users can easily identify scans captured while offline through a dedicated offline badge scan list within the My Scan List view
-
timestamps for offline scans: each offline scan displays a clear timestamp, helping users track exactly when the scan occurred
- placeholder attendee details and lead qualification: For each badge scanned while offline, you can assign a temporary attendee name to ensure clarity until internet connectivity is restored. During offline use, it's also possible to assign lead scores, add comments, and tag team members directly to each scan.
-
automatic syncing: when the device reconnects to the internet, all information added while offline will automatically sync, and any temporary attendee names will be updated with the actual profile names.
.png?width=670&height=377&name=teams%20switch%20(33).png)
-
-
Viewing Your Scan Lists and Exporting Badge Scans
My Scan List
This section of the app displays all the event participants whose badges you have scanned. While you cannot export data directly from the mobile app, you can typically export your badge scan data from the web platform, depending on the event organizer's settings.
Scanned By List
This list shows you who has scanned your badge during the event.
Exporting Your Badge Scans
The ability to export badge scans depends on the event configuration. To check if exporting is available:
Exporting your badge scans depends on the event’s configuration. To check if exporting is available:
- Log in to the event’s web platform.
- If you have access to the My Teams feature, you can find more information on exporting scans here.
- If you do not have access to My Teams, visit the Meetings and Connections Exports Guide.
FAQs
Does the mobile app work offline if Wi-Fi or data isn't available for lead retrieval?
Yes, participants can still scan other participants' badges offline. The badge scanning feature stores data locally and syncs it once the device reconnects to the internet.
Does the mobile app store the barcode or lead if it isn’t verified at the time of the scan?
Yes, the mobile app stores the barcode locally and will retry the verification once the device reconnects to the internet.
How do exhibitors access leads in the mobile app, and who can view them—only the lead owner or all team members?
Exhibitors can access leads through the "Leads" section in the My Team portal on the web app. This section displays profiles of individuals who have shown interest, connected, or interacted with team members or the company profile. All team members have access to this information.
Can I scan a company or product?
Yes, you can scan QR codes for exhibitors or products. Scanning these codes adds them to your Interested List rather than creating a direct connection. You can access these profiles from your My 'Interested' List or My Scan List.
How many times can my badge be scanned?
Your QR code can be scanned multiple times by anyone with the appropriate permissions. There is no limit to how many times your badge can be scanned.
Where can I find my own QR code for badge scanning?
To find your QR code, go to the "More" section in the mobile app and select "My QR Code." This is the code other event participants will scan to connect with you.
How do I find the QR code of colleagues?
To access a colleague’s QR code, ask them to go to the "More" section in the mobile app and select "My QR Code." They can then share this code with others for scanning.