- Changing the Booth Color on the Floorplan
- Adding Pavilions
- Deleting a Booth from the Floorplan
- Moving a Company to a Different Booth
- Removing a Company from the Floorplan
- Manually Adding an Entirely New Booth
- Manually Adding an Entirely New Stage
- Helpful ExpoFP Support Articles and Best Practices
Intro to Interactive Floorplans
Changing the Booth Color on the Floorplan
You can change the color of a booth directly in ExpoFP. Check out the gif below to see how. You can use a color from the pallet, or a specific hex color code..gif?width=670&height=377&name=UpdatingBoothColor%20(1).gif)
To change all booths with the same availability status, click on the grouping icon to the right of the color swatch in the toolbar shown in the screenshot below, then change the color as shown above. 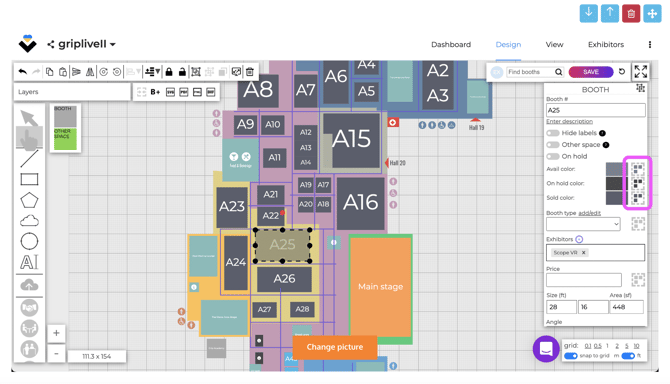
Adding Pavilions
To add additional pavilions to your floorplan, you can use the shape and text tools in ExpoFP. Check out the gif below to see how. 
Deleting a Booth from the Floorplan
Should you want to remove an empty booth from the floorplan altogether, you can do this by clicking on the booth in the Designer and then the delete/backspace button on your keyboard.
Moving a Company to a Different Booth
To move a Company's booth to another booth that already exists, you will need to change the Meeting Location assigned to them in the Grip Engage Admin. These changes will reflect on your floorplan shortly.
Learn more about updating a Company's Meeting Location HERE.
Removing a Company from the Floorplan
In the unfortunate event you need to remove a Company from the floorplan, you will need to do two things to address this:
- First, you will need to unassign the Meeting Location from the Company profile within the Grip Engage Admin. This will prevent people from booking any new meetings there.
Learn more about Meeting Locations HERE. If there are pending or confirmed meetings set to take place at this booth, you will also need to move them to another Meeting Location. - After, you will need to unassign the booth from the Exhibitor profile in ExpoFP. The gif below demonstrates how to complete this step.
.gif?width=670&height=377&name=RemoveProfileFromBooth%20(1).gif)
Reminder: If the Company is no longer participating in the event, you may also need to delete the Company’s profile and associated reps in the Grip Engage Admin, depending on your event’s integration settings. Please speak to your Delivery Manager to confirm.
Manually Adding an Entirely New Booth
This process is only required if you are adding an entirely new booth AFTER your Grip <>ExpoFP integration is complete.
- Create the booth on the floorplan in ExpoFP.
- View the floorplan, click on the newly created POI, and copy the specific URL from your browser.
- Create a Meeting Location in Grip.
- Add the copied URL to the Meeting Location in Grip.
See steps 2-4 in action below!.gif?width=670&height=377&name=AddURLtoLocation%20(1).gif)
Skip steps 5-8 if you are creating a public Meeting Location, like a networking lounge.
5. Create the new Company profile in the Grip Engage Admin, if applicable. If the Company profile was created via an integration, locate the profile in the Data section of the Grip Organizer Dashboard.
6. Assign the newly created Meeting Location to the Company’s profile.
7. Create the Company profile in ExpoFP outlined in the gif below.
8. Assign the ExpoFP Exhibitor profile to the newly created booth. This can be done in ExpoFP from the floorplan designer or the list of Exhibitors. The gif below shows how to assign the booth from the list of Exhibitors. .gif?width=670&height=377&name=AssigningBoothtoExhi%20(1).gif)
Manually Adding an Entirely New Stage
This process is only required if you are adding an entirely new Stage or POI AFTER your Grip <>ExpoFP integration is complete.
- Create the Stage/POI on the floorplan in ExpoFP. Ensure that the toggle for "Other Space" is on.
- View the floorplan, click on the newly created POI, and copy the specific URL from your browser. (See an example in action on the previous page called Manually Adding an Entirely New Booth)
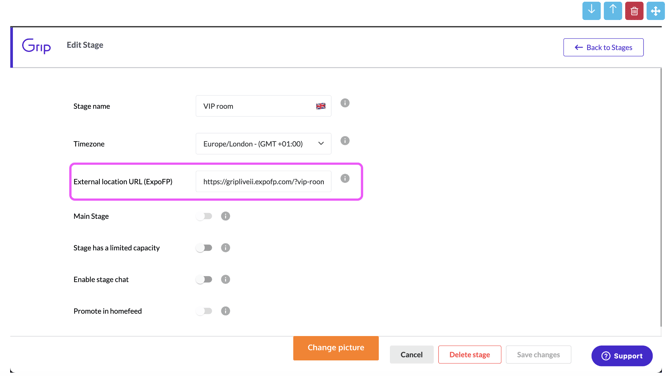
- Create a new Stage in Grip.
- Add the copied URL to the Stage settings in Grip. The External Location URL is highlighted in the image below.
Helpful ExpoFP Support Articles and Best Practices
Getting Started in the ExpoFP Designer
ExpoFP <> Grip Best Practices:
- For Companies with multiple booths, only one location can be linked in the CTA “find me at _____” button within the mobile app. The mobile app will be set to the first location in the list of locations. This is typically the first location created in the Grip Engage Admin (either manually or through an integration). If you want a different primary location than is already applied, the secondary locations will need to be deleted and recreated to push the appropriate primary location to the top spot.

- All Locations and Stages profiles must match exactly to the location/profile in ExpoFP for the linking to work properly.
- Within ExpoFP, a mouse is easier to use compared to a trackpad.
- Add every potential booth to your initial floorplan file. It is easier to delete excess booths than to add them manually later.
- Only the booth/company name populates in ExpoFP, additional Custom Profile Fields are not carried over at this time.