Please note: Analytics tables are distinct from our new insights reports, Grip Pulse.
Analytics tables are extremely powerful and can be used to:
- Take an in-depth look at data within your event
- Create custom views in order to look at specific data
- Download custom data exports
- Use tools to drill down into a specific data set
- Create graphs directly from the dashboard that can be downloaded
In this article we will cover:
Adding And Removing Columns
Re-ordering Columns
Sorting Columns
Filtering
Creating Pivot Tables
Exporting data
Adding And Removing Columns
The new feature allows you add or remove columns to allow you to see the exact data you want to see without needing to download it and manually reorder and delete columns. 
On the right hand side of the table is a popout menu that shows a list of all available columns. To see this you must have the 'Columns' tab selected and open, if you cannot see the area in the green rectangle on the image above, simply click the 'columns' tab again.
All of the columns that are currently displayed will have the boxes beside their name ticked, to add an additional column simply find the name of the column you would like to add, either by scrolling through the list or using the search function in this section.
Once a column has been added it will be added to the group in which it exists, for instance in the above example if I were to add 'Meeting Comment' this would be added in the 'Meeting Info' section of the table.
You can remove columns from the table by simply unticking them from the box on the right. You can also remove entire sections by unselecting them in this box too.
Re-ordering Columns
You can reorder columns within the table to either display data in a way that is most logical for you, order it in a specific way ahead of export, or to help with analysis.
To reorder a column hover over a column header until you see this reorder icon: 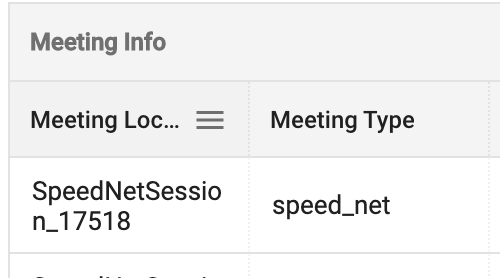
From here you can simply click and hold the header and drag it to where you want it to sit on the table. 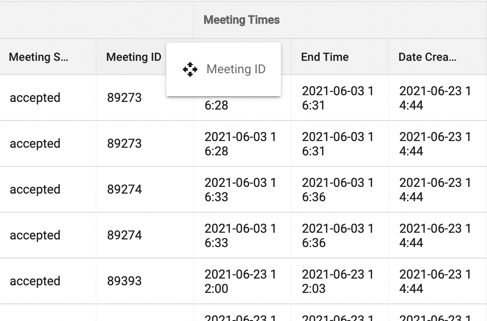
If you move the column to a different section, it will create a label of the section it is part of above it, to avoid confusion: 
In the example above, I have moved Meeting ID into the 'Meeting Times' section; it still has the 'Meeting Info' label above it.
Sorting Columns
In order to sort the table based on a column, simply click on the column header.
On first click, the column header will display the up arrow and sort the column from smallest to largest for numbers, A-Z for words, and earliest to latest for dates.
On second click, the column header will display the down arrow and sort the column from largest to smallest for numbers, Z-A for works, and latest to earliest for dates.
Filtering
There are two ways of filtering on the table:
Using the column headers
Simply hover over a column header until you see this icon:
Simply click the icon and the the filtering menu will appear: 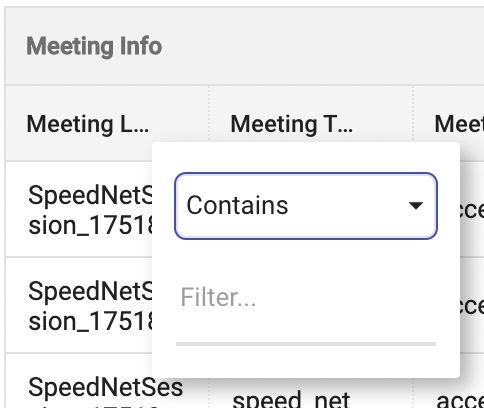
From here just choose from the options in the dropdown that best describes what you want to filter against:
- Contains - The data contains the value entered
- Not Contains - The data does not contain the value entered
- Equals - The data exactly matches the value entered
- Not Equal - The data does not match the value entered
- Starts With - The data begins with the value entered
- Ends With - The data ends with the value entered
You can choose two filters per column which can be added as either:
- AND - The data shown will match both filter values simultaneously
- OR - The data displayed will match one or both filter values
Using The Filters Tab
In addition to filtering using the column headers within the table, you can filter using the filters tab on the right hand side of the table.
This offers the same functionality as using the column header to filter, but also allows you to create filters for the table against columns that are not in the table.
Copy and paste data directly from the data view
You can copy and paste data directly from the data table and insert this into a spreadsheet. Simply, drag over the data you want to copy, click copy (ctrl c) and paste into a spreadsheet (ctrl v).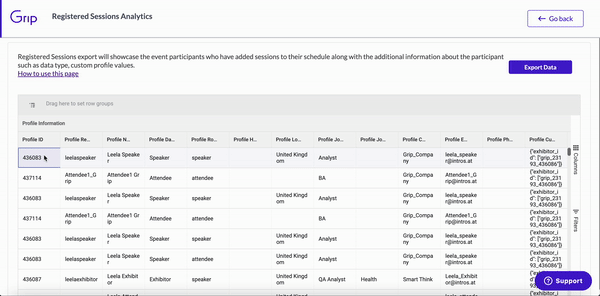
Creating Pivot Tables
In order to create a pivot table, you must select the 'pivot mode' in the right hand box. 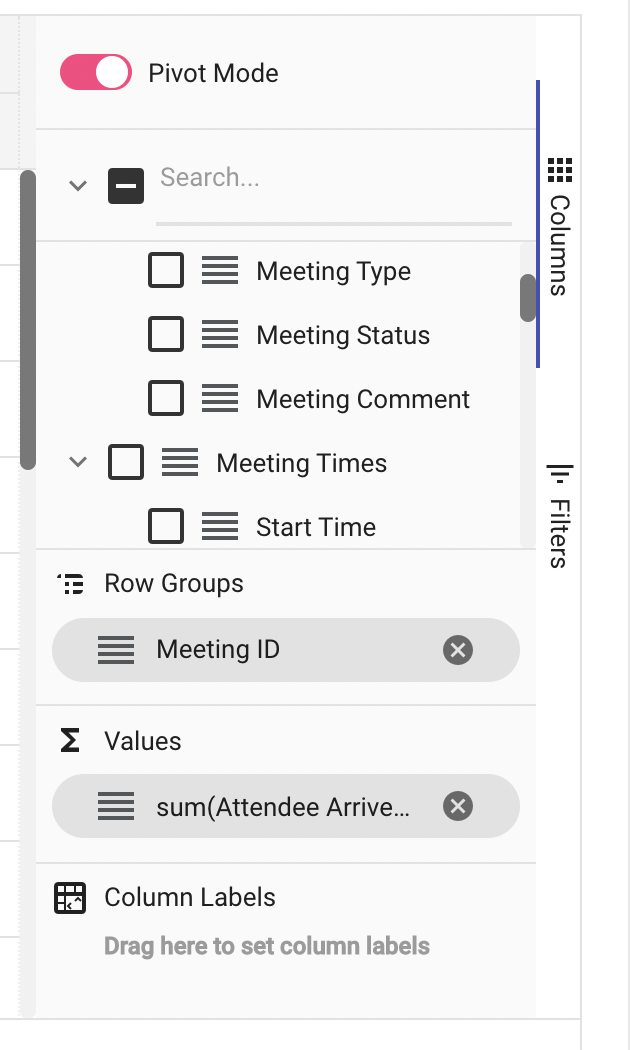
From there select the values you want to display in your pivot table from the columns list.
Select the row groups by dragging the desired columns to the 'Row Groups' section and choose the values that you want to add to the pivot table by dragging the values you want to display to the 'Values' section.
Exporting data
The key thing to remember about exporting data from the Analytics Library is that it will export the current view you have set within the table - so whatever columns, filters, ordering etc you have set in the table is how the export will appear.
You can also click 'Export all Columns' where you can choose to download as a CSV, or Excel file with all available data. 
Analytics Data tables
Stream Views
At Grip, we measure and track the engagement of users that engage with embedded sessions on Grip.
The stream view table is a list of the participants who engaged with the session from three different areas on the platform, the main stage, the session page and the home page when a session is promoted. 
The export will include the following fields:
- User Profile ID
- Viewers Name
- Session ID
- Session Name
- Time and Date Open
- Time and Date Close
- Session Type
- Source
- Data Type Name
- Phone Number
- Company Name
- Total View Duration (seconds)
Stream views key definitions:
Open Events:
Session Page, Home Page with sessions and sessions that are promoted when opened from any of the available navigation pages:
-
Session Agenda Page.
-
Session Link.
Close Events:
Navigate away from the session page using any of the navigation buttons available on the web page:
-
Logout.
-
Navigating away from the session and therefore no longer watching the session page.
-
Profile Links - Users selecting to view a profile.
-
Sponsorship Banners - Users.
Live Stream: Steaming Live Content.
On-Demand: Recorded Content.
Source: This is the place of the views from where the participant has come from to view the session.
The three sources:
- Main Stage.
- Session Page.
- Home Page (when a session is promoted).
Registered Sessions
Registered Sessions export will showcase the event participants who have added sessions to their schedule along with the additional information about the participant such as data type, custom profile values.
| Category Group | Analytics Data Field Name | Description |
|
Profile Information
|
Profile ID | This is a unique profile ID of the user that is generated by Grip |
| Profile Registration ID | This is the Registration ID usually defined by the event organizers or registration system | |
| Profile Name | This is the profile name of the user | |
| Profile Data Type | This is the data type that is associated with the user, configured during event set up | |
| Profile Role | Profile Role will be one of two values. Speaker or Attendee. As part of the event set-up, speakers are assigned to a session where they become a speaker. The attendee is the user who has added the session to their schedule. | |
| Profile Headline | Headline of the User Profile | |
| Profile Location | Free text field location of the user profile | |
| Profile Job Title | Free text field job title of the user profile | |
| Profile Job Industry | Free text field Job Industry of the user profile | |
| Profile Company Name | Free text field Company Name of the user profile | |
| Profile Email | Profile Email us unique to the users profile | |
| Profile Phone Number | Free text field Phone number of the user profile | |
| Profile Custom Fields | Nested JSON format of all the profile custom field values associated with the user profile. | |
| Profile Last Login | This is the last time that user has logged into the event | |
| Profile Active | This is an indication if the user is active | |
| Profile Feedback | If the user left feedback of a session, this is where you will be able to see it. | |
|
Session Information
|
Session ID | This is the unique session ID that is generated by Grip |
| Session Registration ID | This is the Session Registration ID usually defined by the organizers or registration system | |
| Session Name | This is a Name of the session | |
| Session Location Name | This is the stage name of where the session is taking place | |
| Session Track Name | This is the Track name that is associated to different sessions. A track can be assigned to more than one session. | |
| Is Time Blocking | This will indicate if the session that the user has added to their schedule has "Is Time Blocking" enabled | |
| Is Required Attendance | This will indicate if the session that the user has added to their schedule has "Is Required Attendance" enabled | |
| Is Mandatory | This will indicate if the session that the user has added to their schedule has "Is Mandatory" enabled | |
|
Session Sponsor Information
|
Session Sponsor Profile ID | If the session that the user has added to their schedule has a sponsor associated with it, the Profile ID of the Sponsor will be indicated here. |
| Session Sponsor Profile Name | If the session that the user has added to their schedule has a sponsor associated with it, the Profile Name of the Sponsor will be shown in this field. | |
|
Date Information
|
Date and Time Start | This is the start date and time of the session, defined and configured by the event organizer during the event set-up. |
| Date and Time End | This is the end date and time of the session, defined and configured by the event organizer during the event set-up. | |
| Timezone | This is the Timezone of the session, defined and configured by the event organizer during the event set-up. | |
|
Custom Profile Field Information
|
Company Size |
Grip allows participants and exhibitors to interact and connect with the RIGHT people at events. We get this recommendations data from your event participants using the platform, from attendees to exhibitor representatives.
There are a few ways this data can be input, participants can input data when first logging into the platform or this data can be gathered ahead of them logging in (for instance, during the registration process) and either manually input or uploaded through an API. This data entry uses Custom Profile Fields that you set up when creating an event. These are essential all the information that you want to know about the people, companies, or items within your event. Our AI then takes that data, learns from it and kickstarts into action, giving you extremely personalised recommendations. To simplify the above, Custom Profile Field data is used to create instant matches, recommendations, all using our proprietary AI. To learn more about Custom Profile Fields, click here. |
| Company Type |
Event Program
Event Program export will include all data relating to the sessions that have been configured for an event. This will include but not be limited to Session Name, Session Description, Start Time, End Time, Is Session Mandatory, Session Time Blocking and much more.
| Category Group | Analytics Data Field Name | Description |
|
Config Information
|
Application ID | This is the Application ID that is generated by Grip. |
| Event ID | This is the Event ID of the event that is generated by Grip. | |
| Session ID | This is the unique session ID that is generated by Grip. | |
| Session Registration ID | This is the Session Registration ID usually defined by the organizers or registration system. | |
| Session Location ID | This is the stage ID of where the session is taking place. | |
| Track ID | This is the Track ID that is associated to different sessions. A track can be assigned to more than one session. | |
| Session Sponsor Profile ID | If the session has a sponsor associated with it which is added as part of the event set-up, the Profile Name of the Sponsor will be shown in this field. | |
| Session Speaker IDs | As part of the event set-up, speakers are assigned to a session where they become a speaker. The User Profile IDs of the speakers will be listed here. | |
|
Session Information
|
Event name | This is the event name. |
| Session Name | This is the name of the session. | |
| Session Location Name | This is the stage name of where the session is taking place. | |
| Track | This is the Track name that is associated with different sessions. A track can be assigned to more than one session. | |
| Description | If a description of a session is added as part of the event set-up you will see it here. | |
| Session Sponsor Profile Name | If the session has a sponsor associated with it, the Profile Name of the Sponsor will be shown in this field. | |
| Session Speaker Names | As part of the event set-up, speakers are assigned to a session where they become a speaker. The User Profile IDs of the speakers will be listed here. | |
| Is Mandatory | This will indicate if the session that the user has added to their schedule has "Is Mandatory" enabled. | |
| Max Participants | This will indicate if the session that the user has added to their schedule has "Max Participants" enabled and what the number is. | |
|
Date Information
|
Date and Time Start | This is the start date and time of the session, defined and configured by the event organizer during the event set-up. |
| Date and Time End | This is the end date and time of the session, defined and configured by the event organizer during the event set-up. | |
| Session Location Timezone | This is the Timezone of the session, defined and configured by the event organizer during the event set-up. | |
|
Content Information
|
Livestream URL | If the session has a Live Stream URL added as part of the session configuration it will be available here. |
| Recording URL | If the session has a Recording URL added as part of the session configuration it will be available here. | |
| Content URL | If the session has a Content URL added as part of the session configuration it will be available here. | |
| Standard URL | If the session has a Standard URL added as part of the session configuration it will be available here. | |
| Session Deep Link | If the session has a Session Deep Link added as part of the session configuration it will be available here. | |
|
Aggregable Values
|
Number of Attendees | The total number of attendees who added the session to their own schedule. |
| Good Ratings | For those that added the session to their schedule and they provided feedback of Good Ratings this will be available here. | |
| Bad Ratings | For those that added the session to their schedule and they provided feedback of Bad Ratings this will be available here. | |
| Did not Attend | For those that added the session to their schedule and they provided feedback that they did not attend this will be available here. |
Lead & Teams Insights
The Lead & Teams Insights tab provides organisers with dedicated reporting on exhibitor engagement, lead activity, and Teams usage across your event. It gives you deeper visibility into how attendees and exhibitors interact within the platform, going beyond raw data exports into actionable engagement metrics.
| Inbound leads | The total volume of leads generated for exhibiting companies, including how those leads were acquired (profile views, interest swipes, badge scans, connections, and meeting requests). |
| Lead Qualification Usage | Tracks how actively team members are qualifying their leads - including how many leads have been scored, tagged, or had qualification answers submitted. This helps you understand which exhibitors are getting the most value from the lead retrieval features. |
| Team Member Engagement | Shows activity levels per team member, including logins, leads reviewed, and meetings scheduled. Useful for identifying highly active representatives and teams that may need support or encouragement. |
| Lead Conversion Behaviour | Measures how leads progress through the pipeline — from initial interest or connection through to meeting scheduled. This allows you to see which exhibitors are converting engagement into meaningful outcomes. |
| Plan Adoption and Activity | Breaks down usage by Basic and Pro Lead Retrieval plan, showing which exhibitors are on each tier and how actively they are using the features available to them. This supports conversations around plan upgrades and demonstrating ROI to exhibitors. |
To access the Insights tab, navigate to Grip Engage Admin > Grip Teams > Insights.