In this article, we will give you an overview of the Emails page, and outline how you can use the Email feature within the Grip Engage Admin.
Grip email consists of
- Campaign Emails
- Automated Emails
Campaign emails are completely customizable, and are created by the Event Organizer in order to be sent out to users once the platform is configured and launched.
Automated emails are sent out based on an attendee's actions or situation within an event. For example, reminding an inactive user to access their profile or listing attendees who have been showing interest in your profile. Other automated emails are sent for meeting request updates, or when a session has been added to a participant’s schedule and that session is about to begin.
In this article, we will cover:
- Campaign emails
- Automated emails
- Email logs
-
The email logs table
- Email Actions
- Using the email logs table
-
- Organizer email settings
- Chat message emails
- Email security
- SSO email differences
- Unsubscribes
- Spam guidelines
- FAQs
Campaign Emails
A campaign is a customizable email that you can send to as many participants in your event as you like. The most common usage at Grip is for a ‘welcome email’ - which is usually the first email that your participants receive and contains their initial credentials and a link to log in to the event. However, with our email designer, you can create emails for any purpose you like!
To access the Campaign emails on the Grip Engage Admin, click on Engage -> Emails.
Campaign emails have their own dedicated article as they’re very powerful - see here.
Automated Emails
Automated emails are sent to an individual for actions such as meeting requests; meeting reminders; session reminders; chat messages or password reset emails.
To access the Automated emails on the Grip Engage Admin, click on Engage -> Emails.
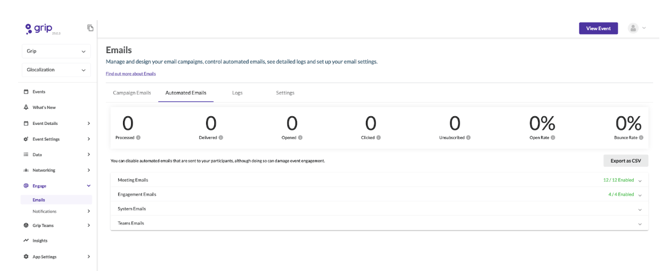
Email statistics for the automated emails are available on this page and are exportable (note that these statistics are separate from those of Campaign emails). Here you will see your processed, delivered, opened, and clicked emails, along with the total number of unsubscribes, the email open rate, and the bounce rate. Check the tooltips for an explanation of what these refer to.
Below that is a table displaying all of the available Automated Emails, along with their individual metrics, controls for turning certain emails off and on, and an option to preview them.
Automated emails are split into three different types:
- 'Meeting Emails'. These are, quite obviously, emails to do with meeting interactions within events - each has a description to explain its usage. If the toggle beside an email is enabled, event participants will receive that type of email notification.
- 'Engagement Emails'. Like meeting emails, engagement emails are sent to participants within the platform based on their engagement in the event, as explained in the email descriptions.
- ‘Teams Emails’: These are also engagement emails, but triggered via actions from the Teams portal. Some cannot be disabled as they are crucial to functionality, like invite notifications.
- ‘System Emails'. Unlike meeting emails & engagement emails, these emails cannot be enabled/disabled. These essential emails are sent based on the event participants’ actions regarding their login/credentials updates or changes.
Email Logs
The email logs page is a great way to interrogate our email system in order to see specific information about an email’s journey or attendees’ engagement. You can see information about any emails sent from this event, whether they are Automated or Campaign emails.
Please note: Grip is limited by the information from our email provider that we have access to. This results in some restrictions on the way that data can be viewed and exported.
The email logs table
On the Logs tab, you can see a table, which when loaded will pull the most recent data from the email system. There are six columns:
|
Name |
Description |
Notes |
|
Email Address |
The email address of the recipient to whom we attempted to send the email. |
|
|
Date |
The date that the log action was created |
|
|
Time |
The time that the log action was created |
|
|
Email Name |
The name of the email that the action relates to |
This includes the Automated Emails as well as any Email Campaigns created within the event |
|
Action |
The type of action that was recorded |
See below for a list of Actions |
|
Action Details |
Any available further details about the action |
For ‘Clicked’ we can see the exact URL that was clicked. For ‘Bounced’ we can see the reason given for a bounced (failed to deliver) email |
Actions
|
Name |
Description |
|
Accepted |
The email system accepted the request to send/forward the email and the message has been placed in a queue. |
|
Delivered |
We sent the email and it was accepted by the recipient email server. |
|
Bounced |
The email failed to be delivered to the recipient. This could be for a number of reasons and could be temporary or permanent. For example, an email can bounce due to a full inbox, and then be successfully delivered later. |
|
Opened |
The email recipient opened the email and enabled image viewing. |
|
Clicked |
The email recipient clicked on a link in the email. We can also see the URL that was clicked. |
|
Unsubscribed |
The email recipient clicked on the unsubscribe link within a sent email. |
Using the email logs table
You can browse the actions that are recorded, or use the column filters to narrow down the results. We can display up to 300 rows per page, and you can use the buttons below the table to move to another page if one is available.
You can also export the available information that is being displayed by clicking the ‘Export current page’ button.
Please note: due to limitations in the data that we can retrieve from our email supplier, you can only export the current page of data that you’re looking at. Be sure to check whether other pages of data are available if you’re looking for a large range of data.
Example 1: You want to check whether a particular person received a particular email. To do this you would:
- Filter the ‘Email Address’ to a specific attendee’s email
- Filter the ‘Actions’ column by ‘Delivered’
- Filter the ‘Email Name’ by the name of the email that you’re concerned with
Example 2: You want to export which event attendees have unsubscribed. To do this you would:
- Filter the ‘Actions’ column by ‘Unsubscribed’
- Export using the ‘Export current page’ button
- Check whether there is another page of available data using the < > buttons below the table.
- Export any other available pages of data.
- You can also see which email caused the attendee to unsubscribe by checking the ‘Email Name’ column.
Limitations
As we are retrieving external email information, there are some limitations to the functionality of this page. This is unfortunately not something that Grip can control.
- Data over 30 days old is unavailable.
- Data under 15 minutes old is not viewable (though of course will be later).
- Filters must contain complete values - so for example, you cannot search for part of an email address.
- While you can combine filters, most filters are single-select - so for example, you cannot filter by ‘Delivered’ and ‘Opened’ actions at the same time.
- You can only export the current page of data.
- We do not know the total number of returned results, so be sure to check whether there are more pages of results.
- We can only retrieve 300 results per page.
- You can only use the Time filter if you’re also filtering by Date. You can however use the Date filter by itself.
- Anonymous users will not receive any emails, they can only opt for notifications, since their IDs are not created as they log into the event without registering.
Organiser Email Settings
Under the settings tab, you will see and be able to modify your Email Domain and Support Email Address. (Please note, each time you change the email domain the email stats will rest and reflect the inserted domain data)
You will also see the ‘Enable Emails in this Event’ toggle (Please note, even when disabled, essential system emails like Password resets and Grip Teams invitations will continue to function). 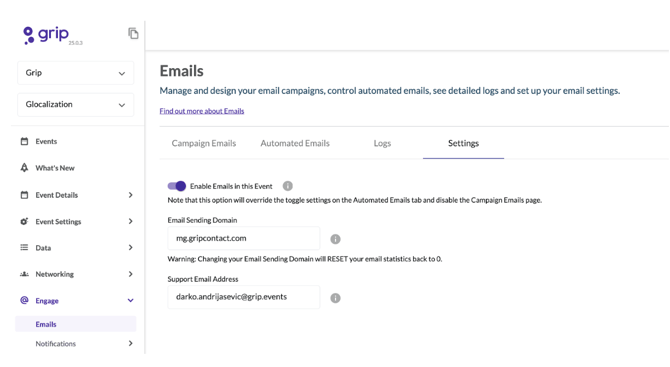
Chat Message Emails
The below grid shows when we send emails to participants about Chat messages they’ve received in an event. As you can see, they are only sent if the recipient is on the web platform and has not used the mobile app, due to the fact that mobile app users are expected to receive notifications on their mobile devices directly.
|
The sender of the message is using: |
Recipient Has Used Web Before |
Used iOS Before |
Used Android Before |
Send Email Chat: |
|
Web |
Yes |
No |
No |
Yes |
|
Web |
Irrelevant |
Yes |
No |
No |
|
Web |
Irrelevant |
Yes |
Yes |
No |
|
Web |
Irrelevant |
No |
Yes |
No |
|
iOS or Android |
Irrelevant |
Irrelevant |
Irrelevant |
No |
Email Security
Some actions around meetings can be taken inside emails without logging into the platform, in order to provide a seamless user experience. The only actions that can be taken are the ability to Accept or Decline a Pending Meeting. This means that if a participant forwards a “Meeting Requested” email that they personally received to someone else, the recipient of that email would be able to accept or decline the meeting on the participant’s behalf.
Beyond this specific user experience improvement, no actions can be taken without the user being logged into the platform.
SSO Email Differences
For Single Sign-On applications, there are two differences with emails:
- No pre-population of Emails and Badge IDs. This is to make sure that any sensitive information that might be stored in the BadgeID field is not exposed to end users.
- No Message and View buttons on emails. This is in line with the above change, due to being unable to pre-populate the information for seamless viewing and messaging in meetings, we've also hidden the View/Message buttons in meeting request emails.
Unsubscribes
When an attendee unsubscribes from an email at Grip, they unsubscribe from that particular category of email, within that specific event. There are several fixed categories of email at Grip:
- Campaign (sent by the Organizer via the Grip Engage Admin)
- Meeting (automated emails regarding meeting invites)
- Engagement (all other automated emails regarding participant activity)
- System (transactional emails like password resets)
For the next event at Grip the attendee is registered to, they will receive all types of emails unless they unsubscribe again.
To re-subscribe an attendee to an email category in an event, speak to one of the Grip team who will be able to manage this request with our email supplier. You should expect to provide some sort of evidence that the attendee themselves has requested to be re-subscribed.
Spam Guidelines
Email providers are consistently tightening their rules about what they consider spam. Due to this, it’s difficult to provide guidelines that work in all scenarios, as many email providers react differently to either the content or the sender domain too. Some emails will go to the spam folder in Hotmail but not to Gmail.
In general, note the following points, and try to find content guidelines for specific providers to be sure about what you’re sending, like this one from Google.
- For best results, use an email domain that has a good reputation already. Grip’s default domain has a good reputation but this can often vary, so if you’re finding emails going to spam for your attendees, consider using your own custom domain.
- Try not to send too many emails! The more marketing or non-essential emails you send, the more likely it is that your attendees will unsubscribe or start to mark emails as spam.
- Make sure that the purpose of each email is very clear, and try to keep each email’s purpose separate, avoiding mixed messages.
- Clean up your sending/attendee list regularly and check bounced addresses to ensure that you are only sending to the right people.
- Advise your attendees to add the sender's email addresses as a sender in the email client. For example, the default sending address for Grip is “noreply@mg.gripcontact.com”. The equivalent for a custom domain would be “noreply@your.custom.domain”.
- Our partner Mailgun has a great article on this subject here - of particular note is the suggestion to avoid trigger phrases used in ads - for example, “Act now”.
FAQ
How often should attendees receive the 'People are showing interest in you' automated email?
This email is triggered by 'interest' actions on your profile. We don't want to swamp attendees with emails though, so there is a sliding scale based on interaction.
For active attendees (those who have logged in to the current event at least once), we send this email when they receive the following numbers of interests: 1, 5, 15, 25.
For inactive users (those who haven't yet logged into the current event), we send slightly more frequent emails, to encourage engagement: 1, 3, 8, 15, 25.
Is it possible for recipients to send replies to emails they have received from the event?
No. Emails sent from our Grip Engage Admin must always follow the format of noreply@[emaildomainhere].com. Participants will receive an "undeliverable" auto-response if they attempt to reply. With this in mind, there are a few alternatives if you feel this would be a poor attendee experience. Should you want to utilize the Campaign Emails within the Grip Engage Admin, you can opt to include visually obvious copy, a button, or hyperlink in the email that directs participants to a functional inbox address for replies or queries. Alternatively, you could utilize your existing external email marketing tool. To send a welcome email from your own email marketing provider, you only need to include the Smart Marketing Link in any email from your marketing system as a button, hyperlink, etc to direct participants to the event platform. You can even utilize a pre-populated URL in your external welcome email to assist participants with simplifying their initial login. Learn more about pre-populating login credentials here.