Integrations with Cvent
A Native Integration between Cvent and Grip is available for Registration data, as well as for Exhibitor data.
In this guide we will cover :
If you have already set up a successful connection within the Grip dashboard, and are ready to complete the integration, we recommend reading the primary Native Integration guide.
Getting Cvent credentials
To connect to Cvent, you will need to provide the following information in your set up.
- Client ID
- Client Secret
Q. Where can I find Client ID and Secret?
1. After logging in, go to Admin page and click REST API

2. This will navigate to the API platform page. Then click the Manage API access button.

3. Create a workplace if you don’t have one, this is required to get get API credentials. You may want to name this something such as "Grip integration".

4. Invite a developer, this should be the email address of the person who has Cvent event access, and will be using the API credentials. Click the View Invitation button in the email received.

5, Follow the guidance and register a new developer. Login to the developer portal and you should be able to copy the Client ID and secret

6. We recommend you set up their own developer account with the recommended scopes (available calls):
*Note, these scopes may vary per customer account and Cvent may need to add additional scopes to the application that are not visible to the developer account.
- event/contacts:read
- event/custom-fields:read
- event/events:read
- event/events:read-sensitive
- event/events:write
- event/registration-paths:read
- event/registration-types:read
- event/sessions:read
- event/speakers:read
- exhibitor/badges:read
- exhibitor/badges:write
- exhibitor/booth-staff:delete
- exhibitor/booth-staff:read
- exhibitor/booth-staff:write
- exhibitor/eliterature-requests:read
- exhibitor/exhibitor-admins:read
- exhibitor/exhibitor-answers:read
- exhibitor/exhibitors:read
- exhibitor/exhibitors:write
- survey/standard-survey-questions:read
- survey/survey-questions:read
Connect Cvent
This section will provide steps on how to connect to Cvent. This section assumes that you have already configured API access on Cvent and have access to the required credentials.
When would I use this?
These steps should be taken as your first step to configuring a Native Integration with Cvent.
How do I use this?
Connect to Cvent.
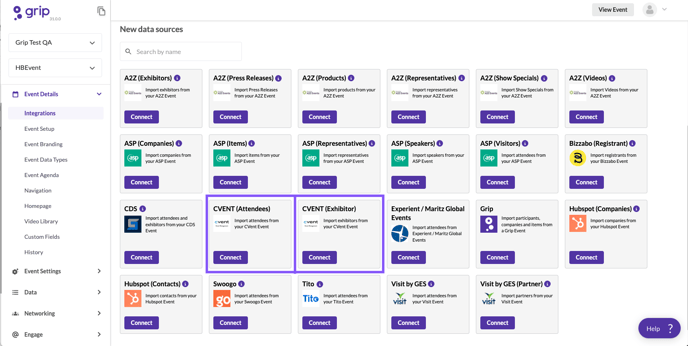
1. Click “Connect” on the relevant Cvent integration block

2. This will open a new window, where you will need to input your CVENT API credentials. Enter the Client ID, Client Secret, and the Region. The supported Regions are NA (North America) or EU (Europe).

3. After clicking next, the 'Select source event page' will now appear. Next to 'Source event', click the down arrow.
A list of available events in Cvent will appear. Select the correct one by clicking on it, or you can use the built in search function to locate the event. Once the correct event is selected click the “Next” button.
Note: Only one event can be selected at a time.

4. After clicking next, the select source data page will appear. Click the down arrow next to 'Select data type(s)'. This will present a list of the different registration types with the associated codes in your Cvent event.
Select which types should be imported into Grip. In the "select Grip data type" you will need to select which data type you wish the registration to be imported too.
Note: Only one Grip data type can be selected, if additional types are needed, additional integrations should be set up .

5. Under the section 'Only retrieve records that were created within the following period', select one of the two options:
-
- 'From the last time Grip successfully retrieved records' is the recommended option for integration that will be scheduled to run repeatedly. This will look for any new or updated records.
- 'From start time to end time' is the recommended option if you are trying to run an update and want to make sure all records are updated. The recommended start time would be when registration opened and the recommended end time would be today.
6. This has now connected the Cvent Event to the Grip event, click next and move onto filtering and data mapping.
Recommended next steps:
Pointers
Cvent Attendees
Pointer type: Last imported time
Pointer during preview (Filtering, Mapping, Preview): Yes
Check on creation time or update time: Creation or update time
Data type filtering: Yes
Time window filtering: Yes
Cvent Exhibitors
Pointer type: Last imported time
Pointer during preview (Filtering, Mapping, Preview): No (Cvent Exhibitor doesn’t filtering with time)
Check on creation time or update time: N. A.
Data type filtering: No
Time window filtering: No