Navigation Items are menu items that act as a quick links to allow event participants the ability to easily navigate the Networking Platform. Navigation Items allow you to create a customized menu side-bar that appears on the Web and Mobile App platforms. Navigation Items can be a Native List, an Email, or a Web URL.
- Navigation Page
- Creating and Editing Navigation Items
- Reordering Navigation Items
- Navigation Items - MustMeet
- Including non-standard event platform pages
- Platform Examples
- FAQs
Navigation Page
To start, you can find the Navigation page under the Event Details menu on the Grip Engage Admin.
Once you land on the Navigation page, you will notice that there are some pre-populated Navigation Items. These are the Grip standard Navigation Items that appear if the Navigation Items haven't been set up yet. These pre-populated items can be removed, edited, or reordered.

The Navigation page is broken up into two pieces by Primary and Secondary Navigation Items.
- Primary Navigation Items are going to be displayed when the Navigation menu side-bar is expanded and when the side-bar is collapsed.
- Secondary Navigation Items only display when the Navigation menu side-bar is expanded.
Creating and Editing Navigation Items
To create Navigation Items for your event, please follow steps below:
In the Grip Engage Admin, under the Event Details section, select Navigation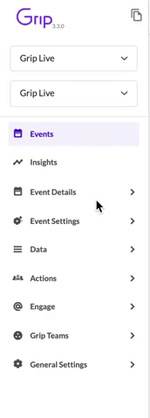
Once you land on the Navigation page, click "Create Navigation Item"

*If you would like to edit an existing Navigation Item click the pencil next to the desired Navigation Item
-
- Navigation Item Name
- Placement (Primary or Secondary)
- Item Type which include:
- Event Agenda: creates a comprehensive or pre-filtered view of your event’s agenda. This will only display if your event has sessions in the platform.
- Floorplan: requires an ExpoFP premium interactive floorplan. For all other 3rd party floorplans, see the URL Navigation item below.
- Main Stage: highlights the content streaming on the virtual Main Stage.
- Meeting: creates a filtered view of a participant’s meeting activity. Two options: Scheduled meetings or Pending meetings.
- My Schedule: consolidates all Pending and Scheduled Meetings, in addition to Sessions the participant has added to their schedule.
- Native List: Creates a list of profiles (Participants, Companies, and/or Items) that users can scroll through and filter. These lists can be customized to meet the event’s visibility needs. You can also use Custom Groups to further refine the profiles displayed in the list.
Please note, the mobile app currently supports only the list view. - Network: showcases profiles that are recommended for the participant to connect with, the participant has made a preference on or has received interest from.
- Speed Networking: highlights any Speed Networking sessions on the agenda
- URL: Integrates external links directly into the Event Platform by embedding content or linking out to external pages. Additionally, utilize Custom Profile Fields to automatically create personalized URLs for each participant. Alternatively, use the Email address sub-type to allow participants to quickly send emails with pre-populated email address and subject lines.
- Video Library: centralizes Video Library content organized by Video Groups.
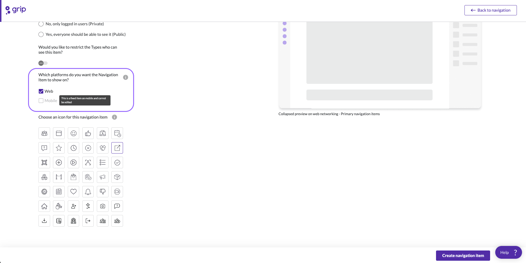
- After you choose to create or edit a Navigation Item, a builder module will be displayed where you can choose the elements of your Navigation Item
You must select:
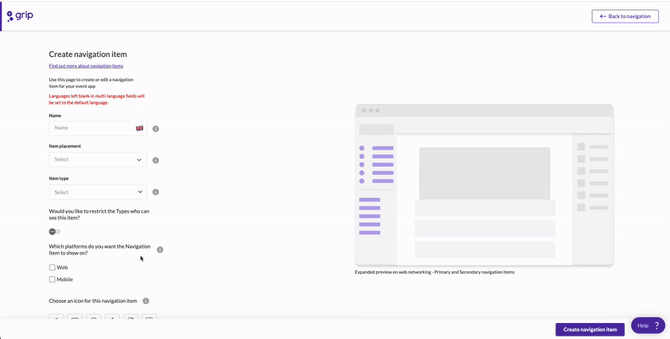
- After you have filled out all of the information about your Navigation Item, click "Create Navigation Item" to save your changes.
- You will now see your custom Navigation Item under the Primary or Secondary Navigation Items table
Please note that the translation of navigation item names is currently unavailable on our mobile apps.
Reordering Navigation Items
Once the Navigation Items have been created, you are able to customize the order in which they appear in the platform. To do this, simply click and drag the Navigation Item to your desired spot.

Navigation Items - MustMeet
When the platform is set up as a MustMeet event, the functionality of the Navigation Page slightly changes.
- When MustMeet is enabled, the Navigation Items set up as Network > Interested and Network > Skipped (Field: Item Type being Network. Field: Profile Filter being Interested/Skipped) will be where the Meet (Interested) and No Thanks (Skipped) limits are displayed.
- The "My Must Meet List" and "My Meet List" will automatically be populated based off of the Navigation Item set up as Network > Interested. The "My No Thanks List" will automatically be populated based off of the Navigation Item set up as Network > Skipped.

 *An information toaster will display for MustMeet events when creating/editing Navigation Items as shown above
 - The naming convention of the Interested and Skipped Navigation Items cannot be changed for MustMeet and will be displayed as the names below:

Including non-standard event platform pages
Some pages within the event platform are not pre-built as navigation items but may still be valuable for your event, depending on its features and format. To make these pages easily accessible, you can create a navigation item using the respective page’s URL.
This is especially useful for browser-exclusive features that you want to integrate into the mobile app. By using Seamless Handoff with URL Navigation Items, participants can access these pages directly within the app and will be automatically logged in when opening event platform URLs.
Example use-cases:
- Editing your profile
- Managing meeting availability
- All features within "My Team"
- Event data exports
- And other advanced functionalities
- Log Into the Web Platform: Open your web browser, navigate to the event platform, and log in to access the administrative functions.
- Locate the Feature's Web Page: Navigate to the specific page that hosts the feature or function you wish to include in the mobile app.
- Copy the Feature's URL: From your web browser’s address bar, copy the URL of the page.
-
For the best user experience, when creating a "My Team" navigation item, replace the last portion of the URL with "create".
For example, instead of using:
🔗
https://matchmaking.grip.events/[systemname]/app/teams/homeUse:
✅
https://matchmaking.grip.events/[systemname]/app/teams/createThis ensures that event participants can access the feature, regardless of their previous "My Team" status. To prevent confusion, this item should only be visible by data types that have the ability to join a Team.
-
- Create a Navigation Item:
- Go to the Grip Engage Admin.
- Under the Navigation settings, create a new Navigation Item, select 'URL' as the type and 'Website URL' as the sub-category.
- Paste the URL copied in the previous step into the Website URL field
- Optional: Enhance Accessibility with a Homepage Block:
- For even more convenient access, consider adding a Homepage block in the mobile app.
- This block can link directly to the newly created internal page, making it readily accessible right from the app’s main screen.
Platform Examples
Navigation Menu Expanded

Navigation Menu Collapsed

FAQs
Q: I’m trying to add a Navigation Item, but it’s greyed out with the message “This is a fixed item on mobile and cannot be edited.” Why can’t I enable some Navigation Items for the mobile app?
A: Certain key features are included in the global menu of all event mobile apps, preventing duplicate Navigation Items. This locked menu includes:
-
- Home Page
- Chats: This replaces the Connections list. If an event participant hasn't made any connections on the platform yet, the 'Chat' section will show 'Start Networking' as the first option. This directs them back to the homepage to explore and find others to interact with. This feature cannot be changed.
- Schedule: This includes both 'My Schedule' and 'Event Agenda.'
- Notifications
- More: This section includes 'Interested in You,' 'My Interested List,' 'My Skip List,' all Badge Scanning pages, and 'My Calendar Sync,' if applicable.

Please note, you can still create Homepage blocks with the above items to display them more prominently within the mobile app.
Q: Under the Navigation Items menu in the Grip Engage Admin, what does "Private" mean under Widgets visibility?
A: The "Private" setting controls whether a navigation item added under Widgets in the Grip Engage Admin will be visible when the Widget is embedded on an external website.
By default, certain items—such as the event agenda, company list, or speaker list—are included in the Widget view. If a navigation item is marked as Private, it will not appear in the embedded Widget, even if it is visible within the main event platform.