Networking and booking meetings are often essential aspects of any event experience. On the Grip Engage Admin, you can set up meetings by navigating to Networking/Meetings. There are three key pages:
- Meeting List: Displays all meetings scheduled for your event.
- Meeting Locations: Where initial meeting configurations are made, such as time zones, meeting times, and limits. This section also defines where meetings take place, such as exhibitor booths or designated meeting areas.
- Meeting Feedback: This page allows you to configure feedback for meetings held during the event.
ProTip: We recommend setting up at least one general meeting area for participants who don't have an assigned meeting location.
If you're looking for Global Meeting Settings (e.g., Multi-User or Instant Meetings), you’ll find these options on the Event Setup page.
Table of Contents
- The Meetings List Page
- The Meeting Locations Page
- How to Manage Availability Calendar for Event Participants
- The Meeting Feedback Page
- FAQs
The Meetings List Page
-
Navigate to the Meeting List
Under the Networking tab, click Meeting List to view all the meetings in your event. -
View, Sort, and Filter Meetings
You can see all meetings (accepted, declined, or pending) and sort or filter the table by clicking the columns. Use the Search field to quickly find meetings involving specific users or companies. Note that search results will match only the visible columns. -
Show or Hide Columns
More columns are available but not shown by default. To adjust the view, click the Columns button on the right-hand side.
-
Meeting Stats Panel
On the right-hand side, the Meeting Stats panel shows a quick summary of meetings by status (accepted, declined, pending, etc.), helping you analyze the status of all meetings.
-
Create a Meeting on behalf of a Participant
To create a meeting for a participant, click the Create Meeting button, fill out the required fields, and click Save.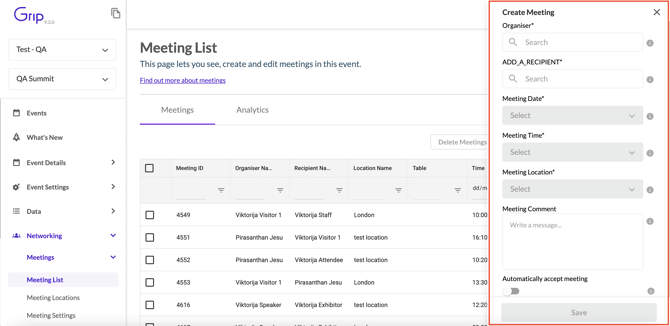
- Note: If you create a meeting in the past, participants will not be notified to avoid confusion.
- Personal Messages: You can add a message to the meeting, but it cannot be edited after creation to protect event participant privacy.
-
Create Multiple Meetings
Click Create Multiple Meetings to set up several meetings at once. Add the organizer and recipients, then click Add Meeting to include additional recipients. The default meeting length will be auto-populated based on shared availability.-1.gif?width=600&height=310&name=ezgif.com-video-to-gif-converter%20(1)-1.gif)
When you create multiple meetings it will auto-populate the meeting organizer and recipient(s) schedules in the default meeting length (more on this in the Meeting Settings section) that they share. You can then go into the individual meeting and change this to a specific time if needed. Within the event platform the organizer or recipient(s) can also request new meeting times. -
Delete a Meeting
Select the meeting(s) by checking the box and click Delete Meetings to remove them.
-
Edit Meeting Details
Click on a meeting to update its details, change attendees' statuses, or mark participants as "arrived."
- Note: Modifying a meeting that has already started will not notify participants to avoid confusion.
-
View Participant Information
You can expand the Profile Preview to see detailed information about the meeting participants and control individual acceptance.
-
View Meeting Analytics
Click the Analytics tab to view detailed information about meetings, including event participant-level data such as profile fields and meeting feedback. You can sort and filter data as needed.
In this table, each row is a participant in a meeting, so that it's possible to view their actions relevent to that specific meeting. This means that there are at least two rows per meeting, to account for each participant in it.

Export Meeting Analytics
Click the Export Data button to export meeting data in CSV or XLSX format. You can choose to export all columns or only the ones displayed in the table view.
The Meeting Locations Page
The Meeting Locations page is split into two tabs: Locations and Default Location Settings.
- Locations: Displays the meeting locations within your event and allows you to create or update them.
- Default Location Settings: Set default values for locations automatically created during your event.
Locations Tab
This tab allows you to view, filter, and sort all meeting locations. To create or manage locations:
Create a New Location
Click the Create Location button to open the location configuration sidebar. Here are the key fields:
- Location Name: Enter the name of the location.
- Type: Choose between:
- General: For networking lounges or general meeting points.
- Booth/Table: For exhibitor booths, stands, private meeting areas or tables that should be assigned to a particular company or participant.
- Virtual: Available only in Hybrid events, used for virtual participants to have meetings.
-
Capacity: Define the maximum number of concurrent meetings that can take place at this location. Options include setting an unlimited capacity or specifying a table limit.
-
Using 'Tables' allows you to specify a number of tables within this meeting location, each of which can have a one meeting at once. When a meeting is Accepted at this location, a table number will be automatically assigned and be visible to participants, so they know where to go.
When using this, ensure that you label your physical meeting tables clearly, always starting from number 1.
-
-
- Note: The capacity can only be increased after setup.
-
External Location ID: If using an ExpoFP floorplan, add the location’s ExpoFP URL. - External Meeting URL: For virtual events, you can provide a custom meeting link if staff will manage the virtual room.
- Location Start & End Date: Select the availability dates for the location.
- Meeting Duration: Specify how long meetings will last.
- Meeting Breaks: Enable breaks between meetings if needed.
- Make this location available even if meeting attendee has a default location: If enabled, participants that have a booth assigned to them will be allowed to book meetings at this location, even when those times overlap.
If disabled, participants that have a booth assigned to them will only be able to book meetings at this location during times outside of their booth's hours.
This is useful if you want to priotize this location for participants that don't have their own assigned locations. - Allow data types to book meetings here by default: This controls whether this location will be added to meeting permissions for all data types by default. If disabled, this meeting location will not be added to permissions, unless you decide to add it manually via the Data Types page.
This is useful if you need to create a private meeting location while an event is already live. - Start & End Time: Set the meeting hours for each day.
- Copy Day 1 Timetable: Quickly copy the first day’s schedule to other days.
MustMeet Meeting slot configuration:
If MustMeet has been enabled at app level, this toggle will be visible. Toggling it on allows you to set MustMeet times for your location, should you be running a MustMeet event.Edit a Location
To edit a location, click on it, and the sidebar will appear.
Caution: If meetings have already been created in the location, some settings cannot be changed. All other settings are locked. All of the location's meetings need to be removed or moved to another location before certain actions like editing open times can be made.
Bulk Actions
You can select multiple locations and bulk edit them by ticking the boxes and clicking the Edit Selected Locations button.
You can also delete multiple locations using the Delete Locations button.
Default Location Settings Tab
The Default Location Settings tab allows you to configure key aspects of meeting locations, including dates, times, and meeting durations. This step is particularly crucial when importing exhibitor booths (stands), as these are often added through registration or spreadsheet uploads, rather than manually via the Grip Engage Admin.
Under the Settings tab, you can configure the following:
- Capacity: Choose between unlimited capacity or set a limit for the number of concurrent meetings or tables.
- Meeting Duration: Define the default length of meetings for the locations.
- Start & End Dates: Specify the default availability period for the meeting locations.
- Start, End Time & Breaks: Set the default start and end times for meetings, and configure any breaks between meetings. You can also create multiple time slots, MustMeet slots, or easily copy Day 1’s schedule to other days.
- Add Meeting Slots: Add additional meeting slots to accommodate different schedules. For instance, you could create two meeting periods with a lunch break in between.
Important Notes for Automatically-Created Meeting Locations:
- Automatically-created locations are always of the Booth/table type, as they are assigned to specific profiles for personal use.
- The names of automatically-created meeting locations are defined during the import process.
- Changes made to the Default Location Settings will only apply to locations created after these changes have been saved.
How to Manage Availability Calendar for Event Participants
Managing availability for meetings is a crucial feature for event participants using the networking platform. It allows users to define when they are available for meetings, optimizing their event experience. You can find more detailed instructions on managing availability on the networking platform here.-1.gif?width=600&height=310&name=ezgif.com-video-to-gif-converter%20(2)-1.gif)
Caution: This feature is currently supported on the web platform, based on the dates and times configured in the 'Default Location Settings' tab. However, there is an easy way to enable availability management for event participants through the mobile application as well.
Steps to Enable Availability Calendar via the Mobile App
-
Open the web platform
Navigate to the web version of the platform where participants can manage their profile and availability. -
Access the "Edit Profile" page
In the top-right corner, click on your profile and select Edit Profile. The URL will look something like this:https://matchmaking.grip.events/[yourevent]/app/profile/edit. -
Copy the URL
Copy the URL of the Edit Profile page. -
Create a URL Navigation Item on the Grip Engage Admin
Under Navigation Items, create a new Website navigation item using the URL copied in Step 3.
with the new seamless handoff feature, the app detects that the URL in the nav item/homepage block is also an event platform page and automatically logs the event participant in with the same credentials they used to log into the app -
Optional: Create a Homepage Block
Optionally, you can create a homepage block using the navigation item created in Step 4 for easy access.
The Meeting Feedback Page
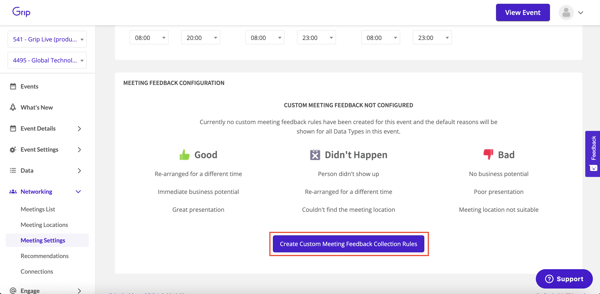
The Meeting Feedback page allows you to configure feedback options for attendees to rate their meetings. Meeting feedback helps you assess the quality of meetings during the event.
Create Custom Meeting FeedbackClick the Create Custom Meeting Feedback Collection Rules button. Choose the Rater Type and Type Being Rated, then select feedback answers (Good, Bad, Didn’t Happen) from a pre-populated list or create custom answers. Once complete, click Save.
FAQs
- Can I create multiple meeting locations for different purposes?
Yes, you can create various meeting locations, such as exhibitor booths, networking lounges, or specific meeting points, each with unique settings and availability. -
How do I edit a meeting location if meetings are already scheduled?
If there are already active meetings at the location, only specific fields can be updated. You can modify the location’s name, increase (but not decrease) the capacity, and change some other settings. All other settings are locked for editing. -
What happens if I change the Default Location Settings after meetings have been scheduled?
Changes to the Default Location Settings will only affect new meeting locations created after the changes are saved. Existing locations will retain their current settings. -
How do participants manage their availability for meetings?
Participants can manage their availability through the web platform by editing their profile. This feature allows them to set specific time slots for meetings. -
What are the meeting capacity limits for locations?
You can choose to set a limit on the number of concurrent meetings (or meeting 'tables') at a location or allow unlimited meetings based on the event's requirements. -
Can I bulk edit multiple meeting locations at once?
Yes, you can select multiple meeting locations and apply bulk edits, such as adjusting capacities or meeting times. -
How do I enable virtual meetings for my event?
Virtual meeting rooms are automatically created whenever your event is set to Virtual or Hybrid in the Event Details page, you don't need to configure this separately.
However, you can also configure virtual meeting using a different platform like Zoom, by providing an external meeting URL, and adding it in a meeting location's settings. -
How can I collect feedback on meetings during the event?
You can configure custom meeting feedback forms through the Meeting Feedback page, allowing participants to rate their meetings with predefined or custom options. -
The meeting times have changed since they were first added to the event platform. How do we update them for a meeting location with active meetings?
A: If meetings have already been booked at a meeting location, directly removing or changing the meeting location would disrupt existing meetings, causing confusion for participants. Instead, we recommend blocking delegates' availability as a workaround to prevent scheduling conflicts, or preferably, removing existing meetings and updating the locations.
-
Q: Why can’t I remove or edit a meeting location with active meetings?
A: Once participants have started booking meetings, removing a meeting location could lead to lost or invalid meetings. To avoid disruptions, the best approach is to block user's availability instead of deleting the location.
- Q: What is a 'fallback' location?
A: Locations will show as 'fallback' in the meeting locations table if the toggle "Make this location available even if meeting attendee has a default location" is enabled. This is only relevant for General or Virtual locations.
These are known as fallback locations because participants with their own assigned locations will be permitted to book meetings at this location even during times that their own location is open. For example, if they run out of space at their own stand, and need to 'fall back' to having meetings in a general area.