Table of contents:
- What are widgets?
- Widget types and use cases
- Supported content types
- How do I set up widgets
- Widgets embedding guidelines
What are widgets?
Widgets allow organizers to embed specific parts of their event platform directly into an external website. They replace the outdated iFrame method with a user-friendly, customizable integration that ensures consistency with your website’s design and layout.
There are two types of widgets available:
1. Single Item Widget
-
Embeds one specific item (e.g., event agenda or speaker list).
-
Displays content without a sidebar for a cleaner look.
-
Best for embedding content into marketing pages or blog posts.
2. Full Event Widget
-
Includes a sidebar for navigation between multiple content types.
-
Allows you to reorder or toggle items for display.
-
Ideal for creating a complete embedded event hub or microsite.
Widget types and use cases
| Widget Type | Description | Best For |
|---|---|---|
| Single Item Widget | Displays one content area (e.g. agenda) without sidebar | Landing pages, speaker/exhibitor lists |
| Full Event Widget | Displays multiple items with sidebar navigation | Event hubs, microsites, portals |
Supported content types
Widgets can be used to embed the following types of content:
-
Event Agenda
-
Pre-filtered Agendas
- Profile Lists (grid or list view) - e.g. speakers or exhibitors
-
Floorplans
- URLs
- Embeddable URL
- Website URL (just available for Full Event Widget)
Note: Content that includes personal or private information (e.g. custom user agendas, networking recommendations, or private fields) cannot be displayed in widgets for privacy and data protection reasons.
How to set up widgets
- Make content public
-
Navigate to your event platform's Navigation setup page

-
Ensure that the items you want to display in the widget are marked as Public.

-
- Access the Widgets section
- Go to Event details > Widgets

- Go to Event details > Widgets
- Configure the full event widget
- By default, you will land on the Full Widget tab
- Use toggles to enable or disable specific content areas.
- Drag and drop the enabled items to define the order in the sidebar.
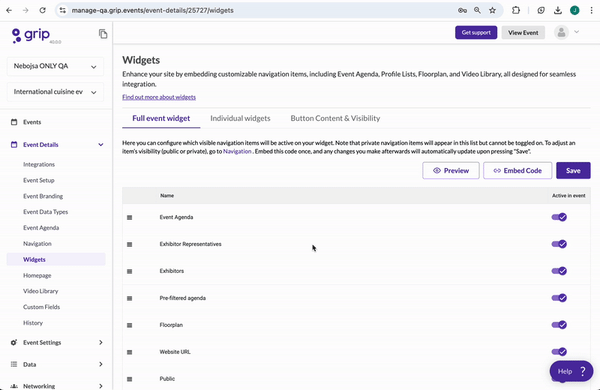
4. Preview and Save
-
-
Click Preview to view how the widget will appear once embedded.
-
If everything looks correct, click Save.

-
- Click the Embed Code button to copy the code to your clipboard.
- The code will look something like this: <iframe src="https://example.com" style="width:100%;height:100%;" frameborder="0" allowfullscreen></iframe>
- You can adjust the width and height in the code if needed
- Embed the code once - any future changes will automatically update in the widget after saving
6. Embedding an individual widget
- If you prefer to embed a single widget, first set the relevant navigation items as Public (Step 1)
- Then, go to the Individual Widgets tab, preview it before embedding, and then copy the embed code

When embedding into your website, we recommended that the iframe height is set to 100%, and the parent container is either a fixed height (e.g. 800px) or a dynamic height (e.g. 80vh). The height should not be taller than the viewport (i.e. should not be a long scrollable container), so that dialogues and popups are always visible on screen.
7. Configuring primary and secondary buttons
-
- You can control whether Primary and Secondary Buttons appear on:
- Session Details Page
- Profile Details Pages
- Toggle them on or off as needed
- Define the button text and destination link for each

- You can control whether Primary and Secondary Buttons appear on:
We recommend using one of the buttons to link to your event's Smart Marketing Link so that participants can easily log in.
Customization options
Widgets offer several customization features:
-
Sidebar Navigation (Full Widget only): Choose and order which items appear.
-
Call-to-Action Buttons: Show or hide action buttons depending on your event status or campaign goals.
-
Brand Styling:
-
Match the widget’s colors and fonts to your website.
-
An optional upgrade to remove default platform branding.
-
-
Privacy Controls: Only content marked as public can be displayed. Personal user data is never included in widgets.
Widget examples: how event platforms use widgets
Widgets are commonly used across event websites to create an integrated, user-friendly experience. Below are some typical examples of how event organizers incorporate widgets into their platforms:
-
Homepage Promotion
Embed the event agenda or speaker list directly on the homepage to give visitors a preview of what’s happening and encourage registration.-png.png?width=600&height=375&name=image%20(31)-png.png)

-
Microsites for Tracks or Themes
Use pre-filtered agenda widgets to create dedicated pages for specific topics, audience groups, or session types.-png.png?width=600&height=362&name=image%20(33)-png.png)
-
Exhibitor and Sponsor Hubs
Display searchable lists of exhibitors, sponsor representatives, or product showcases, embedded within partner or sponsor pages.-png.png?width=600&height=372&name=image%20(34)-png.png)
-
Venue and Floorplan Overviews
Embed interactive venue maps or floorplans to help attendees plan their visit or navigate on-site events.-png.png?width=600&height=373&name=image%20(32)-png.png)
-
Speaker Lineups
Showcase speakers or moderators using grid or list view widgets, linked from promotional or program pages. -
Login or Networking Landing Pages
Include call-to-action buttons in widgets that link to networking tools or login portals for attendees.
Widget embedding guidelines
Widgets automatically scale to the container size on your website. Use a dynamic height to ensure they display well across screen sizes.
Note: if you embed a widget in a very tall section, pop-ups like session details may appear lower than expected. This is because the widget centers them vertically within the total space. To prevent this, keep the widget section height reasonable.
FAQs
Q: Under the Navigation Items menu in the dashboard, what does "Private" mean under Widgets visibility?
A: If a Navigation Item is marked as Private, it will not be visible within a Widget. Only Navigation Items marked as public can be displayed externally. Personal event data—such as networking matches, personalized agendas, or custom profile fields—cannot be shown in widgets for privacy and security reasons.
Q: Can I embed multiple sections of my event into my website?
A: Yes! Use the Full Event Widget to embed several Navigation Items at once, with sidebar navigation for a comprehensive view. You can also choose to embed full event widgets in one area in your website, and single widgets in other areas - feel free to combine!
Q: Can I remove Grip branding from the widget?
A: Yes, but this is available as a paid add-on. Speak to your Delivery or Client Success Manager for more information.