The guide will explain the various steps required to set-up a native integration within Grip.
This guide is broken down into multiple sections to align with the various pages you will use when configuring your native integration.
Each section highlights:
- Which data source it applies to
- If the step is optional or required
- Examples of how to use the feature, where applicable
If you are unfamiliar with Native Integrations, we suggest reviewing each section in turn.
Recommended next section:
If you already have the API credentials and have successfully connected to the source event within the dashboard (including selecting the types to map), we recommend starting at the
Select the source data step, where you can select more than one source data to be imported into your single Grip data type, as well as set up the record retrieval start time and intervals.
If you are unsure where to get your API credentials from, want to know more about connecting to your event in the Native Integration Wizard, we recommend looking an one of the articles below. Depending on which source you are using, it will differ.
Source Articles
Kentico
Other contents:
Select Source Data feature
Filter Data feature (optional)
Modifier: Capitalize the first letter (optional)
Modifier: Cut and take a portion (optional)
Modifier: Trim whitespaces (optional)
Managing Your Integrations (optional)
Supplementary articles:
Working with Custom Profile Fields
Select Source Data step
When setting up an integration in Grip, the Select Source Data step is crucial for determining which data will be imported into your Grip platform. This step allows you to choose the specific data types from the source system and map them to the relevant Grip data types.
Once you've set up the data types, you then have a choice about where to start the integration. By configuring start times and intervals, you can avoid redundant data pulls, ensuring that only the newest and most relevant records are retrieved. This gives you a greater flexibility in terms of:
-
Manual 'pointer' input: You can manually set whether to pull data from a specific time or record, depending on the data source. This is great for targeted updates to specific sets of records.
-
View of where the last integration stopped: You are able to see the last date used or record that was pulled in the integration. This provides greater clarity on the next starting point for data retrieval. Depending on the data source, this could be the date Grip last checked for records, the timestamp on the last record that was imported, or a specific record ID - the UI will change depending on the data source chosen to make this clear.
-
Start from scratch: You can remove the existing date or ID to easily restart the integration from scratch without selecting an arbitrary early time window.
-
Enhanced mapping and filtering: Pointer and time-window settings now apply to the Filter, Mapping, and Preview steps, making mapping much easier by allowing the selection of a known sample record that has the data you're looking for. A prompt will notify users if no data is available based on the selected criteria.
Note that this depends on the data source chosen, as some registration systems don't support this kind of specificity - check the first step in the process for instructions particular to your data source. -
Display on integration detail page: The date of the last check, or the timestamp or ID of the last record imported is visible on the Integration Detail page, allowing you to access this information without editing the integration.
Troubleshooting:
- No Data Available: If no data is retrieved while you're editing the integration, you'll be given some options about how to proceed. This is usually due to no 'new' records being available based on your current settings in the Select source data page.
Consider selecting 'Retrieve all records' to temporarily ignore the settings on this page so that you can see some data in the following steps. Note that this does not remove these settings from the integration, it just allows you to continue through the steps with some sample data visible. When the integration next runs, the existing settings will be used.
- No Data Available: If no data is retrieved while you're editing the integration, you'll be given some options about how to proceed. This is usually due to no 'new' records being available based on your current settings in the Select source data page.
Filter Data step
This section assumes you have already connected to your source event, selected the source data. Please refer to the source articles otherwise.
Applies to: All Data sources
Is this step required? No
This section will provide steps on how to use the Filter Data feature on Grip Native Integrations. The Filter Data feature allows for you to select criteria to either allow or block specific records from being imported in your Grip event.
On the left hand side of the page you will see 20 example records from your datasource, and on the right hand side will be where you select which filters to use to control the data import into Grip.
This section assumes that you have already performed the following steps:
- Connected your datasource
- Selected the source event
- Selected source data
When would I use this?
- You have registrants that have indicated that they do not want to participate in Grip Engage (Grip's AI-powered matchmaking and recommendation platform).
- You have attendees that have not paid for their tickets.
- You only want to import attendees that have completed their registration.
Note: The strength of this feature depends on what information you capture during registration and what data is available from the datasource.
How do I use this?
1. Click the arrow in the drop down next to 'Select filter type'
-
- Select 'Allow' if you want to import records
- Select 'Block' if you want to exclude records
Note: If you want to not use this feature, select 'No filter', click 'Next'. Under Select field', click the drop down arrow.
3. Select the field that you wish to use from the data source. You can click the down arrow and scroll until you see the field, or use the search feature.
Note: This will need to be an exact match, so capitalisation and whitespaces must be exactly the same as what will be coming from the data source.

Note: A record that satisfies at least one of the rules will be considered to have satisfied the filtering rule as a whole.
6. Once satisfied with the filter rules configured, click “Next”
Examples of how a filter rule may help you:
|
Scenario: You have attendees that have not paid for their tickets |
|
Data from source: For example, your records may have a field called 'paid'. Attendees that have paid have the value '1' and attendees that have not paid have the value '0' |
|
How to configure Filter Data feature: Choose 'Blocklist' as the filter type and select the field 'has_paid' and add '0' to the Values section to set up the filter rule for this integration. |
|
Scenario: You only want to import attendees that have completed their registration. |
|
Data from source: For example, your records may have a field called 'registration_completed'. Attendees that have completed the registration have the value 'complete' and attendees that have not completed have a value to indicate which step they are on in the registration process. |
|
How to configure Filter Data Feature: Choose 'Allowlist' as the filter type and select the field 'registration_completed' and add 'complete' to the Values section to set up the filter rule for this integration. |
Recommended Next Section:
Map Data feature
Advanced Filtering
Note: Advanced filtering options are available for supported data sources. Advanced filtering extends the standard filter rules with the following capabilities:
- AND/OR logic: Combine multiple filter rules using AND (all conditions must be met) or OR (any condition must be met) operators.
- Extended operators: In addition to value matching, you can filter using:
- Equals / Does Not Equal – exact match or exclusion
- Is Empty / Is Not Empty – filter based on whether a field has a value
- Greater than / Less than – numeric or date comparisons
- Grouped rule sets: Group multiple rules together into sets and apply AND/OR logic between the sets, allowing complex, multi-condition import logic.
This means you can build sophisticated data import rules without needing a custom managed integration. For example, you can import only records where registration is complete and ticket type is not “Complimentary”, or where company size is greater than 50 or sector equals “Technology”.
Map Data step
Applies to: All Data Sources
Is this step required? Yes
This section will provide steps on how to use the Map Data feature in Grip's Native Integrations. The Map Data feature allows for you to determine which data from your source you will import into Grip. It also lets you edit the data from the source before it is imported into Grip. Each of the editing options are further explained in their own sections.
On the left hand side of the page you will see 20 example records from your datasource and on the right hand side will be where you select which of the fields to import into Grip. The first column will be used to indicate if a field is required to be imported into Grip, or not. The second column allows you to pick source field you wish to pull data from, or write your own data and formatting in free text. The third column labels the Grip field that the data will be imported into.
This section assumes that you have already performed the following steps:
- Connected your datasource
- Selected the source event
- Selected source data
- Selected filters
When would I use this?
This feature is used to ensure the source data is appropriately mapped to each of the Grip fields. This allows you to have full control over what data each of your attendees will see and use in your event.
How do I use this?
There are three required fields to be able to import data into Grip:
- First Name/Name
- Registration ID
These three fields and other commonly used fields have been automatically mapped to fields in the source data on what we recommend, but can be edited following the steps below.

Note: To import a field into Grip ensure that the 'Do not import' is not checked.
2. To map a field from the source data, under 'Source mapping' begin type the field name in the text box or click the blue '+'-
- If you click the blue '+' a new window will appear


4. Click Next
5. You will then be prompted to select optional modifiers. Click 'Save' if you wish to use one, otherwise see the Optional Modifiers section to understand how to use these Modifiers.

6. To remove any source mapping, click the 'x' that appears next to the mapped source field.
7. Repeat steps 1 through 2 for all of the rows.
Note: You can map multiple fields to each row or even type in text between two fields. For example, You can map 'job_title' - 'company_name' to the Grip Field 'headline'.
8. Multiple source fields can be mapped into a single Grip field. This applies to multiple choice Custom Fields and special metadata fields that support multiple values (e.g., Exhibitor ID).
9. Click 'Next'
Examples of how the Map data function will help you:
|
Scenario: During registration you have asked your attendees for their job titles and wish to have this displayed in the Grip mobile app. |
|
Data from source: In your source data, the attendee’s job titles are contained in the field 'role' |
|
How to configure Map Feature: In the row that corresponds to the Grip field 'job_title', type in the word 'role' and ensure that the 'Do Not Import' check box is not checked. |
Mapping Link Custom Fields:
At the bottom of the mapping step screen, you will see an option to import data into any Link custom fields that are assigned to the current data type. For best results, map multiple URLs in your source data to a single Link field in Grip - for example adding individual social media links all into a single 'Social Links' Grip Link field. This will look best on profiles within your event.


A profile can have links added to it as part of the data load in your event. When links are added through a Native Integration, they are set up in the mapping screen. You can map multiple source links in to a single Link custom field, each having their own optional title and description, which keeps URLs in profiles looking tidy.
The system will handle missing data gracefully, adding only valid links and only showing URLs for links without names.
Multi-Language data:
Native Integrations can also import multi-language data for custom fields by automatically trying to match them to existing translated values in the Engage dashboard. This will work as long as your data source has the correct English values available, and you have already added all of the translated custom field values in the dashboard - you do not need to map languages other than English in the Native Integration.
This means that:
- If incoming data is an exact match to the default language value (English), the system will assign the correct values from the dashboard, including any stored translations.
- If the only data available in your data source is not in English, you will not be able to assign multi-language data.
- If incoming data does not match in English, a new value will be created in the dashboard but will be 'hidden' by default (to prevent innacurate/accidental data from showing to participants in your event). You can choose to 'Display' any imported value by finding it in the Custom Field's settings under the Values tab.
This system ensures more reliable results across multiple languages and sources, but relies upon the Custom Field values you have entered into the Grip Engage dashboard being correct.
Recommended next section:
Modifier: Capitalize the first letter
Modifiers
Modifier: Capitalize the first letter
Applies to: All Data Sources
Is this step required? No
This section will provide steps on how to use the optional modifier 'capitalize the first letter'
This section assumes that you have already performed the following steps:
- Connected your datasource
- Selected the source event
- Selected source data
- Selected filters
- Mapped your source data
When would I use this?
Modifiers are completely optional and allow you to reconcile the differences in data between your source and Grip or fill in gaps if there are any.
How do I use this?
1. Open the 'Apply Optional Modifiers' for the source data you wish to modify.Note: This will automatically appear while mapping our source data or can be opened by click on the pen icon next to the mapped field name.
2. Click 'Capitalize the first letter'
Note: To remove this modifier, click on the 'x' or you can click 'Cancel’ and it will remove any changes made since the last save.
2. Click 'Save'
Examples of how this filter rule may help you:
|
Scenario: Some of your attendees have not capitalized the first letter in their Company name. |
|
Data from source: Company name is contained in the field 'exhibitor_name'. |
|
How to configure Optional Modifier Feature: Mapp 'exhbitor_name' to 'Company Name'. Open the Optional Modifier window and select 'capitalize the first letter.' |
Recommended next section:
Modifier: Cut and take a portion
Modifier: Cut and take a portion
Applies to: All Data sources
Is this step required? No
This section will provide steps on how to use the optional modifier 'Cut and take a portion'
This section assumes that you have already performed the following steps:
- Connected your data source
- Selected the source event
- Selected source data
- Selected filters
- Mapped your source data
When would I use this?
Modifiers are completely optional and allow you to reconcile the differences in data between your source and Grip or fill in gaps if there are any. This optional modifier will search for a value and perform one of the following depending on which option is selected. Below are examples of the different options available.
e.g. Data: 123XABC; value to search for is X
|
Option |
Result |
|
Cut and take everything after and excluding |
ABC |
|
Cut and take everything after and including |
XABC |
|
Cut and take everything before and excluding |
123 |
|
Cut and take everything before and including |
123X |
How do I use this?
1. Open the 'Apply Optional Modifiers' for the source data you wish to modify.
Note: This will automatically appear while mapping our source data or can be opened by click on the pen icon next to the mapped field name.
2. Click 'Cut and take a portion'
3. The following window will appear

4. Click the down arrow next to select and click on the option you wish to use.
5. In 'Enter a letter or word', type in the value that the modifier should search for.
Note: Special characters are also supported.
Examples of how this filter rule may help you:
|
Scenario: You are using discount codes for any exhibitor reps which follow the format <companyname>EXH<uniquevalue> and you want to automatically assign relationships through the integration. |
|
Data from source: Discount codes are stored in the field 'discount_code' with the structure: <companyname>EXH<uniquevalue> |
|
How to configure Cut and Take a Portion feature: Map the source field 'discount_code' to the Grip field 'exhibitor_id'. Select the optional modifier 'Cut and take a portion'. Select the option 'Cut and take everything before and including' and for the letter or word type in 'EXH'. |
|
Scenario: You want to import company names, but remove any trailing ', co.' |
|
Data from source: Company names are stored in the field 'company_name'. |
|
How to configure Cut and Take a Portion feature: Map the source field 'company_name' to the Grip field 'company'. Select the optional modifier 'Cut and take a portion'. Select the option 'Cut and take everything before and excluding' and for the letter or word type ', co.' |
Recommended next section:
Modifier: Make all letters uppercase
Modifier: Make all letters uppercase
Applies to: All Data Sources
Is this step required? No
This section will provide steps on how to use the optional modifier 'Make all letters uppercase'
This section assumes that you have already performed the following steps:
- Connected your datasource
- Selected the source event
- Selected source data
- Selected filters
- Mapped your source data
When would I use this?
Modifiers are completely optional and allow you to reconcile the differences in data between your source and Grip or fill in gaps if there are any.
e.g. Your attendees have titles like CEO or DR and have not capitalized all of the letters when registering for the event.
How do I use this?
1. Open the 'Apply Optional Modifiers' for the source data you wish to modify.
Note: This will automatically appear while mapping our source data or can be opened by click on the pen icon next to the mapped field name.

Note: To remove this modifier, click on the 'x' or you can click 'Cancel’ and it will remove any changes made since the last save.
3. Click 'Save'
Examples of how this filter rule may help you:
|
Scenario: Your attendees have titles like CEO or DR and have not capitalized all of the letters when registering for the event. |
|
Data from source: Titles are contained in the source field 'suffix' |
|
How to configure Optional Modifier Feature: Map 'suffix' to 'last_name'. Open the Optional Modifier window and select 'Make all letters uppercase.' |
Recommended next section:
Modifier: Replace
Modifier: Replace
Applies to: All Data Sources
Is this step required? No
This section will provide steps on how to use the optional modifier 'Replace'. The modifier Replace lets you transform an incoming value in your source data to a replacement value, before importing it into Grip. You can also select to not import specific values. This feature also includes default options if a field is empty, does not match one of previously indicated values, or if the field is missing from the record entirely.
This section assumes that you have already performed the following steps:
- Connected your datasource
- Selected the source event
- Selected source data
- Selected filters
- Mapped your source data
When would I use this?
Modifiers are completely optional and allow you to reconcile the differences in data between your source and Grip or fill in gaps if there are any.
- The source data passes registration questions in a coded format
- You want to use Grip supply and demand CPFs, but the attendee registration data does not match the company registration data..
How do I use this?
1. Open the 'Apply Optional Modifiers' for the source data you wish to modify.
Note: This will automatically appear while mapping our source data or can be opened by click on the pen icon next to the mapped field name.
2. Click 'Replace'.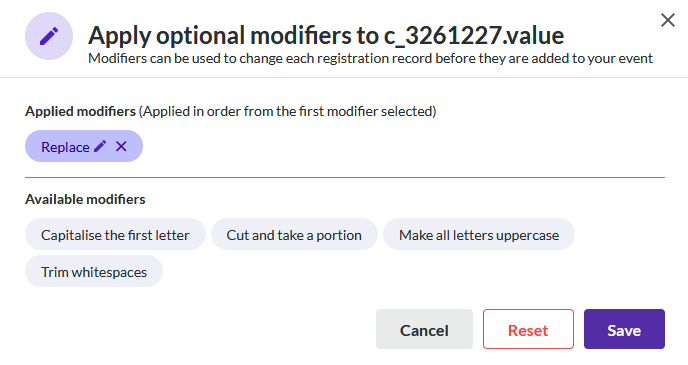
Note: To remove this modifier, click on the 'x' or you can click 'Cancel’ and it will remove any changes made since the last save.
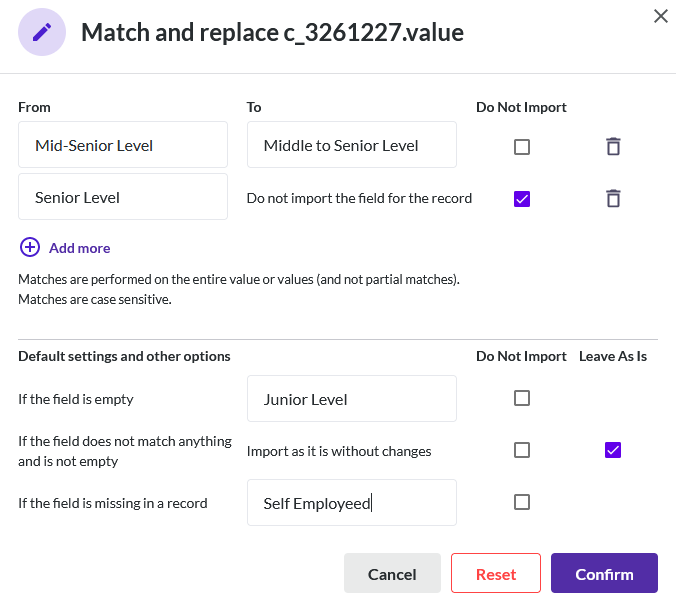
3. The following window will open:
4. Under the 'From' column, type in the value that exists in the source.
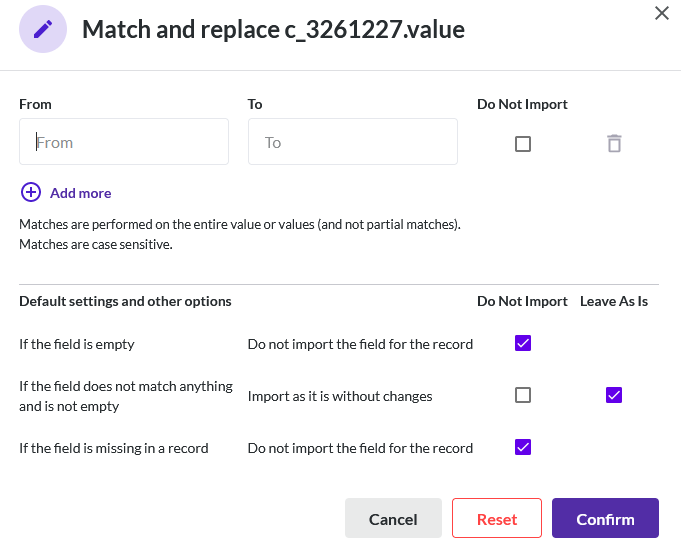
5. Under the 'To' column, type in the value that you would like to see instead, or select 'Do Not Import' if you do not want to import that value into Grip at all.
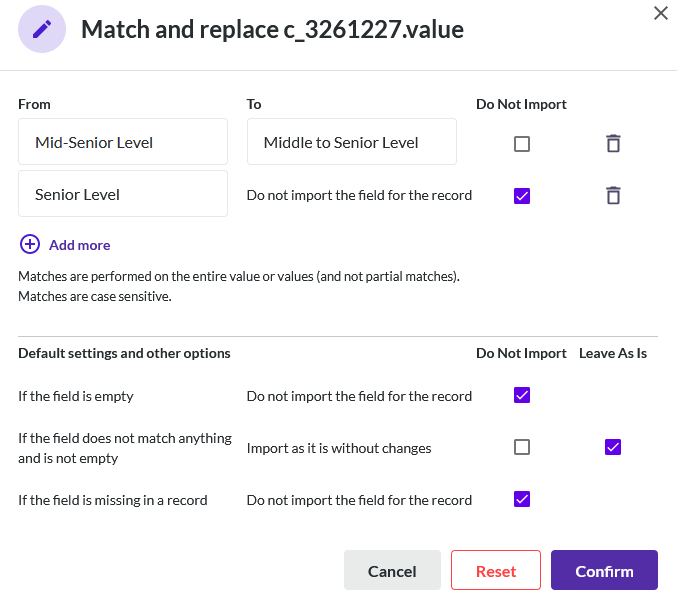
-
- If the field is empty
This covers the condition where there is no value present in the mapped field. The default option is to 'Do Not Import', but if you unclick that option, you can enter in a value and all empty values will be replaced with the enter value before imported into Grip. - If the field does not match anything and is not empty
This covers the condition where there is a value present in the mapped field, but does not match one of the previously entered values. You can either not import these values, or import them as is. - If the field is missing in a record
This covers a similar condition as discussed in 'a' above, but this condition instead if the field does not exist for a record at all instead of just being empty. The default option is to 'Do Not Import', but if you unclick that option, you can enter in a value and all empty values will be replaces with the enter value before imported into Grip.
- If the field is empty
7. Click 'Confirm'
Pasting multiple cells of data into the Replace transformation function during mapping is also supported.
- This allows you to prepare From → To replacement values in a spreadsheet and paste them directly into the dashboard.
e.g. create two columns in any spreadsheet program. Your 'From' values go in column A and your 'To' values go in column B.
Copy the data, select any 'From' cell in the Grip dashboard, and paste. You should see the values populate, with new rows being created automatically. - If you want to exclude specific values from being imported, you can use the value "NO_IMPORT" (without quotes) in your spreadsheet instead of a replacement value (in column B).
Examples of how this filter rule may help you:
|
Scenario: The source data passes registration questions in a code. |
|
Data from source: You asked attendees why they are attending the event and the answers are contained in the field 'demo1'. If they responded that they want to network then the value in 'demo1' is 'A' and if they responded that they want to attend sessions, the the value in 'dem1' is 'B'. |
|
How to configure Optional Modifier Feature: Map 'demo1' to a Grip CPF. Select 'replace' as an optional modifier. Configure the Replace optional modifier so that A will be replaced with Networking and B will be replaced with Attend Sessions. |
|
Scenario: You want to use Grip supply and demand CPFs, but the attendee registration data does not match the company registration data. |
|
Data from source: The source data contains which products attendees are interested in and one of the options is 'AI technology', This data is contained in the field 'interested'. You want to match this with the company data for products supplied of a value 'AI'. |
|
How to configure Optional Modifier Feature: Map 'interested' to a Grip CPF. Select 'replace as an optional modifier. Configure the replace modifier so that 'AI Technology' will be replaced with 'AI'. |
Recommended next section:
Modifier: Trim whitespaces
Modifier: Trim Whitespaces
Applies to: All Data Sources
Is this step required? No
This section will provide steps on how to use the optional modifier 'Trim Whitespaces'. Whitespaces are spaces that are entered in before or after a word or letter instead of appearing in between two words or letters. For example, the value 'Grip ' would be considered to have a whitespace that appears after a word.
This section assumes that you have already performed the following steps:
- Connected your datasource
- Selected the source event
- Selected source data
- Selected filters
- Mapped your source data
When would I use this?
Modifiers are completely optional and allow you to reconcile the differences in data between your source and Grip or fill in gaps if there are any.
e.g. You want to add a suffix to the end of your attendees last name, but want to make sure that whitespaces will not cause odd spacing to appear.
How do I use this?
1. Open the 'Apply Optional Modifiers' for the source data you wish to modify.
Note: This will automatically appear while mapping our source data or can be opened by click on the pen icon next to the mapped field name.
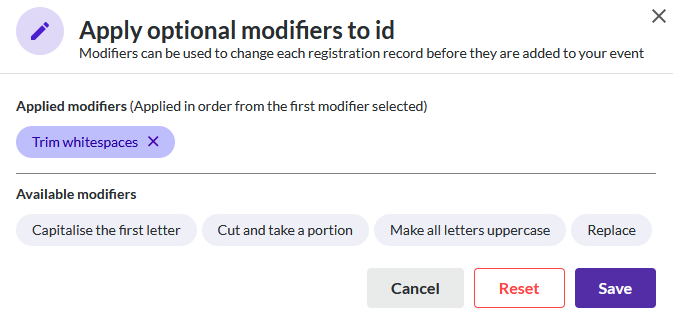
Note:To remove this modifier, click on the 'x' or you can click 'Cancel’ and it will remove any changes made since the last save.
3. Click 'Save'
Examples of how this filter rule may help you:
|
Scenario: You want to add a suffix to the end of your attendees last name, but want to make sure that whitespaces will not cause odd spacing to appear. |
|
Data from source: Titles are contained in the source field 'suffix' and last names appear in the source field 'last_name' |
|
How to configure Optional Modifier Feature: Map 'last_name' to 'last_name'. Open the Optional Modifier window and select 'Trim Whitespaces.' Enter in a space. Map 'suffix' to 'last_name' |
Recommended next section:
Preview
Preview
Applies to: All Data Sources
Is this step required? Yes
This section will provide steps on how to use the Preview Feature. The Preview page allows you to look at the first 20 records from the source and confirm that the data imported into Grip will appear as you expect. You will be able to see a side by side preview of your decisions to compare your source data records with your destination data records in Grip.
This section assumes that you have already performed the following steps:
- Connected your datasource
- Selected the source event
- Selected source data
- Selected filters
- Mapped your source data
- Applied any optional modifiers
How do I use this?
1. Compare the first record by using the side by side comparison.
2. Click 'Next record' or 'Previous record' to toggle through the available records.
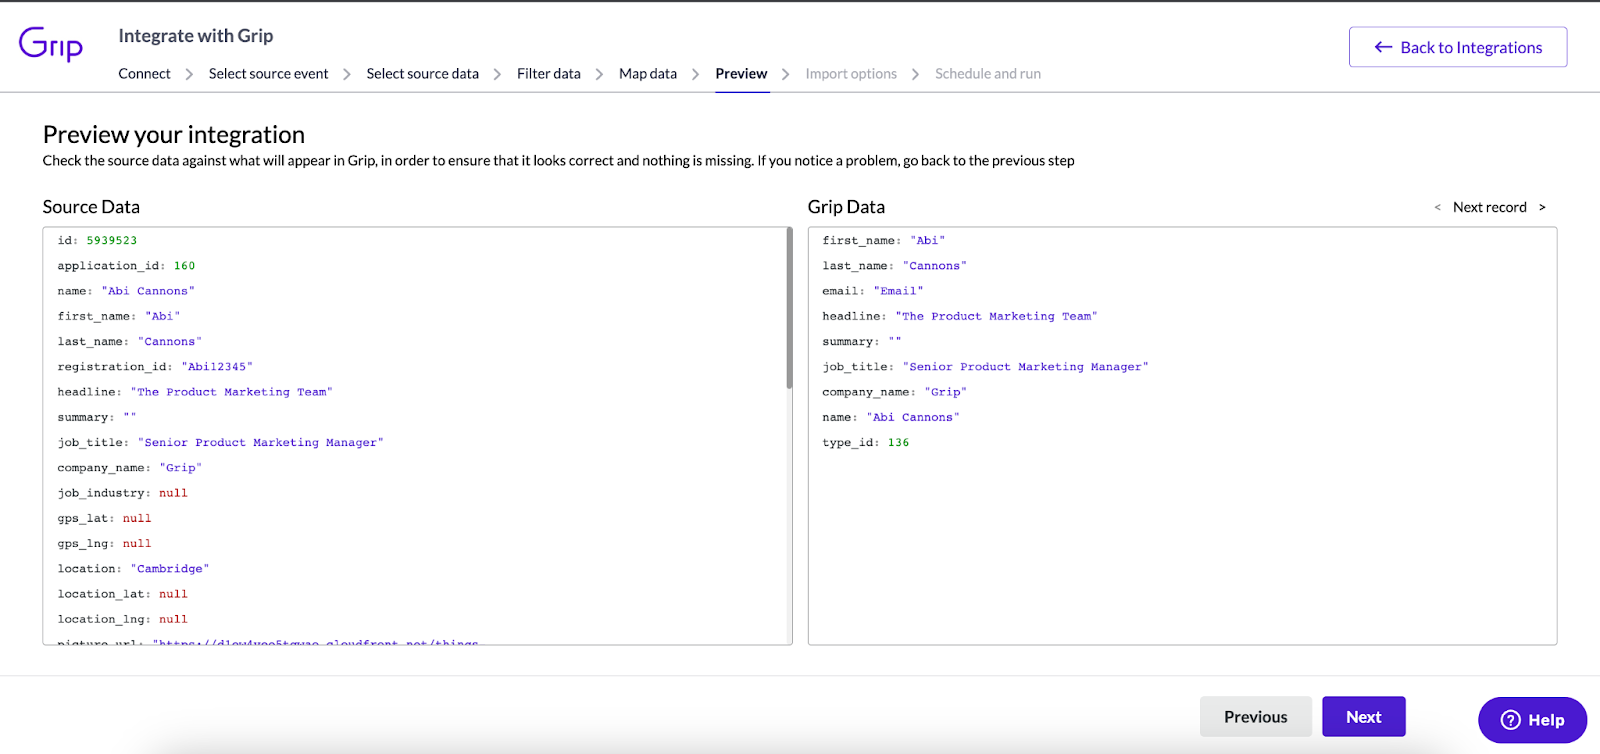
3. If you are happy with the integration, click 'Next'. Otherwise, click 'Previous' to go back to the previous feature pages.
Recommended next section:
Import Options
Import Options
Applies to: All Data Sources
Is this step required? Yes
This section will provide steps on how to select the correct import option.
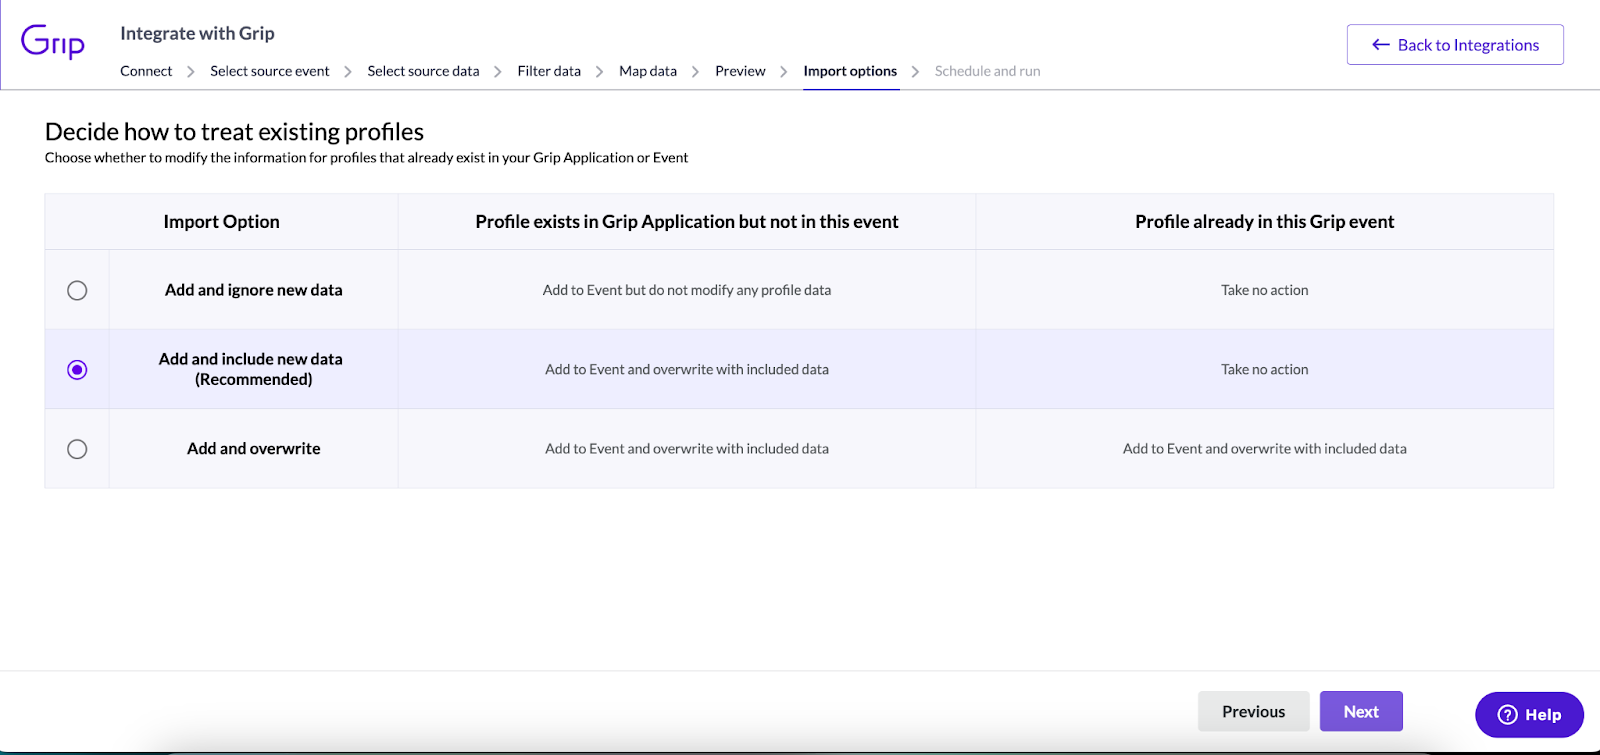
Data integration is a complex matter; here are some important decisions to take so that you can configure the integration to treat existing data in your event the right way.
We always recommend that you leave the import option at its recommended setting. However, there may be situations where you may want to pick a different import option.
- Add and include new data (Recommended):
- If a user has previously attended one of your events, this will add the user to the new event and update their data in the new event and any existing events. This includes the general profiles information or any shared CPFs shared across events.
- If the user is already in this event, then no action will be taken.
- If the user does not exist in any events, this will add the user based on the source data.
- Add but ignore new data
- When a profile exists, but not in this particular event, then this will add it to the Grip Event but not modify any existing profile data. i.e. the profile will be added to the event, but any new data imported from the source will not be included.
- When a profile is already in the event, then no action will be taken.
- If the user does not exist in any events within the application, this will add the user based on the source data.
- Add and overwrite
- If a user has previously attended one of your events, this will add the user to the new event and update their data in the new event and any existing events. This includes the general profile information and any Custom Profile Field information shared across events.
- When the profile already exists on the event, then this will update the profile information based on the data contained in the data source.
- If the user does not exist in any events within the application, this will add the user based on the source data.
This section assumes that you have already performed the following steps:
- Connected your data source
- Selected the source event
- Selected source data
- Selected filters
- Mapped your source data
- Previewed your data
When would I use this?
- I am importing new attendees to an event that occurs every year.
- I am importing new attendees to a new event and I also have engagement hub active all year.
- I imported attendees to an event and I wish to make changes to their profiles before setting the event live.
How do I use this?
1. Select the import option that you would like to use.
2. Read and accept any additional warning that may appear.
3. Click 'Next'
Examples of how the Import Options may help you:
|
Scenario: I am importing new attendees to an event that occurs every year. |
|
Data from source: The native integration has been configured and contains some of the same CPFs from the previous year that the event was held. The attendees have updated their information in the registration form and I want it to be reflected in the new event. |
|
How to configure Import option: Select the option 'Add and include new data' |
|
Scenario: I am importing new attendees to a new event and I also have an engagement hub active all year. |
|
Data from source: the native integration has been configured and contains the same profile information from the engagement hub. Attendees in the engagement hub will also be attending this event. Attendees have updated their profile in the engagement hub, but not the source data. |
|
How to configure import option: Select the option 'Add and ignore new data' |
|
Scenario: I imported attendees to an event and I wish to make changes to their profiles before setting the event live. |
|
Data from source: The native integration previously ran and imported attendees into the event. I changed some mapping in the integration based on feedback from my team. |
|
How to configure import option: Select the option 'Add and overwrite' |
Recommended next section:
Schedule and Run
Schedule and Run
Applies to: All Data Sources
Is this step required? Yes
This section will provide steps on how to Schedule and run your native integration.
There are three options for when the integration will run:- Do not Run: This saves the integration and does not run it.
- Run once at some time in the future: The integration will run once at the imputed time.
- On Repeat: The integration will run on the selected internal until requested to be stopped.
Please note:
- Availability of recurring schedules is subject to licence plans and Schedules cannot exceed a month from when your event ends.
- You can make as many copies of your integration as you wish but only one of your copies may be active at a time for each pair of event and Grip data type. An active integration is one that is on a schedule (recurring or one-time) or is currently running.
This section assumes that you have already performed the following steps:
- Connected your datasource
- Selected the source event
- Selected source data
- Selected filters
- Mapped your source data
- Previewed your data
- Selected your import option.
When would I use this?
- I want to import data and allow the rest of my team to sign off on the integration.
- The integration is complete and I am to continue to import new attendees as them register.
- The integration is complete and all data that is needed is in my source.
How do I use this?
1. Click the down arrow next to 'Schedule this integration'
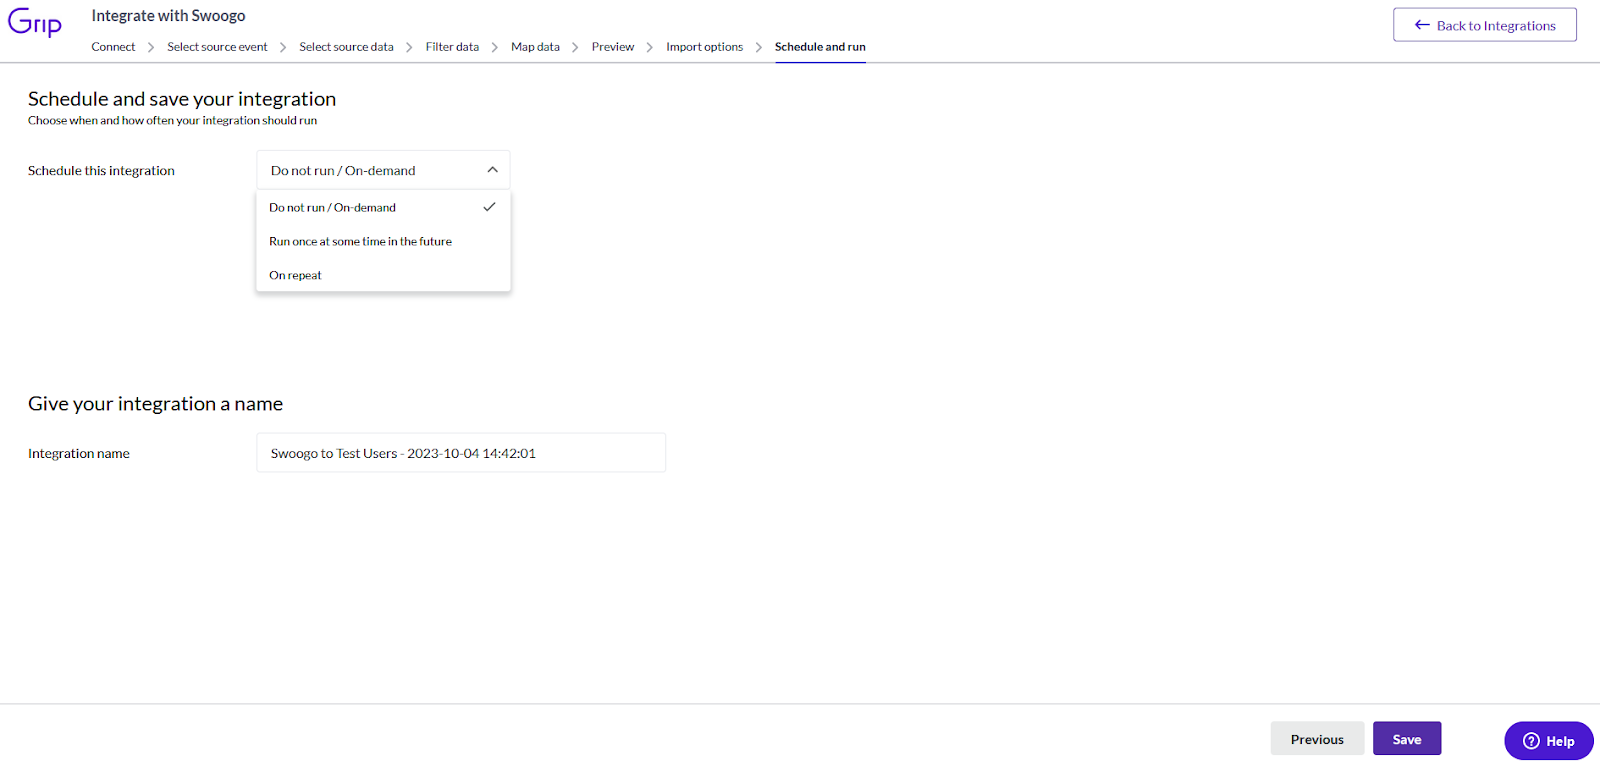
-
- Do not run: continue to step 3.
- Run once at some time in the future:
- At: Select the date and time you which the integration to run.
- In this timezone: Select the correct timezone for the above date
- Repeat
- To run every: Select how often the integration should run.
Note that the options here are dependant on your data source, and on some plans additional options may be available once your event's start date is within 14 days. These options will be labelled as 'Live Event Boost'.
- To run every: Select how often the integration should run.

-
-
- Not before: Select when the integration should start running.
- Until: Select when the integration should stop running.
- In this timezone: Select the correct timezone of the above dates
-
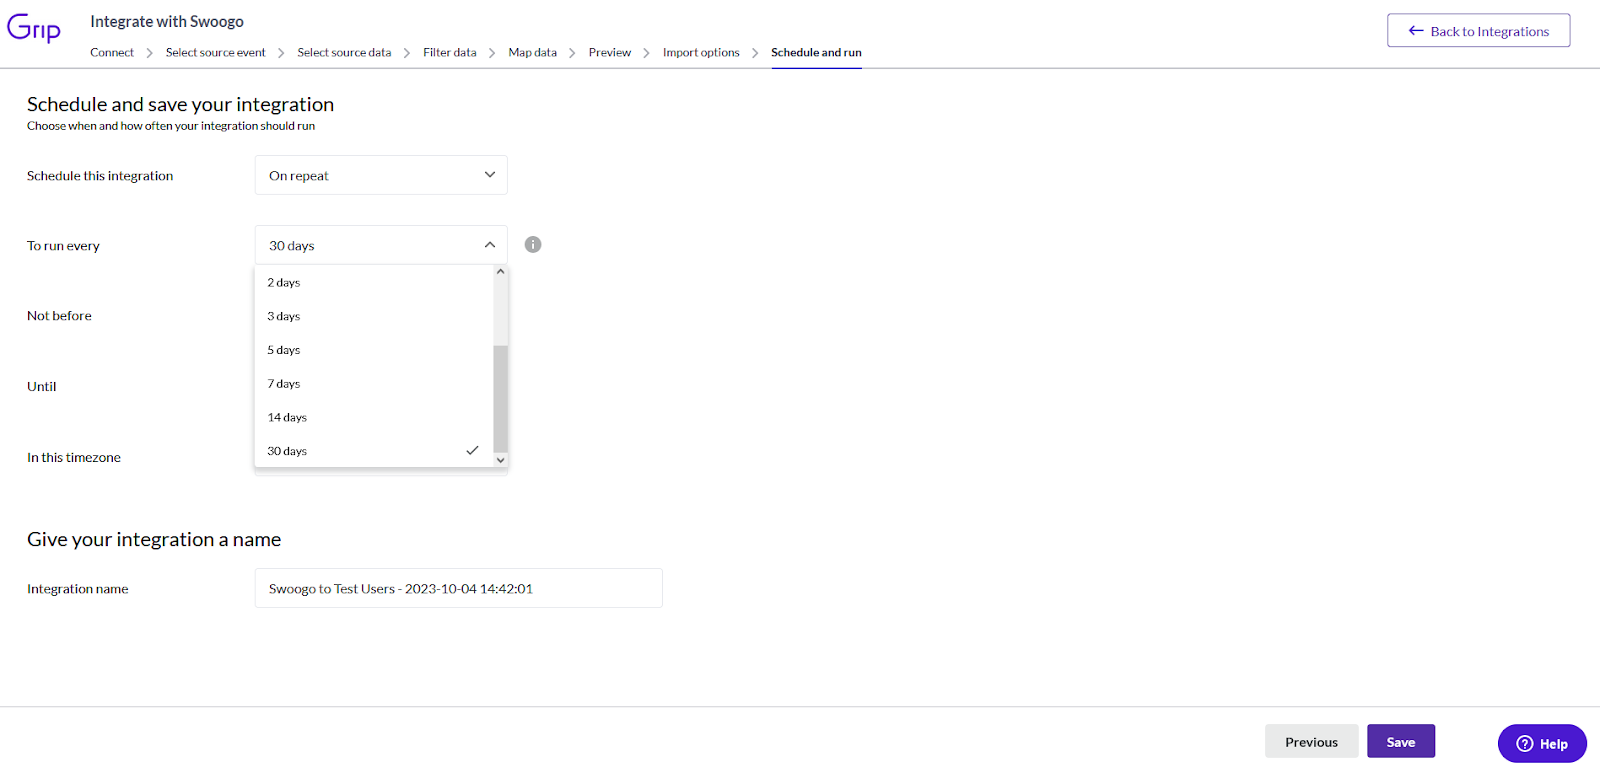
3. Under 'Give your integration a name', type a name for the integration or proceed with the configured integration name.
4. Click 'Save'. Your integration is now saved. It can be reopened and edited in the future without needing to complete all steps.
Examples of how a filter rule may help you:
|
Scenario: I want to import data and allow the rest of my team to sign off on the integration. |
|
Data from source: I need additional signoff from my team before the integration can be considered complete and just need some sample data for review. |
|
How to configure Optional Modifier Feature: Select the schedule and run option to 'Do not Run / On- Demand' |
|
Scenario: The integration is complete and I am to continue to import new attendees as they register. |
|
Data from source: The integration has been completed and the whole team has signed on it. |
|
How to configure Schedule and Run: Select the schedule and run option 'On Repeat'. Ensure that it is not running more often than it takes for one run to complete, as this can cause further delays. Select it to start today and end the day after your event completes. |
|
Scenario: The integration is complete and all data that is needed is in my source. |
|
Data from Source: The integration has been completed and the whole team has signed off on it and I do not expect any new registrations. |
|
How to configure Schedule and Run: Select the schedule and run option 'Run once at some time in the future' and select some time in the future before the event goes live. |
Recommended next section:
Managing Your Integrations
Managing Your Integrations
Applies to: All Data Sources
Is this step required? No
Change history
Once on the Main Integration page, you can access the Change History by click on the eye icon.
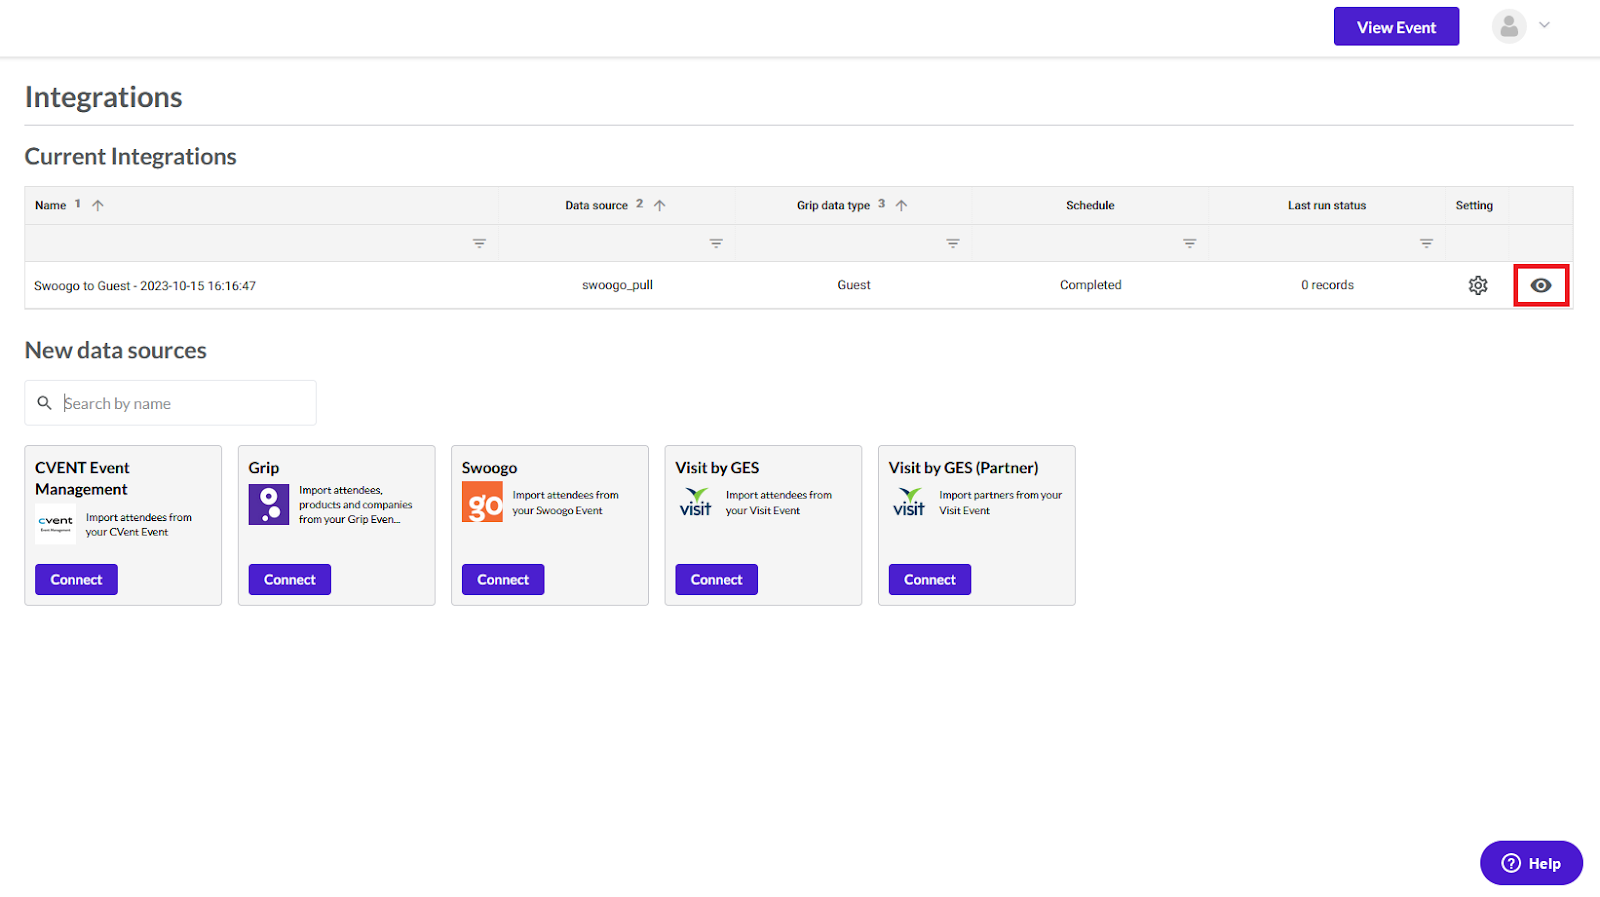
Changes made to your integrations are also tracked so that you may identify when and who updated them over time.
You can also roll back any unwanted changes by selecting the desired version and clicking 'Rollback to this version'. A new version will automatically be created from this point. You can track a rolling total of the last 20 saved versions of each integration.
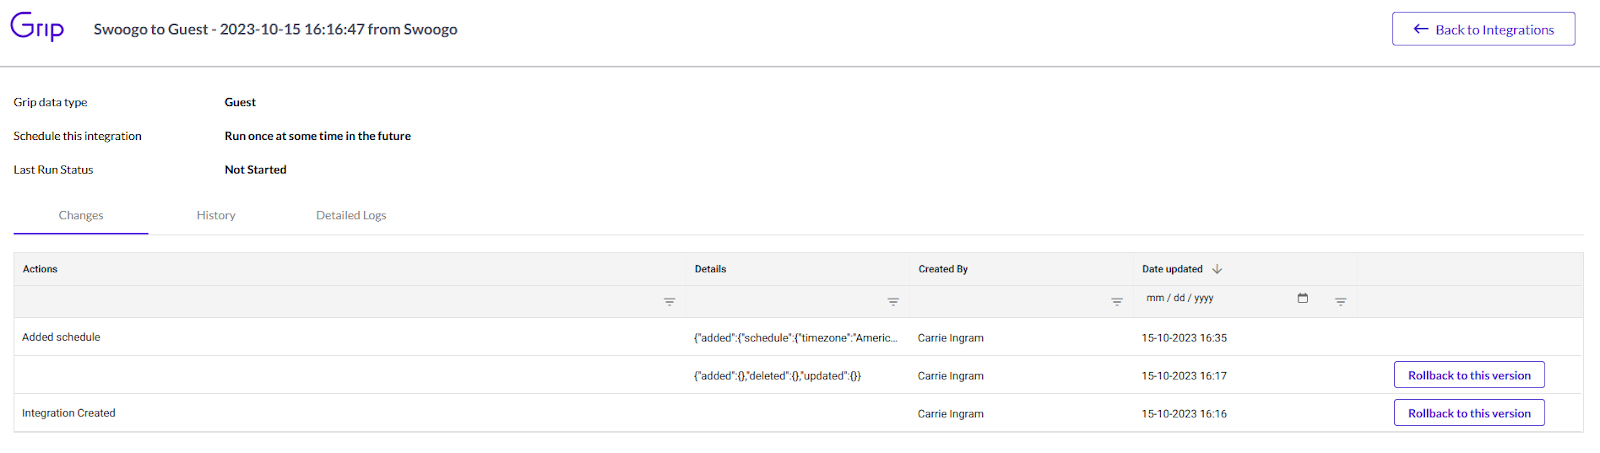
Note. The schedule of execution is not considered in rollbacks. This means that a rollback of an integration will create a new version of your integration that will not have an active schedule.
You can also clone an existing integration if you wish to reuse it to integrate with another data type. Cloned integrations will always be created without a schedule attached.
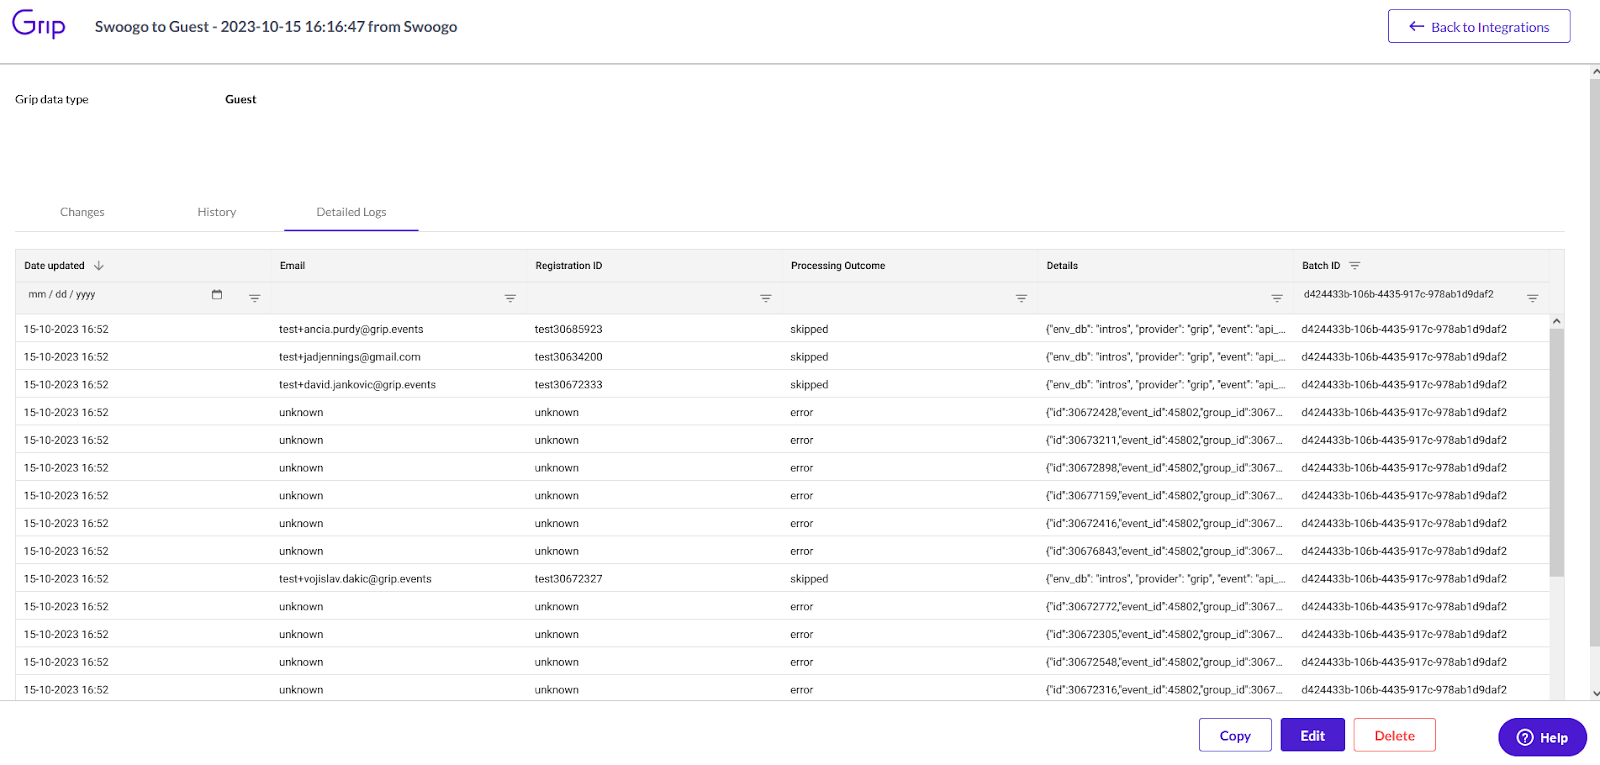
Logs
As your integrations run, information about when and how they ran is tracked and made available to you via the dashboard. These are accessible if you click on the History tab.
Logs are kept for each record processed in your run and these can be searched for using the email or registration id of the record.
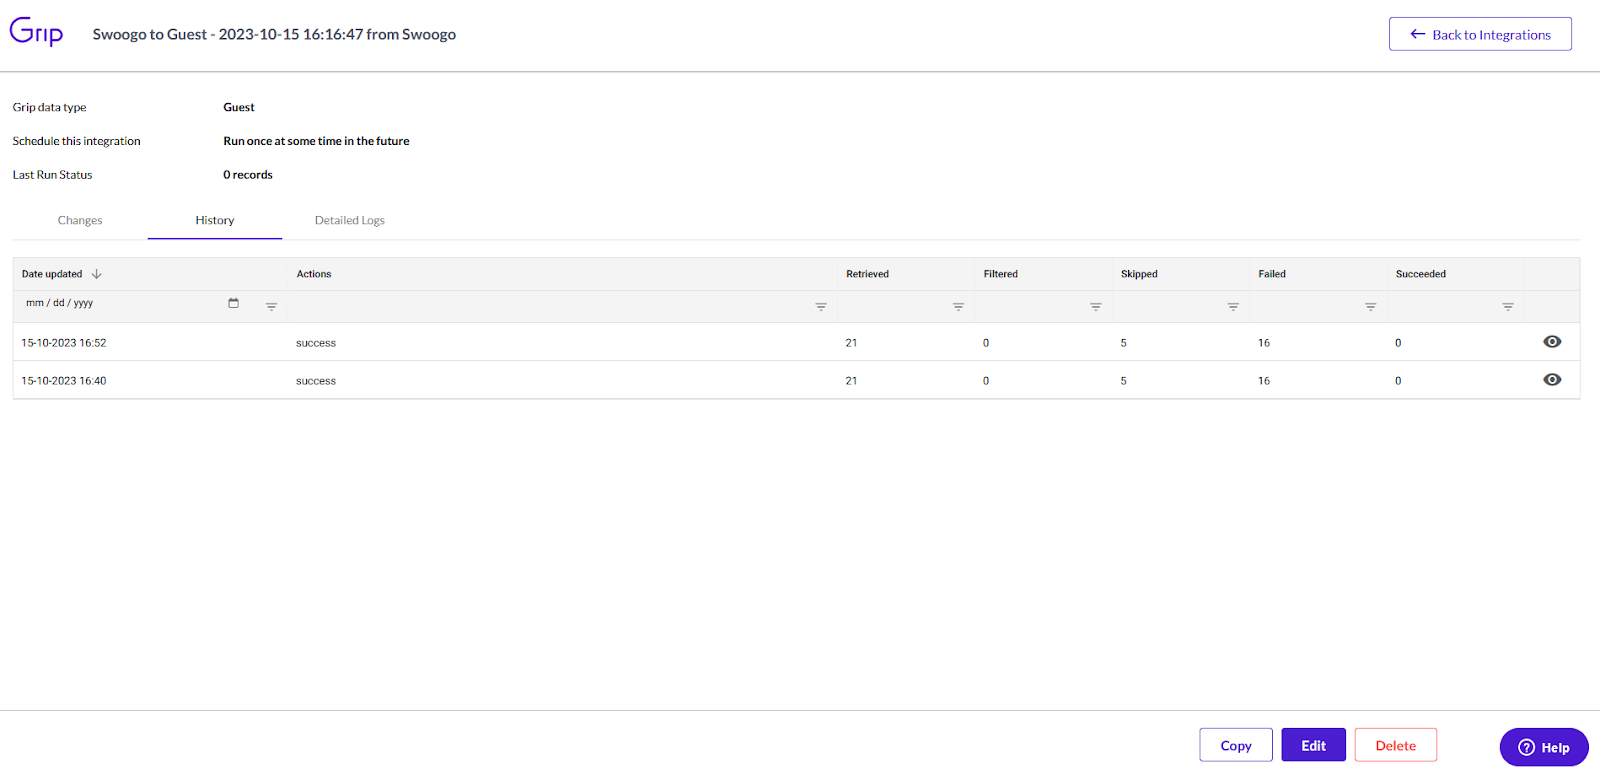
Each registration record that is retrieved or sent to Grip will be tracked and the processing outcome of it logged into the integration’s history and detailed logs for up to 30 days (rolling). These are accessible if you click on the 'eye' icon in the History Log, or in the 'Detailed Log' tab.
FAQs
Data sources
Q: What data sources can I connect to?
A: see above for a list of the current sources.
Q: I know Grip supports Data Source X, Why can’t I see it?
A: Please contact Sales or your account manager for access
Q: I'm unable to connect to a data source as it has an IP address Allowlist. What do I do?
A: Some registration providers such as Visit by GES require you to add Grip’s IP addresses to be able to use our native integrations. If required, please add the below 3 IP addresses to your registration system:
52.18.247.78
34.253.163.181
34.243.38.165
Creating or editing integrations
Q: Why can’t I see a preview of my source data?
A: Depending on the method of connection, some data sources may not always provide a preview of records
Q: Why can’t I make mapping decisions on some Grip fields like 'name'?
A: The name field is automatically derived from combining our first_name and last_name fields, no additional formatting is required for it.
Q: Why am I unable to create an integration with a data source?
A: The data source may be disabled temporarily for new integrations because of maintenance or other technical issues on the provider
Q: I want to filter my records based on the presence or absence of a specific field. How can I do this?
A: You can get the same outcome by using the Allowlist or Blocklist filter rule and providing all options. By implication, any record with or without that field present will be caught by your filter.
Q: I’m integrated with Visit by GES, Why can’t I see partner data?
A: Visit has two distinct setups for Visitor and Partner data. We have created a data source option for each of these. You should pick the specific data source for your needs.
Q: Can I combine two source fields into a single destination field?
A: Absolutely. You can add one or more source fields to any destination field on Grip by clicking on the + button. You can also provide any separator characters, such as commas or spaces, for your fields by typing them in place.
Q: My source field contains list data, how will it appear in Grip?
A: If your destination field is a multiple choice Custom Profile Field, then each of your list’s values will become a value in Grip. If your destination field is a freeform or single choice Custom Profile Field, then the list will be converted into a single comma separated value.
Managing your integrations
Q: How many versions of my integrations can I track and roll back to?
A: You can see up to 20 of the latest versions of your integration and roll back to any of them
Q: Why can’t I run more than one copy of my integration at the same time?
A: Each data source that Grip connects to has a set limit of how many active integrations are allowed. Exceeding these limits may cause your account on the data source to be suspended.
Q: How long can I keep my integration running?
A: You can run your integrations up to 30 days after your event is scheduled to end.
Q: What happens when my integration is deleted?
A: When you delete an integration, we will stop any ongoing integration at the point of deletion. in a safe manner. This means that you may still see updates appear after your deletion as we complete processing of any remaining records in your integration queue.
When you delete your integration, the processing and change history of your integration will also be removed. Existing records processed by your integration in the past will remain available.
Q: How far back can I look into my integration’s logs?
A: You can see up to 20 previous saved versions of your integration, up to 20 previous executions (batches), and up to 30 days worth of processing history
Q: Does Event copying also copy over my integrations?
A: Yes, when you copy an event, you will also copy over any integrations in that event. However, copied integrations will be set to on-demand and you will have to create a new schedule for them.
Q: Can I clone my integration to another event?
A: At present, integration cloning is only possible within the same event. However, integrations are copied over as part of Event Copying.
Q: How can I pause my scheduled integration?
A: At present, pausing is not supported. However, you can achieve the same effect by updating your integration to become an on-demand integration and perform a rollback to bring the schedule back.
Q: Why is my integration disabled?
A: We may temporarily disable an integration for a number of reasons. For instance, If you have requested support in investigating your integration, or if your data source provider is performing a maintenance event. This is a temporary measure and no other integration settings will be changed without your knowledge.
Q: I’ve seen my integration run at least once but no record has appeared on Grip. Why is that?
A: There may be a number of reasons why this may be the case and your processing history logs will help you identify the cause. These are:
- Your filter rules may have eliminated these records from being retrieved by Grip
- Your data source may be experiencing an outage or undergoing maintenance
- Your import options may have eliminated these records from being processed by Grip
- Your records are still being processed in your registration queue. We have a first-in-first-out queue for processing data to ensure that your records and any changes that come with them are processed in the correct order
Q: Can I change my integration configuration if my event is deactivated?
A: No. You cannot create or amend any integrations for a deactivated event. However, you may delete integrations from it.
Q: Can I manually enter a pointer for any data source?
A: Pointers are supported by some but not all data sources. If supported, the option to input a pointer will be available.
Q: What happens if I remove a pointer?
A: Removing a pointer forces the integration to restart from scratch, fetching all available data as if no previous records had been processed.
Q: Why should I use pointers in data mapping?
A: Pointers help streamline the data mapping process by focusing on specific records, saving time and preventing unnecessary data retrieval.
Working with Custom Profile Fields
Native Integrations supports custom profile field mapping but there are some finer details to be aware of when working with then.
Freeform custom profile fields
You can map data to a freeform field just like any other field such as First Name or Job Title. If your source data has multiple values, they will be automatically joined together with a ','.
Single choice custom profile fields
You can map data to a single choice field just like any other field such as First Name or Job Title.
If your source data has multiple values, they will be automatically joined together with a ',' into a single value. Any previously unknown value will be imported and added to the list of 'hidden' values for that custom profile field.
Multiple choice custom profile fields
You can map freeform, single choice or multiple choice data to a multiple choice field.
Any previously unknown value will be imported and added to the list of 'hidden' values for that custom profile field. Native Integrations does not follow any user minimum or maximum value requirements for a multiple choice field. For example, you may map a source data field of just one value to a destination field even if the destination field requires a user to pick at least two values.
Parent-child custom profile fields - basic support
It is possible to map some basic data to a parent-child field by using the special characters '>>' between source fields. For this to work you will need to have a single-field in your source data where all of the child categories come through. For example, if your source field is 'Room' and 'Category' with values that look like this:
- Rooms:
- Bathroom: Storage
- Bathroom: Fittings
- Bathroom: Toiletries
- Kitchen: Utensils
- Kitchen: Cookware
- Kitchen: Small Appliances
Then your source field mapping should be just to the Rooms field. You can then use a 'Replace' function for each value to add the parent in:
From: "Bathroom: Storage" or "Storage"
To: "Bathroom>>Storage"
Your sample records will be presented in the preview page to you with values like 'Kitchen>>Cookware' or 'Bathroom>>Storage'.
Any new child levels that have not been defined for the parent-child field will be created (as inactive values) with generic names like 'level 4' or 'level 6'.
Currently Livebuzz parent/child mapping is not supported due to the format of the data for parent/child fields from the source data.
Multilingual support
Custom fields support improved multilingual handling during data import. Translated values from source data are now automatically matched to existing translated options in the dashboard.
Advanced Mapping
At the bottom of the mapping window you may notice an expandable section called 'Advanced Mapping'. Once you expand it, you'll see a separate list of fields which will change depending on the kind of data type you're importing to (Participant, Company or Item).
This area works in the same way as the section above, but the fields perform special functions while importing, or are used for specific purposes later in events.

Here's a rundown of the available fields, what they do, and how they can be mapped to.
Add Meeting Locations (by name)
Available for: Participants, Companies
This field is used for assigning Meeting Locations to profiles - the most common usage being for Company profiles to be assigned their booths within an expo.
This is a freeform text field, into which you need to map the name of the meeting location(s) you'd like to create or assign.
If a meeting location exists already with the same name, the profile will be added to it. If no meeting location exists with that name, one will be created, and will have the event's Default Meeting Settings applied (in the dashboard under Networking > Meetings > Meeting Locations > Default Location Settings).
You can create and assign multiple locations per profile if you map one multiple-choice source field to Add Meeting Locations (by name).
If you're manually entering the location names (e.g. every profile is being added to the same locations) you can also write a comma-separated list of location names if there is more than one.
Add to Group (by ID)
Available for: Participants, Companies, Items
This field adds the incoming profile to one or more Custom Groups which is essential for MustMeet or Hybrid events. Each Custom Group created in Grip has an ID which is what needs to be imported in this field.
The Replace function is recommended here, as it allows you to take a value in your source field like 'Buyer Group' and turn it into a Group ID so that Grip can process it.
You can dynamically map to multiple groups if you map to one multiple-choice source field, or if you manually write out the Group IDs and separate them with commas (which would add all profiles to the same set of groups).
Add to Session as Speaker
Available for: Participants
Adding Session Registration IDs to this field will mean that incoming profile is added to that Session as a Speaker. Custom contributor roles are not supported, but of course profiles can be switched between roles later via the dashboard.
Session Registration IDscan be created externally when sessions are imported, or automatically if a Session is created in Grip. You can find them in the dashboard when looking at a session - not to be confused with the Session ID, which is not used in this way.
You can add multiple sessions by entering a comma-separated list of Session Registration IDs.
Add to Session as Attendee
Available for: Participants
Similar to the above, adding Session Registration IDs to this field will mean that incoming profile is added to that Session as an Attendee. This is the same action as a participant adding a Session to their Schedule, so in effect this is a way to pre-assign sessions.
You can add multiple sessions by entering a comma-separated list of Session Registration IDs.
Add to Session as Sponsor
Available for: Participants, Companies, Items
Again, as above, this field adds the incoming profile as a Headline Sponsor to Sessions. You can add one or more Session Registration IDs separated by commas or mapped from one multiple-choice field. Bear in mind that a Session can only have one Headline Sponsor.
Sharer ID
Available for: Participants
This field is used in MustMeet events, for creating relationships between Sharers. It is an alternative to the normal field Exhibitor ID, for situations where only a portion of company representatives need to be set up as Sharers, and so the IDs need to be separated.
In order to use this field, a custom Sharer relationship will need to have been created within the event first.
Exclusive Meetings
Available for: Participants
Used in MustMeet events, this field is used (along with Exhibitor ID) in order to denote participants that will have exclusive meetings. The only functional value that can be passed is "Exclusive Meeting".
See our article on exclusive meetings for more details.
Meeting Target
Available for: Participants
Used in MustMeet events, this field should contain the target minimum number of meetings that a participant should receive. This can only be expressed as a simple number, e.g. "10".
See our article on Meeting Targets for more details.
Meeting Limit
Available for: Participants
Used in MustMeet events, this field should contain the maximum number of meetings that a participant can receive. This can only be expressed as a simple number, e.g. "10".
See our article on Meeting Targets for more details.
Monetization Plan ID
Available for: Companies
This field is used to pre-assign a Monetization plan based on its ID. This means that when the Team is created for this Company profile, the Team will be automatically assigned a particular Monetization plan, matching the ID in this field. See our Monetization article for more details about plans.
Monetization plan IDs can be found in the dashboard on the Monetization page, next to each plan. You can only assign a single ID for this field - e.g. "231".