Teams allow representatives from the same company to collaborate, manage leads and access shared tools on your event platform. As an organiser, setting up Teams ensures companies have access to features like lead capture, meeting tracking, and internal collaboration—all within their own private dashboard.
In this article
-
Why use Teams?
- Configuring data types that can join a team
- Setting a team size limit
- Configuring monetization (optional)
- Adding data on the Grip Engage Admin
-
-
What is the Exhibitor ID?
-
How to manually add relationships between profiles
-
- Managing individual teams in the Grip Engage Admin
- Profile tab
- Relationships tab
- Teams tab
- FAQs
Why use Teams?
Teams is a powerful feature that gives your exhibiting companies the tools they need to succeed on the event platform—while making it easier for you as the organiser to manage engagement and performance.
When enabled, Teams provides exhibitors and sponsors with:
-
A shared company dashboard for viewing leads and exporting contacts/meetings
-
Real-time lead qualification with custom tags, scores, and comments
-
Access to shared products, sessions, and brand materials
-
Team management tools, so companies can add, remove, and organise their own team members
Why it matters for your event
When teams are empowered with the right tools, they’re more likely to:
-
Proactively manage leads and follow up during the event
-
See the value of the platform through tangible results
-
Collaborate efficiently without needing constant organiser input
Teams are especially valuable for exhibitors and sponsors who need to capture leads, coordinate meetings, and demonstrate ROI to their stakeholders.
By setting up Teams, you give your partners a structured, self-service way to succeed—while maintaining full control over data, access, and monetization.
How Teams are created on the event platform (from exhibitor perspective)
Teams are created automatically when a representative logs in—based on their relationship to a company profile.
-
The first representative to log in (web or mobile) will create the team if their profile is configured to be on one.
-
Other company representatives with the correct relationship are automatically added.
-
Newly added representatives (after the team exists) must request to join and be approved by a Team Admin.
If a user is associated with multiple companies, Teams will be created for each one upon login (if they don’t already exist). The user can choose which team to act on during their session.
How to enable Teams
To enable Teams it is important that Teams is first enabled on company level. To enable Teams:
-
Navigate to Event Details > Event Data Types > Companies.
-
Click the gear icon beside the company data type you want to configure.
-
Toggle Teams to Enabled.

-
Select which participant types can join Teams (a relationship must exist for them to be selectable).
-
(Optional) Enable Company Chat to allow company reps to receive and respond to participant messages via the web platform.
Note: Ensure relationships are activated between:
- Company → Participant (e.g., "In-Person Exhibitor" → "In-Person Exhibitor Rep")
- Company → Product (if products need to be visible in teams)
.gif?width=600&height=296&name=ezgif.com-gif-maker%20(2).gif)
Configuring who(data types) can join a Team
You can control which participant types (who can join) and item types (what is visible) are allowed in teams.
1. Participant types (who can join)
Only participant data types with an active relationship to the company type can join a team.
-
Profiles with a matching Exhibitor ID will appear under the company and gain access to the Teams portal on event platform.
-
If a data type appears greyed out under Teams settings on Grip Engage Admin, it means it does not have a relationship with the company data type you’re configuring.

Note: With AppSync real-time updates, participant data updates instantly when a user joins a team mid-session—no need to log out or refresh the platform to access team features.
2. Item types visible in Teams (What’s visible)
- Choose item data types that have an active relationship with the company data type.
- These will be visible under the company profile and in Teams (this needs to be setup additionally).
- If a data type appears greyed out, it means it does not have a relationship with the company data type you’re configuring.
Setting a team size limit
The Team Size setting allows you to define the maximum number of members in a team. This option is available only when either "Invite Members via Email" or "Invite Members on Platform" is selected.
How to set a team size limit
- Ensure that one of the supported invitation type methods is selected.
- Enable the Team size limit toggle.
- Enter the desired team size (between 1 and 999 members).
- Save your settings.

Key considerations:
-
The team size setting is not available for "Invite via External Registration Link." Since external registration systems manage sign-ups, Grip cannot enforce a team size limit in this case.
-
For "Disable Team Member Invites," a team size limit is not needed. When this option is enabled, all team invitations are blocked, so setting a limit is unnecessary.
Team size limit restrictions on the event platform
On the event platform, team admins cannot invite additional members once the team size limit has been reached.
When this limit is reached:
- The "Invite Members" button under the Team Member tab within Teams will be greyed out, preventing further invitations.

- Only team admins will see this button in a disabled state. Team members will not see the button at all, as they do not have permission to invite members.
Important note:
The team size limit only applies to invites sent within the event platform. It does not apply to team members added manually through the Grip Engage Admin or API.
This means that if a new registration includes the correct Exhibitor ID, the user will still be added to the team—even if the team has already reached its size limit. Registration data is considered valid and cannot be restricted by the team size setting.
Managing team size for an individual Team
In addition to setting a event-wide team size limit, Grip Engage Admin admins can adjust the team size limit for individual teams through the Grip Teams settings page in the dashboard.
- If an event-wide team size limit has been set under Event Details > Event Data Types > Company > Settings > Team Size, it will automatically apply to all teams within the event. This limit can be viewed under Grip Teams > Teams.
- Dashboard admins can override this limit for individual teams by navigating to Grip Teams > Teams and adjusting the limit for each team separately.
Note: The most recent team size limit always takes precedence, whether it was set at the event level (Event Details > Event Data Types > Company > Settings > Team Size) or at the individual team level (Grip Teams > Teams).
Adding data on the Grip Engage Admin (Exhibitor ID / Relationships)
After setting up Teams, data must be added to the Grip Engage Admin to ensure the Team setup is correctly configured and working as expected.
What is the Exhibitor ID?
The Exhibitor ID is a unique identifier that automatically links:
- Company profiles to company representatives
- Company profiles to items (such as products, if applicable)

The Exhibitor ID ensures that relationships between companies, representatives, and items are created automatically on the event platform.
Key considerations
- The Exhibitor ID is required to link profiles automatically.
- If a profile does not have an Exhibitor ID, you must manually add the relationship.
- Manually adding relationships can take a lot of time, especially for large events.
How to manually add relationships between profiles (ideal for testing and one-off cases)
If relationships are not automatically established, you can manually link profiles by following these steps:
- Go to Grip Engage Admin > Data.
- Select the profile you want to edit (company, participant, or item).
- Scroll to the Relationships section within the profile.
- Click "Add Relationship" and manually link the profile to its corresponding entity.
This method is best for testing or making one-off adjustments rather than handling large amounts of data.
For more details on managing data profiles, visit: Overview of Profile Pages on the Grip Engage Admin
Managing individual teams in the Grip Engage Admin
Important: To ensure that all leads are captured effectively, please encourage your company representatives to activate their Team on the web event platform as soon as possible.
Once teams are configured and event platform has been, you can manage them individually from the Grip Engage Admin > Grip teams > teams.
Key features:
- Profile tab – edit team details, including name, industry, location, and images.
- Relationships tab – manage team members, join requests, and associated products.
Accessing Teams list in the Grip Engage Admin
- Go to Grip Engage Admin > Grip Teams > Teams.
- Here, you will see a list of all Teams created on the event platform.
Click on a specific Team to view and manage its settings in more detail, but have in mind that team membership is instantly updated when a user joins.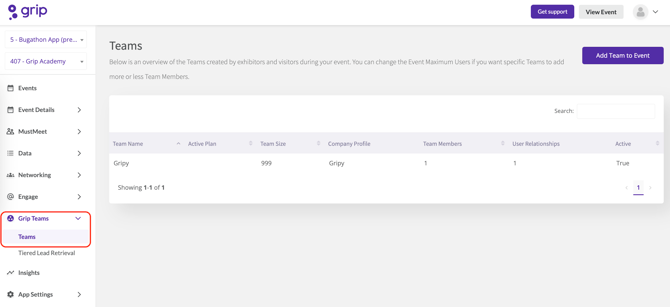
Profile tab
When you select a team, you will land on the Profile tab (alogside there are 2 other tabs explained below - relationships and plans), where you can see/edit key details:
- Team Name
- Company Name
- Headline
- Industry
- Location
- Summary
- Image
Note: These edits function similarly to managing a company profile under data on Grip Engage Admin.
Profile preview and team size per individual team
On the right side of the page, you will find:
- Profile preview – An overview of the team’s products, participants, and custom fields.
- Team size limit – Super Admins can modify this limit if needed.
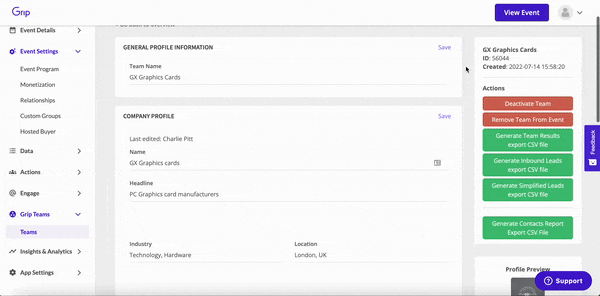
Actions: Managing a Team’s Status & Data
On the right-hand side, at the top of the page, under the Actions section, you will find six key tools to manage Teams and their data in the Grip Engage Admin.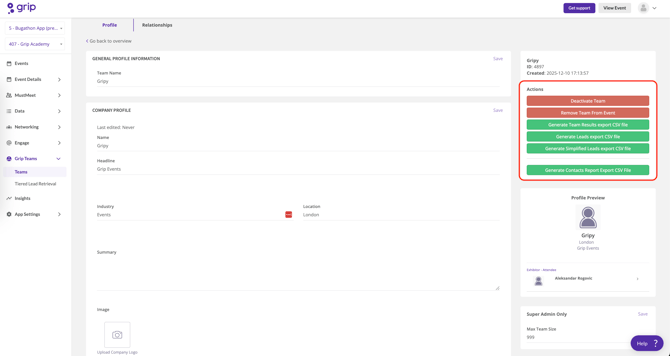
1. Deactivate Team
-
Removes the team and all associated data from the event.
- Once deactivated, the team will no longer be accessible on the event platform.
2. Remove Team from Event
-
Permanently deletes the team from the event.
- This action cannot be undone, so use it with caution.
3. Export Team Results
This export provides a detailed overview of team activity and engagement, including:
-
- Profile & Session Views
- Session Attendees
- Interested Actions (Sent & Received)
- Connections & Meeting Requests (Sent & Received)
- Scheduled Meetings
- Team Activity Status (Active in Event, Last Login Date)
- General Profile Information
Note: Exported data points are provided in numerical format for reporting and analysis.
4. Export Leads
This export provides a full list of leads associated with the team, including:
-
- Lead Name & Company Name
- Job Title & Industry
- Lead Contact Details (Phone Number & Email)
- Lead Location
- Lead Last Login Date
- Tags Related to Various Actions
- Review Status & Contact Status
- Lead’s Connection with Team
- Sponsored Session Unique Views & Contact Sharing Details
A Lead is a profile that has shown interest, connected, interacted with you, your team members and/or company profile. They could have also streamed, been scanned into a session your company is sponsoring. They could also have been qualified by a team member by adding a score and/or qualification answer.
Convert your leads to Contacts by booking a meeting, connecting or badge scanning. Skip or ignore to disqualify a Lead. Lead qualifications and comments are only visible to you and your colleagues and are included in the 'Contact and Badge Scans' Export.
5. Export Simplified Leads (Condensed lead information)
-
- Lead Name & Company Name
- Job Title & Industry
- Lead Contact Details (Phone Number & Email)
- Lead Location
- Lead Tags & Engagement Data
- Review Status & Connection with Team Members
- Sponsored Session Unique Views
- Contact Sharing Details & Custom Profile Field Data
Note: This version is useful for teams that require basic lead insights without extensive details.
6. Export Contacts Report
This export provides a detailed list of contacts associated with the team, including:
- Contact Name & Stage
- Email & Phone Number
- Job Title & Industry
- Company Name & Location
- Source (How the contact was acquired)
- Scanned By (Person who scanned the contact's badge)
- Date Created & Last Login
- Lead Qualifications & Active Status
Relationships Tab
under relationships tab manage team members, access levels, and associated items to individual Team.
Key Functions:
-
View Team Members: Access a full list of team members, including their details and roles.
-
Edit Team Member Access: Click "Edit Access" to adjust team member permissions and access levels.
-
Manage Team Member Join Requests: Review, approve, or decline requests from individuals who wish to join the team.
-
Manage Associated Items: View and manage all items linked to the team, including:
-
- Products
- Parent company information
- Representatives
- Add representatives as team members directly from this tab.
-
Company Plans (Team Plans)
If the event has enabled Tiered lead retrieval (Tiered plans for Exhibitors) feature and you are not using Grip Manage, you can manually upgrade Teams plans through the Company profile (or via Hubspot, or other third party web page).
Navigate to the relevant company profile in the dashboard > Scroll to Team > Edit > Choose the plan.
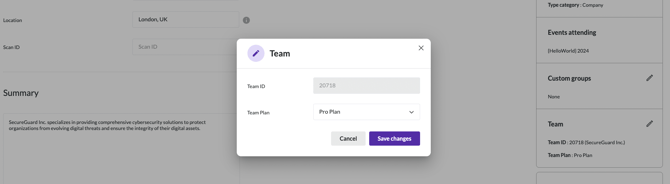
If your event has an integration with Grip Manage the process of upgrading must be done in Grip Manage, and the changes will propagate to Grip Engage dashboard. In this scenario, the option to upgrade won't be available through the dashboard.
Note: Enabling Exhibitor plans is a paid add-on within Grip, and if you'd like to monetize your event with tiered exhibitor plans, please contact your designated Account manager.
MustMeet Meeting Filter in Teams
For MustMeet events, the Teams meeting pages include a MustMeet Meeting Filter that allows MustMeet meetings to be shown or hidden from the calendar and meeting lists.
The filter is designed to reduce confusion for team members who are not participating in MustMeet, while still making those meetings visible to those who are. It behaves as follows:
- It is automatically enabled or disabled based on the participant's MustMeet status — no manual configuration is required per team member.
- It is only displayed during relevant MustMeet event phases, so it will not appear outside of those phases.
- The filter label can be customised to match your event's language and branding via App Settings > Customize Text.
This feature is available as standard on all MustMeet events and is automatically active.

FAQs
Q: What is required to set up Grip Teams in an event?
A: To use Teams, your registration data must include a unique identifier (called the Exhibitor ID on our platform) that links Representatives to their Company.
Q: How are teams created on event platfom?
A: Teams are automatically created based on the relationship between a Representative and their Company:
- The first Representative to log in will be prompted to create the team.
- Any other Representatives linked to the company will be automatically added when they log in.
Q: Does Grip Teams work if the event uses single sign-on (SSO)?
A: Yes, but with some limitations:
- Team members cannot invite new users from within the platform.
- All Representatives must be linked to the Company using a unique identifier in the registration data.
Q: How do Representatives access the My Team portal?
A:
- When a Representative logs in, they will automatically be directed to the My Team portal.
- If they are the first Representative from their company, they will be prompted to create the team.
- All other Representatives linked to the Company will be added automatically upon login.
Q: Do teams have access to participants' email addresses?
A: No, Grip does not share participant email addresses unless:
- A participant's badge has been scanned by a team member.
- This ensures that contact details are only shared with explicit permission.
Q: Will newly joined participants have instant access to the platform after being added to a team?
A: No, any participant added after a team has been created must be approved by the Admin or Event Organizer before they can access the Teams platform.