![Grip-Vertical-Logo-Purple-1.png]](https://support.grip.events/hs-fs/hubfs/Grip-Vertical-Logo-Purple-1.png?width=23&height=34&name=Grip-Vertical-Logo-Purple-1.png)
The MustMeet Scheduler lets you rapidly generate meeting schedules for your MustMeet events directly inside the Grip Engage dashboard.
This article walks Event Organizers through the end-to-end schedule generation flow, from triggering the scheduler to reviewing your results.
Read more:
- Editing, swapping and cancelling individual meetings on the Meeting Schedules page is covered in a separate article here.
- For a broader overview of MustMeet event setup, see this starter article.
In this article, we will cover the following:
- What is the MustMeet Scheduler?
- Before you begin
- How to generate a meeting schedule
- Troubleshooting
- Frequently asked questions
What is the MustMeet Scheduler?
The MustMeet Scheduler is the tool that automatically books meetings between your matched participants. It uses the meeting scores generated from attendees' preferences and profile data, then places meetings into your event's available time slots and locations to build the best possible schedule for everyone.
In practice, this means you can:
- Generate a complete set of MustMeet meetings for your event with a single run.
- Control how meetings are prioritized, scoped and booked before you generate.
- Re-run generation as often as you need as your data changes in the lead-up to the event.
Once a schedule has been generated, you review and fine-tune the individual meetings on the Schedules page (covered in its own article).
Modern or legacy?
The Grip Engage Scheduler replaces the legacy MustMeet scheduling platform, so you can validate your event data, choose how meetings should be created, generate a full schedule, configure Slot Priorities, and print participant schedules — all within Grip Engage, without exporting or importing anything. It is highly recommended that you use the modern scheduler for your event.
If you still need to use Grip's legacy MustMeet Scheduler platform for those features, you can find instructions here.
Switching schedulers
If you start using either Scheduler and decide that you need to change to the other Scheduler, it is possible to do so later in the event - however, doing so will mean removing all of the scheduled meetings and scheduling again.
You do not need to re-run scores, re-do preferences or make changes to other event data when switching schedulers - once removing the existing MustMeet meetings, you can just continue with the other scheduler.
Before you begin
Schedule generation relies on the rest of your event being set up correctly. Before you generate a schedule, make sure that:
- The preferences phase is complete for the event and you've moved to the "Closed - Meetings are being scheduled" phase in Settings & Preferences.
- Your event data is complete and correct. The scheduler validates your data before every run and will block generation if it finds errors (see Step 2).
- Meeting availability and slots are configured, so the scheduler has time slots and locations to book meetings into.
- Meeting scores have been generated. Meetings are booked based on the scores between attendees, which are produced from their preferences and profile data. You can generate and review these on the Scores tab of the Scores & Schedules page.
- You can also pre-configure Slot Priorities, though you can also choose to do this in a separate tab during the generation flow.
You will need dashboard access to the MustMeet section for your event, which is restricted to App Admin accounts and above.
How to generate a meeting schedule
Generating a schedule is a short, guided flow: you open the generator, let Grip validate your data, choose your options, and generate. The steps below cover each stage in order.
Step 1: Open the schedule generator
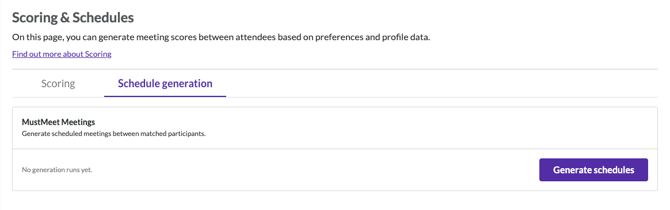
- In the left-hand menu, go to MustMeet › Scores & Schedules.
- Select the Schedule generation tab.
- Find the MustMeet Meetings card:
- If you have never run generation for this event, the card shows "No generation runs yet." with a Generate schedules button.
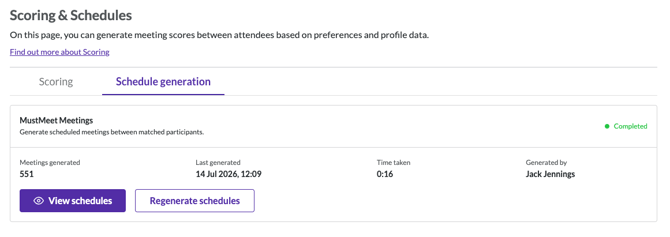
- If a schedule has already been generated, the card shows the status of the last run along with Meetings generated, Last generated, Time taken and Generated by, plus View Schedules and Regenerate schedules buttons.
- Select Generate schedules (or Regenerate schedules) to start the flow.
Step 2: Review data validation
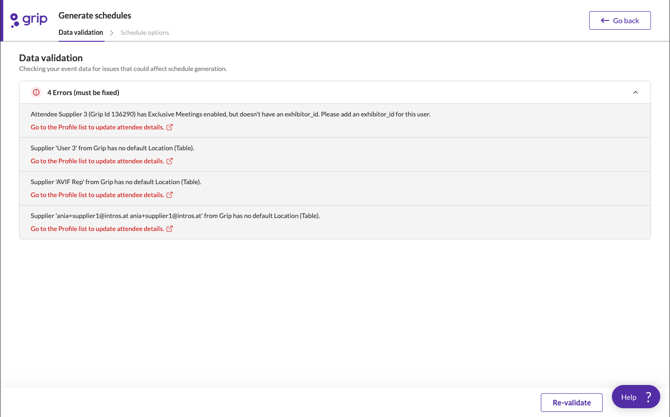
Before generating, Grip checks your event data for anything that could affect the schedule. This is the Validation step of the flow, and it is essential to ensure that time isn't wasted later in the procedure.
Results are grouped into two types:
- Errors (must be fixed). These will prevent generation, and the Continue button stays disabled until they are resolved. Each error includes a link to the right place to fix it — for example "Go to Custom Groups to review group settings" or "Go to the Profile list to update attendee details". Typical errors include custom groups with incorrect metadata, or an attendee with 'Exclusive Meetings' enabled but no Exhibitor ID assigned.
- Warnings. These are advisory and do not block generation, but are worth reviewing as they can affect schedule quality — for example two sharers who have different availability or different meeting limits to one another.
To work through this step:
- Wait and check whether validation is complete using the button.
- Expand the Errors and Warnings sections to see the details.
- Use the links to fix any errors (these open the relevant pages, often in a new tab).
- Once you have made changes, select Re-validate to run the checks again.
- When there are no outstanding errors, select Continue to move on to your options.
Step 3: Configure your schedule options
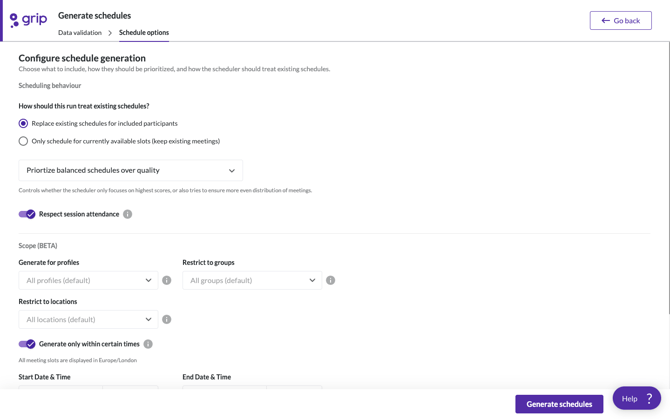
On the Schedule options step you choose what to include, how meetings should be prioritized, and how the run should treat any schedules that already exist.
Scheduling behaviour
- How should this run treat existing schedules?
- Replace existing schedules for selected activities — clears the current schedule for all participants that are included, and builds a fresh one. Choose this for a clean, full regeneration.
- Only use currently available slots — keeps existing meetings in place and only books new meetings into the slots that are currently free. Choose this when you want to add to a schedule rather than rebuild it.
- Prioritisation — use the dropdown to control the balance between meeting quality and an even spread of meetings.
- "Prioritize quality above balanced schedules" - focuses on the highest-scoring meetings only. No consideration is given to try to balance meeting schedules between participants.
- "Prioritize balanced schedules over quality" - this alternative still prioritises quality meetings, but aims for a more even distribution of meetings across participants. It does this gradually deprioritising participants throughout the run if they already have close to the number of meetings that is expected, in favour of those with fewer meetings.
- Respect session attendance — turn this on to avoid booking meetings in time slots where a participant is already attending a (normal) session.
- Note that 'time-blocking' sessions are always respected by design, and will always block meetings, regardless of this setting.
Scope
Use these fields to narrow a run down to part of your event. Each option defaults to including everything:
- Generate for profiles — limit generation to specific profiles (default: All profiles).
- Restrict to groups — limit generation to specific groups (default: All groups).
- Restrict to locations — limit generation to specific locations (default: All locations).
- Generate only within certain times — turn this on to restrict the run to a specific window, then set a Start date & time and End date & time.
When you are happy with your options, select Generate schedules.
Step 4: Generate and monitor the run
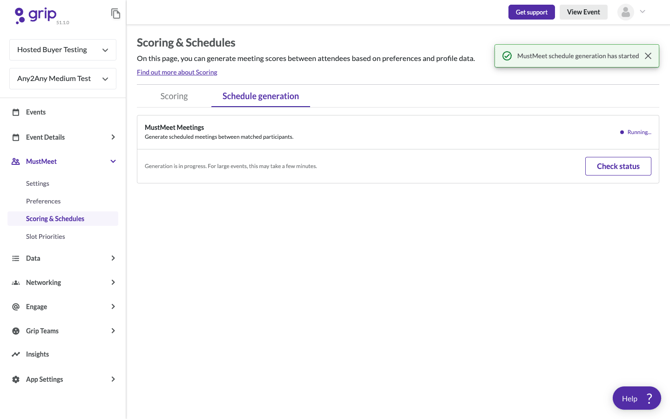
After you select Generate schedules, Grip starts the run in the background:
- A confirmation appears — "MustMeet schedule generation has started" — and the card status changes to Running….
- You can leave the page and come back; select Check status to refresh the current state of the run.
- Note - for most MustMeet events with numbers of participants in the 100s, this will be very fast.
As participants scale into the 1000s, generation time will increase exponentially with all the possible matches, so please be patient.
Step 5: Review your results
When the run finishes, the MustMeet Meetings card updates:
- Complete — the card shows a green Complete status and a summary of the run: Meetings generated, Last generated, Time taken and Generated by.
- From here you can select View Schedules to open the Schedules page and review, edit or fine-tune the individual meetings (covered in a separate article), or Regenerate schedules to run again with new options.
- Once you're happy with your schedules and you're ready for your participants to view them, you should move to the Closed - Provisional or Closed - Finalized stages and publish your meeting schedules. See our guide on publishing meetings here.
When generating schedules for a second (or more) time, choosing Replace existing schedules for included participants will clear the current schedule and rebuild it. Any manual edits you have made to those meetings will be lost. If you want to leave existing meetings intact, use Only use currently available slots instead.
Troubleshooting
Address common issues you may encounter when generating a schedule.
- Generation failed. If a run fails, the card shows a red Failed status and an error message (for example a database timeout). This is usually temporary — select Regenerate schedules to try again. If it fails repeatedly, contact Grip Support with the event and the time of the run.
- The "Continue" button is grayed out at the validation step. There are still errors to fix. Expand the Errors section, use the links to resolve each one, then select Re-validate. Warnings alone will not block you.
- Generation is taking a long time. For large events this is expected. You can leave the page and use Check status to see progress.
- Fewer meetings were generated than expected. Check that you have enough availability and meeting slots, that meeting scores have been generated, and that your meeting limits and any Scope restrictions (profiles, groups, locations or time window) are not narrower than intended.
- Manual edits disappeared after regenerating. A run using Replace existing schedules rebuilds the schedule from scratch. Use Only use currently available slots to preserve existing meetings.
Frequently asked questions
Do I need to generate meeting scores before generating a schedule?
Yes. Meetings are booked based on the scores between attendees, so generate your scores on the Scores tab first. Without scores, the scheduler has nothing to rank meetings by.
Can I regenerate a schedule after I've already run it?
Yes. Use Regenerate schedules on the MustMeet Meetings card at any time. Choose Replace existing schedules for a full rebuild, or Only use currently available slots to add to what's already there.
What happens to meetings I've edited by hand if I regenerate?
If you regenerate with Replace existing schedules for selected activities, those edits are overwritten. Use Only use currently available slots to keep existing meetings and just fill the gaps.
Is it possible to generate a schedule for only part of my event?
Yes. Use the Scope options to restrict a run to specific profiles, groups or locations, and/or turn on Generate only within certain times to limit it to a date and time window.
Do warnings at the validation step stop me from generating?
No. Only errors block generation. Warnings are advisory, but it's worth reviewing them as they can affect schedule quality.
Why do some time slots get better meetings than others?
This is controlled by your Slot Priorities rules. Slots matched by a higher-priority rule are used first; unmatched slots are treated as the lowest priority.
Can I edit or cancel individual meetings after generating?
Yes — this is done on the Schedules page, which is covered in a separate article.